

The Mystery FALL Crochet Blanket CAL is over, but we are still finishing up loose ends! This cute C2C crochet pumpkin border is the perfect way to end it. This blanket pattern is forever free on the blog.
If you’ve landed here searching for a cute C2C blanket border pattern, and missed the CAL, don’t worry; the Kawaii C2C Pumpkin Blanket pattern is forever free on the blog.
There are THREE versions of this pattern. C2C (corner-to-corner crochet) and two Row by Row written patterns. The Row by Row patterns can be created using single crochet & double crochets.
Grab the eBook
c2C & Row by Row Pattern Ebook: Click Here
Kawaii Pumpkin C2C Border
The C2C border is different from the double crochet & single crochet borders. Here you will find the C2C version & double crochet version.
Abbreviations:
- sc – single crochet
- dc – double crochet
- hdc – half double crochet
- str – standing treble crochet
- tr – treble crochet
- pmpk – pumpkin stitch
- sp – space
- ch – chain.
Stitch Guide:
Single crochet – Insert hook in indicated stitch, yarn over, draw up a loop, yarn over, pull through both looks on hook.
Double crochet – Yarn over, insert hook in indicated stitch, *yarn over and draw up a loop, yarn over and pull through two loops, repeat from * one more time.
Treble crochet – Yarn over 2 times, insert hook in indicated stitch, *yarn over and draw up a loop, yarn over and pull through two loops, repeat from * two more times.
Standing treble crochet – Insert hook in indicated stitch, yarn over and draw up a loop, yarn over and pull through two loops (one single crochet created). *Insert hook in left vertical post of single crochet just created. Yarn over and pull up a loop, yarn over and pull through both loops on hook. Repeat from * one more time.
Half double crochet – Yarn over, insert hook in indicated stitch. Yarn over and pull up a loop, yarn over and pull through all three loops on your hook.
Pumpkin Stitch (tr cl) – This stitch is a treble cluster stitch. Yarn over two times, insert hook in indicated stitch, *yarn over and pull through 2 loops (two times), repeat from * four more times. Yarn over, pull through 5 loops on hook, pull up new color, finish stitch with new color. (click the link for full step by step photo tutorial)
C2C Border Pattern
After completing the Kawaii Pumpkin chart (or written) pattern, don’t cut your yarn. You begin working the border immediately.
Pumpkin stitches are made in orange, carry it inside the Aran Tweed, and pull it up as needed to create the pmpk clusters
Row 1: Ch 1, sc 2 in corner, [*ch 2**, sc in space between the two C2C squares, repeat from * across, end repeat at **, (sc 2, ch 1, sc 2) in corner] repeat from [ to ] 3 more times, sc 2 in corner, ch 1, join.
Note: In Row 2, carry your non working yarns through the stitches, when starting the pumpkin stitches, bring up the orange (carry the white) then complete the pumpkin stitch.
Row 2:
Side 1: (Str 1, tr 4) in corner, tr 5 in next ch-2 sp (2 times), pmpk st, *tr 5 in next ch 2 sp, repeat from * 10 times, [pmpk st, *tr 5 in next ch-2 sp, repeat from * 11 times] repeat from [ to ] 4 times, pmpk st, *tr 5 in next ch-2 sp, repeat from * 10 times, pmpk, tr 5 in next ch-2 sp (2 times).
Side 2: (tr 5, ch 2, tr 5) in corner. tr 5 in next ch-2 sp (2 times), [pmpk st, *tr 5 in next ch-2 sp, repeat from * 10 times] repeat from [ to ] 2 times. [pmpk st, *tr 5 in next ch-2 sp, repeat from * 11 times] repeat from [ to ] 4 times, pmpk, tr 5 in next ch-2 sp (2 times).
Side 3: (tr 5, ch 2, tr 5) in corner. tr 5 in next ch-2 sp (2 times), [pmpk st, *tr 5 in next ch-2 sp, repeat from * 11 times] repeat from [ to ] 4 times. [pmpk st, *tr 5 in next ch-2 sp, repeat from * 10 times] repeat from [ to ] 2 times, pmpk, tr 5 in next ch-2 sp (2 times).
Side 4: (tr 5, ch 2, tr 5) in corner. tr 5 in next ch-2 sp (2 times), [pmpk st, *tr 5 in next ch-2 sp, repeat from * 11 times] repeat from [ to ] 4 times. [pmpk st, *tr 5 in next ch-2 sp, repeat from * 10 times] repeat from [ to ] 2 times, pmpk, tr 5 in next ch-2 sp (2 times)
Row 3: Ch 2, hdc in each stitch around entire blanket, work (hdc 2, ch 1, hdc2) in each corner, join (I had over 1500 hdc to end this row!)
If these instructions seem confusing at all, I’ll explain here.
I spaced my pumpkins around 10-11 stitches apart (stitches being the 5 trebles in the ch-2 space.
I counted each ch-2 space as 1, and the five trebles inside as 1 cluster of stitches)
The corner stitches are (tr 5, ch 2, tr 5).
How you space your pumpkins and how many pumpkins is completely up to you. You can create a pumpkin every 2 ch-spaces. Or like mine, space them every 10 or 11 stitches (ch-2 spaces with the 5-trebles inside).
I wanted to space mine out a little. The math didn’t quite match up to make them evenly spaced, but I think it looks great!
Double Crochet Border
I didn’t design a double crochet border initially because my main focus was on the C2C version. However, I didn’t want to leave my crochet friends out in the dark on this one, so I created a guide to creating a double crochet border.Keep in mind; this is a guide… Let’s do this…
After your last stitch, don’t cut the yarn (if you already cut it, just attach your new yarn in the right corner stitch, ch 1, and start the pattern below)
Note: Make first stitch in same as ch-1.
Row 1: Ch 1, sc in first 2 stitches, *ch 2, skip 2, sc in next stitch, repeat from * across, in last stitch (sc 2, ch 2, sc 2), repeat from [ to ] on all four sides, join.
Count the number of ch-2 spaces you have and decide how you’d like to space out your pumpkins (I counted 49 ch-2 spaces). So around 7 pumpkins will fit nicely.
Rows 2: Treble 5 in each ch-2 space, add a pumpkin cluster where you’d like (as recommended above). Corners: Treble 5, ch 2 Treble 5) into each corner, when you reach the beginning, join (do not cut yarn).
Row 3: Ch 1, hdc in each stitch around. Corners: (hdc 2, ch 2, hdc 2) in each corner, join to first hdc, tie off and weave in all tails.
I hope you enjoyed this pattern. I’ve add photos from some of the makers who joined the CAL and a photo of my finished blanket with and without the border.
Thanks everyone!
I had SO much fun working this pattern with everyone, and thank you so much for your continued support. Cannot wait for the next one! Keep an eye out because the second week of November a new CAL will start. It’s called the Jingle All the Way Blanket CAL – wooohoo!
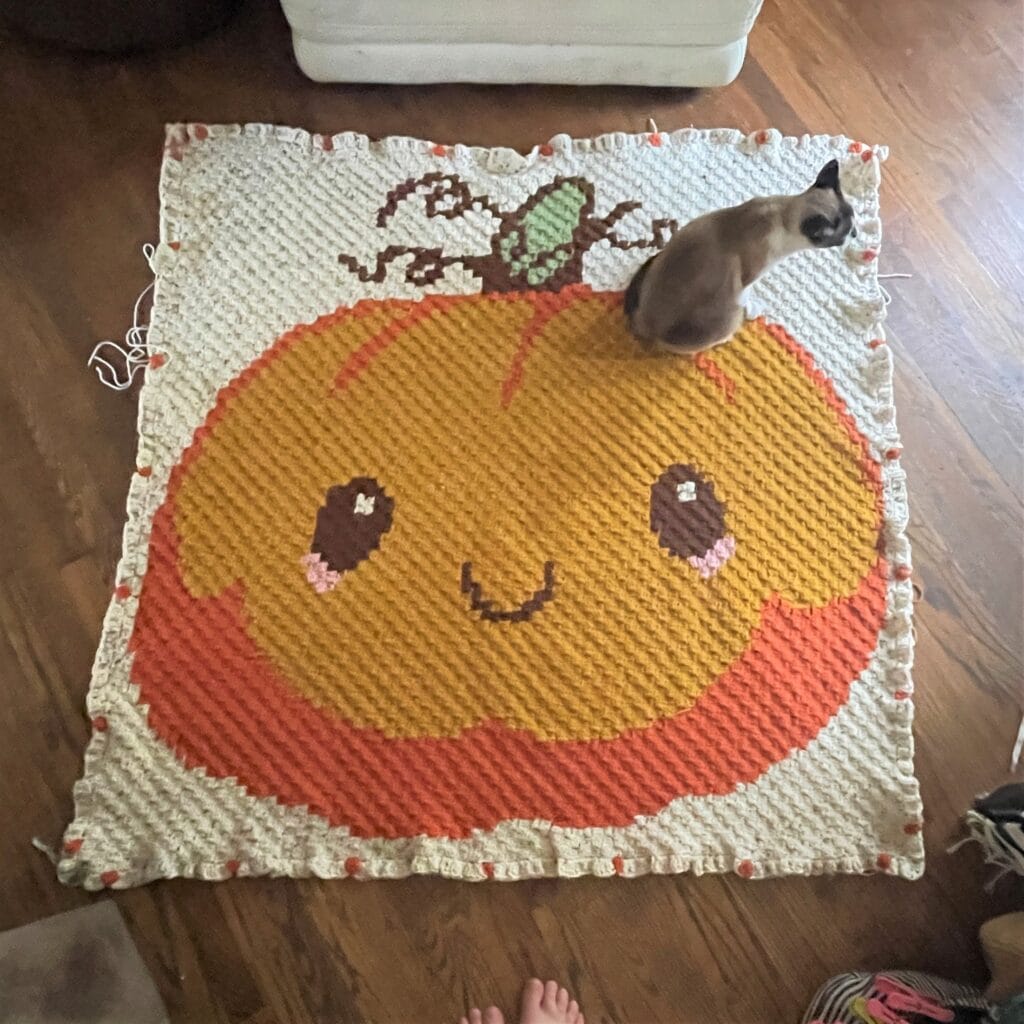
Here is My Finished Blanket (need a better photo!)
I hope you enjoyed this crochet along and the border pattern. Please post your finished photos to the Crochet a long with US group!
Please let me know if you have any questions.


Want to learn new stitches? Check out the Stitch Explorers Series or
better yet…get the latest on new stitches and premium patterns, by signing up for the Stargazers mailing list here.

*any FREE pdf download participants agree to my privacy policy.
It says a border for C2C and double crochet are here but I have only found C2C. Are they one in the same or am I missing something?
I bought the ebook and cant log into my computer from where I am so quickie question is does the ebook have the border or will there be an update for it thankyou
Yes! I am updating the ebook with the border today 🙂