

It’s that time of year again, hearts everywhere in all forms. I’m not immune to it, I absolutely LOVE hearts, and Valentine’s Day. When I was single and my daughter was little, I’d shower the Valentine’s stuffed animals and chocolate hearts on her. 🙂
She has a little one of her own now, and I recently made him one of these beanies in toddler size, he ❤ ‘s it.
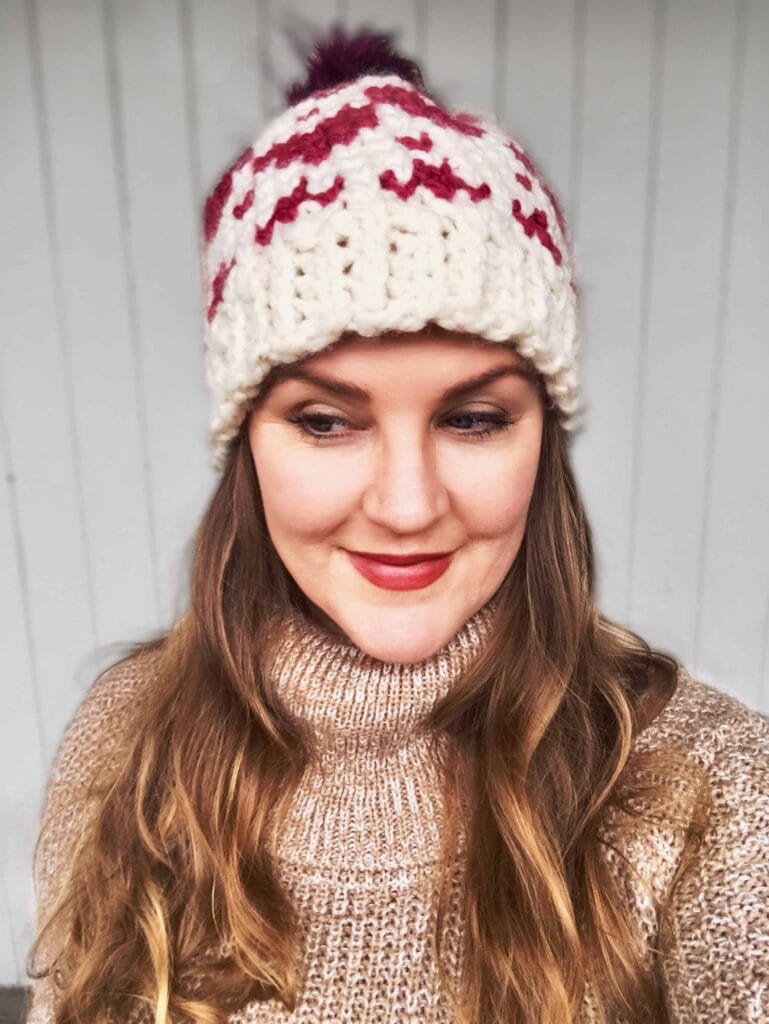
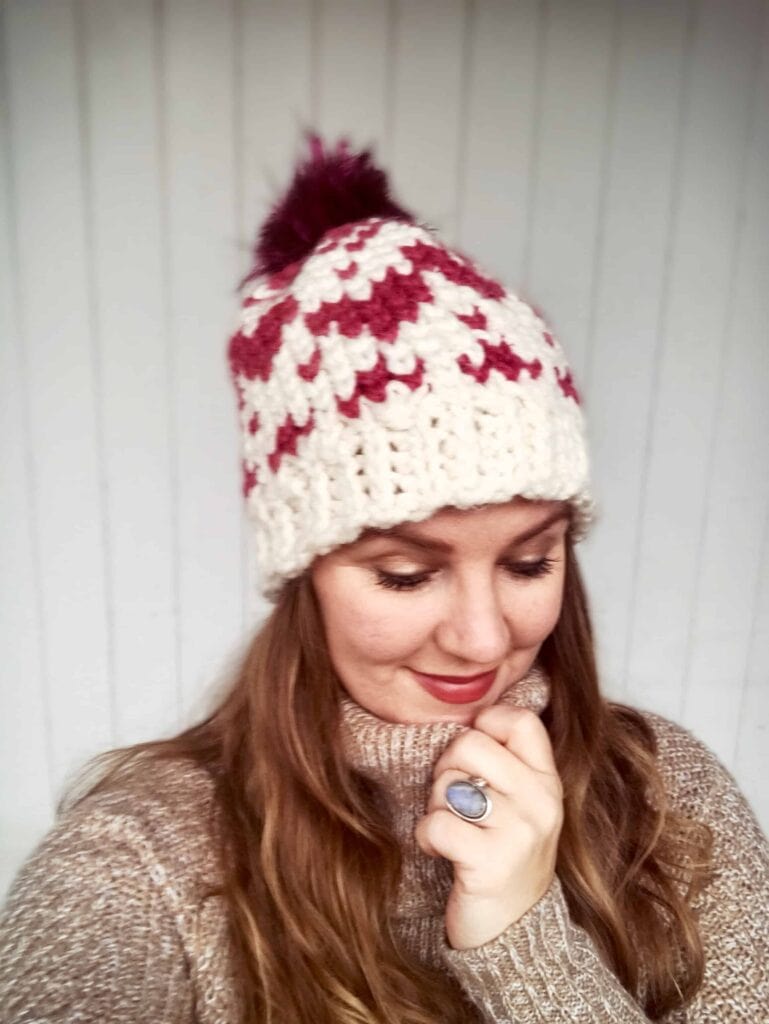
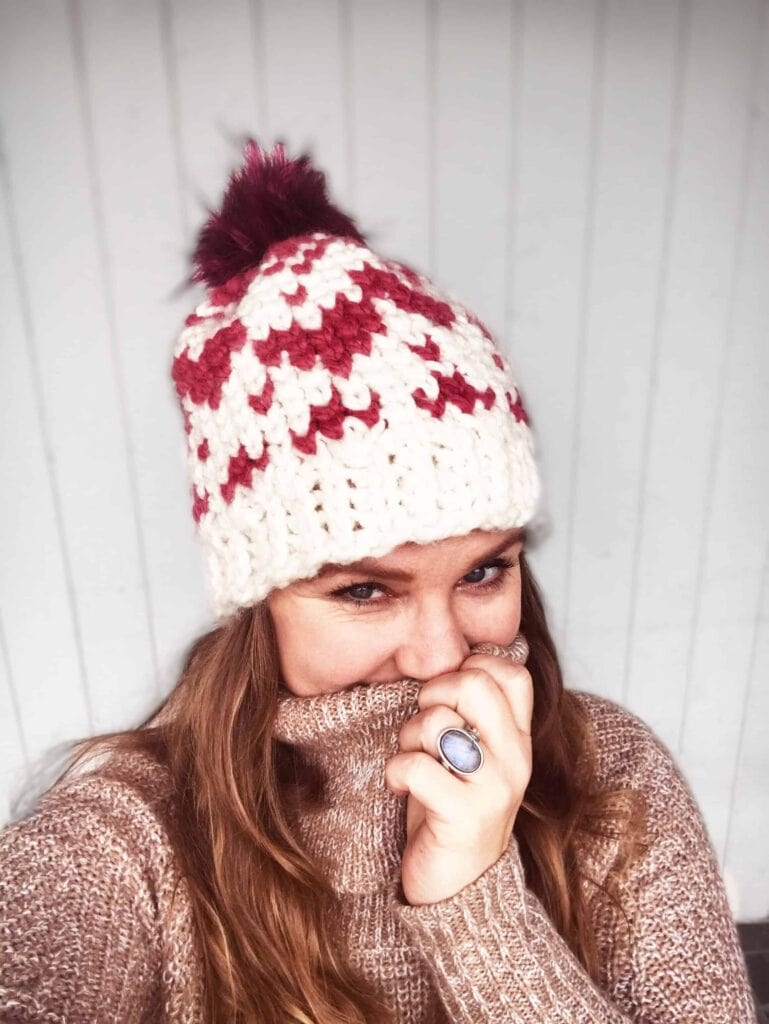
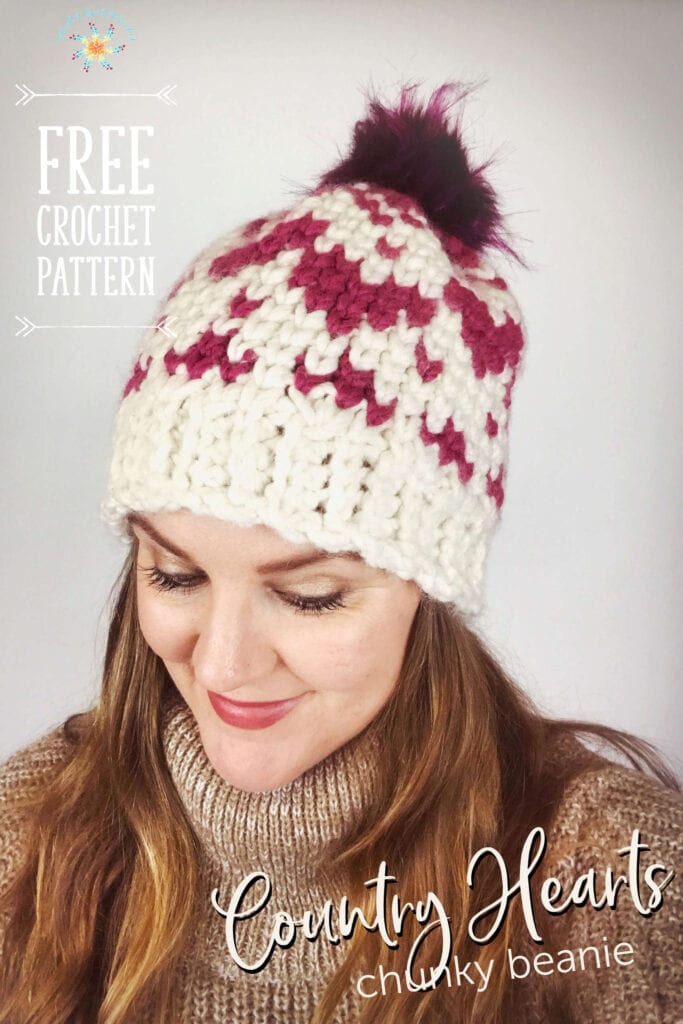
The Country Hearts beanie is inspired by the rustic country hearts motifs found in country homes around America, and of course Valentine’s Day!
I set out to create a design that mixes a little Fair Isle with those country hearts, and this is what came out of it. I hope you enjoy the pattern.
It is very similar to the Ice Crystals Chunky Beanie, so I used some of the same photos to describe how to create and assemble the beanie.
I used Wool-Ease for this pattern, however, if you are allergic, or don’t like the feel of wool, you’re welcome to substitute it for another 6 weight – Lion Brand Hometown yarn is another great 6 weight acrylic that has a beautiful selection of colors too.
Tip for softening wool blends
- Grab a bit of fabric softener or hair conditioner and soak your beanie in it for a few hours.
- Rinse.
- Hand press out the water between two towels, lay flat to dry in the sun (if it’s warm outside) or you can use a dyer sheet and low to cool setting. Because it’s a wool blend, it won’t shrink up significantly if you use a low heat. ❤.
Add to your Ravelry queue & favorites – please make a project page if you make it! & show some <3 on Etsy


Are you ready to make it? Let’s do this!
Gauge:
Top of Beanie = 8 ks x 10 rows (in the round) = 4 x 4” or (10 x 10 cm)
Brim of hat = 5 rows = approximately 4″ (10 cm)
Materials:
Suggested Yarn:
I used Lion Brand Wool-Ease Thick & Quick in Fisherman & Raspberry – click here to see Lion Brand’s selections of colors.
Suggested Yarn Details:
80% Acrylic, 20% Wool, 106 yards (170g) per skein.
Yardage Needed:
Adult; Medium / Large:
104-6 yards (95 m – 96 m) of each color (approximately 1 skein of each)
Toddler/ Child/ Small:
1 skein of each color
~ Hook Size: M-13 (9 mm)
~ Scissors
~ Darning Needle
~ Pom Pom (optional)
+ Size(s):
When complete and lying flat (approximately)
Measurements below are with negative ease and meant to stretch slightly
Toddler:
Height = 7.5” (19.05 cm), Width = 8” (20.32 cm)
Circumference of brim = 15.5” (39.37 cm)
Child:
Height = 7.5” (19.05 cm), Width = 8” (20.32 cm)
Circumference of brim = 16.5” (39.37 cm)
Small:
Height = 9.5” (24.13 cm), Width = 8.5” (21.59 cm)
Circumference of brim = 20.5 (52.07 cm)
Medium / Large:
Height = 10” (26.67 cm), Width = 9” (22.86 cm)
Height = 10.5” (23.5 cm), Width = 9.5” (24.13 cm)
Making adjustments to sizing happens in the brim of the beanie and the number of pattern repeats for top of beanie.
Measure your head (or child’s) head first. The sizes listed within the pattern are fashioned after the yarn council standard sizing, and are as follows:
16” for toddler, 18” for child, 20” for small, and 21-22” for medium/large.
The pattern is worked in multiples of 20, so you can create a brim size to your liking, then make increases to match a multiple of 20, i.e., 40, 60, 80, etc.
The larger you go, the more of a slouchy beanie it becomes. My tester said her child size didn’t fit her toddler because her toddlers head is 18” with thick hair, so best to measure first 😉.
Stitch guide:
hdc – half double crochet
ks – knit stitch
the knit stitch is a single crochet stitch that works into the center V of the st from the previous round, instead of the top two loops.
fhdc – foundation half double crochet
Changing colors using the Knit / Waistcoat Stitch Tutorial
Abbreviations:
| fhdc | foundation half double crochet |
| ks | knit stitch |
| hdc | half double crochet |
| RS | right side |
| WS | wrong side |
| sl st | slip stitch |
| BLO | back loop only |
| ch | chain |
| MC | main color |
| CC | contrasting color |
| rnd | round |
| ch | chain |
| st(s) | stitches |
- Joins are made by sl st into the ch 1 at end of rnd, unless otherwise indicated.
- Remember to count your stitches 😉.
- Knit Stitch: Work a little loose – they tend to get very tight.
- Each square of graph represents 1 knit stitch.
- Sizing is listed within in the pattern
- Stitches at end of row listed as follows: Adult S/M/L, T, C
- Foundation row included in row count for brim
Pattern:
MC – Fisherman
Brim:
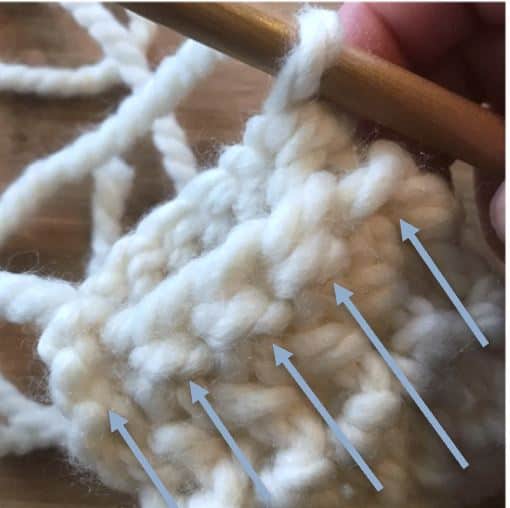
Here is a video on how to work the brim, and the first round of the top of beanie, written pattern is below:
Note: The arrows in the photos don’t indicate which stitch to work into – they are only there to indicate how to identify the loops.
Using 9 mm (M) hook and MC, try to match brim gauge because this is where the sizing is important.
Gauge for Brim of hat = 5 rows = approximately 4″ (10 cm)
Adult Small, Medium, Large
R1: fhdc 5. (5 sts)
Toddler / Child
R1: fhdc 3 to 4 – your preference (3, 4 sts)
All sizes
R2: ch 2, turn. hdc 1 (working into camel hump in front) in each of next 4 (2, 3) sts


then work 1 hdc (working through both front camel hump and next loop) in last st. (5 sts)
R3: ch 2, turn, hdc 1 (BLO) in each of next 4 (2, 3) sts.


then, hdc 1 (in back loop, and through another back loop of the hdc below) of last st. photo below – (5, 4, 3 sts)


Toddler:
R4 – 24: Repeat R2 & R3 (should measure around 15.5”)
Child:
R4 – 26: Repeat R2 & R3 (should measure around 16.5”)
Small:
R4 – 28: Repeat R2 & R3 (should measure around 17.5”)
Medium / Large:
R4 – 30: Repeat R2 & R3 (should measure around 19.5”)
(will curl a little, you can block before or after if you choose to, but I like the little curl 😊 ).
finished with brim.
+ Joining Brim

Bring RS’s together. Join in back loop (where tail is) with a sl st – Turn
sl st in front bar of front piece (pictured below, arrows indicate front bar of front piece), and back loop of back piece, for 5 (4, 3) sts total.
The V’s should be facing like this…. 😉.

Reminder: Joins are made by slip stitch into the ch 1 at the end of each round, unless otherwise indicated.
+ Top of Beanie:
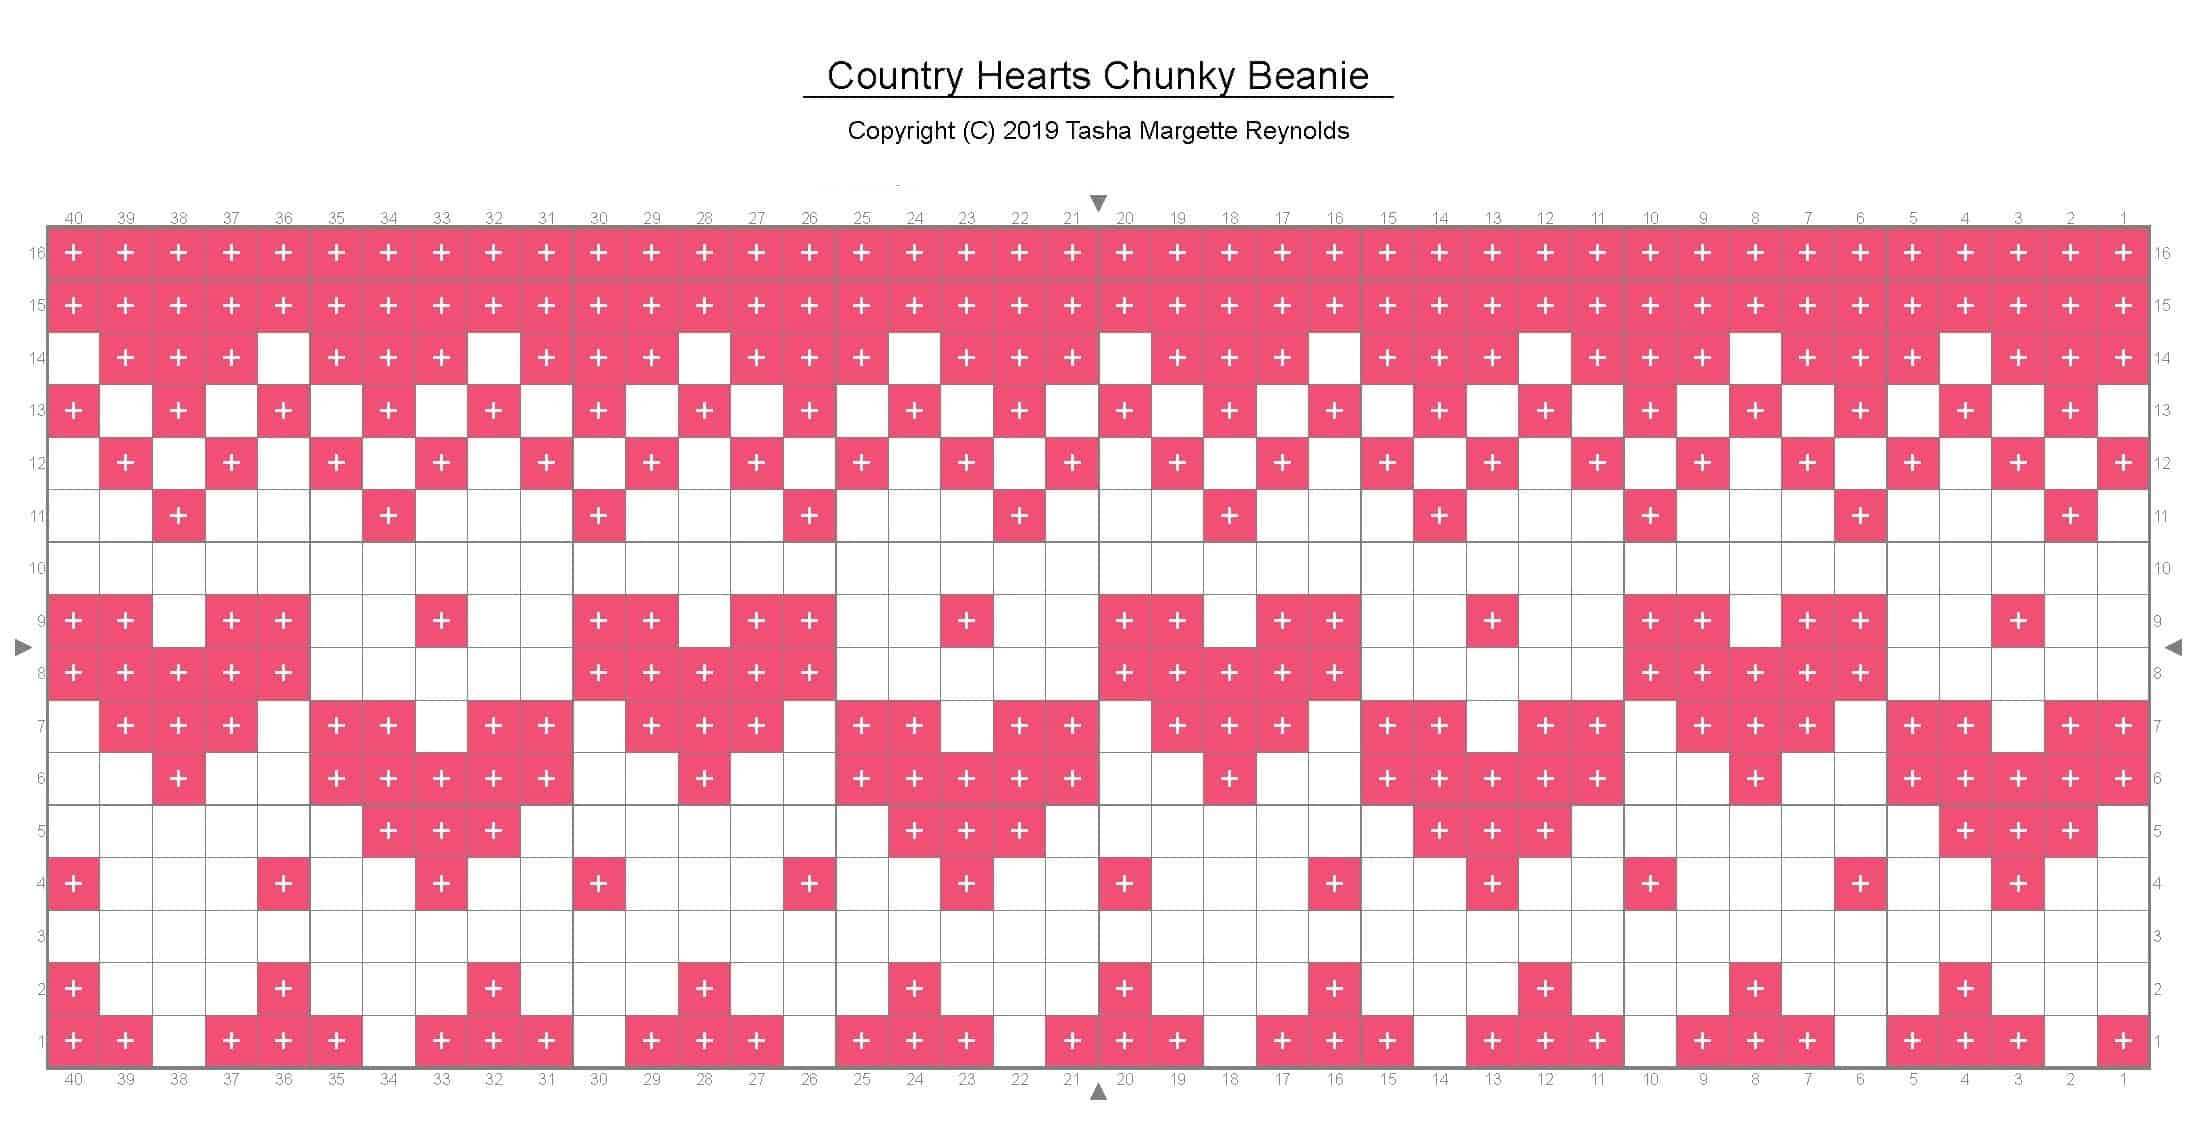
Work graph from right to left and from the bottom to the top.
Toddler
Rnd 1: ch 1, loosely ks into the center of the V at the top of each row, inc by 1 in every 4th row, join (6 increases made). (30 sts)
Child
Rnd 1: ch 1, loosely ks into the center of the V at the top of each row, inc by 1 in every 6th row, join (4 increases made). (30 sts)
Small
Rnd 1 : ch 1, loosely ks into the center of the V at the top of each row, inc by 1 in 1st row, ks 1 in next row, inc by 1 in next row, then inc by 1 in every third row to end, ks 1 in last row, join. (12 increases made). (40 sts)
Medium | Large
Rnd 1 : ch 1, loosely ks into the center of the V at the top of each row, inc by 1 in every 3rd row, join. (10 increases made). (40 sts)
Begin working graphs for round 2 – (16, 12, 14).
The toddler size can be adjusted to 14 rows if you’d like. My tester said she used 14 for her child, but also mentioned that her child has a lot of hair, and a size 18″ circumference ;).
Toddler
Rnd 2 – 12: ch 1, then begin working graphs using the knit stitch (ks), join. (30 sts)
Child
Rnd 2 – 14: ch 1, then begin working graphs using the knit stitch (ks), join. (30 sts)
Small
Rnd 2 – 16: ch 1, then begin working graphs using the knit stitch (ks), join. (40 sts)
Medium | Large
Rnd 2 – 16: ch 1, then begin working graphs using the knit stitch (ks), join. (40 sts)
Leave an extra-long tail (at least 18”) for weaving hat together and sewing on a pom pom.
Reminder that this graph is a 20 column repeat – meaning you can work columns 1 – 20 as many times as you’d like and the pattern will remain consistent.
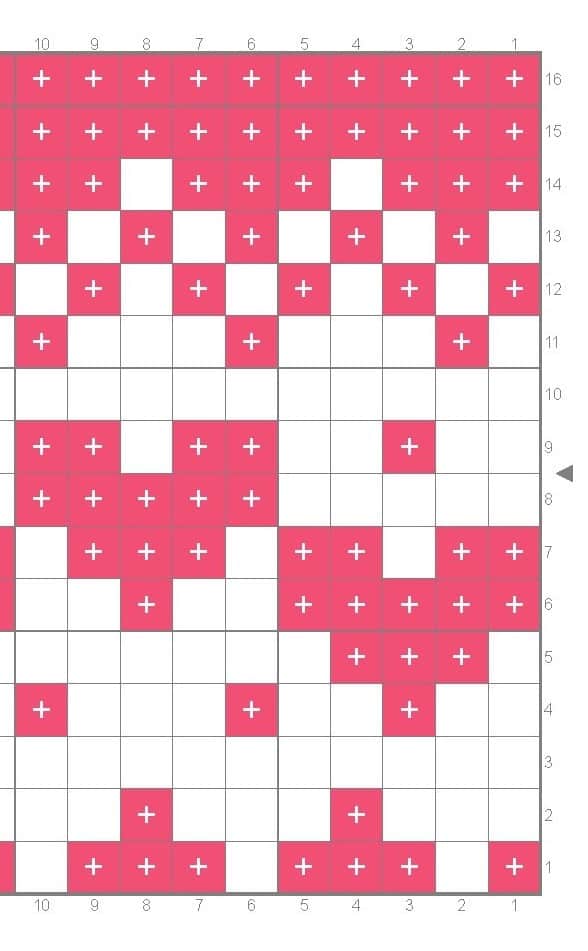
Toddler | Child Graph

Adult Small | Medium | Large Graph
Here is a close-up of the pattern repeat – work 16 rows for adult S/M/L and 14 rows for Toddler/Child.
+ Assembly for Top of Beanie:
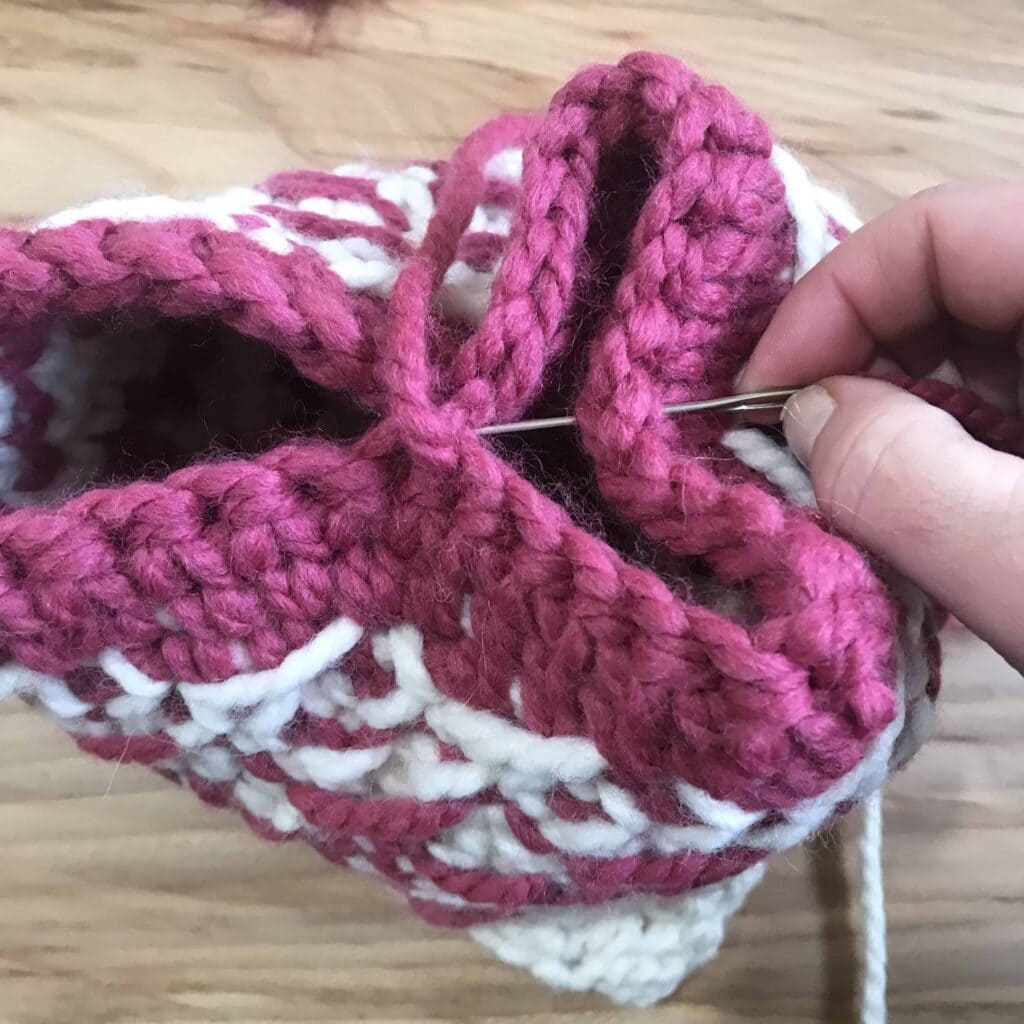
With seam facing you and WS out, position the beanie like this, top side up:
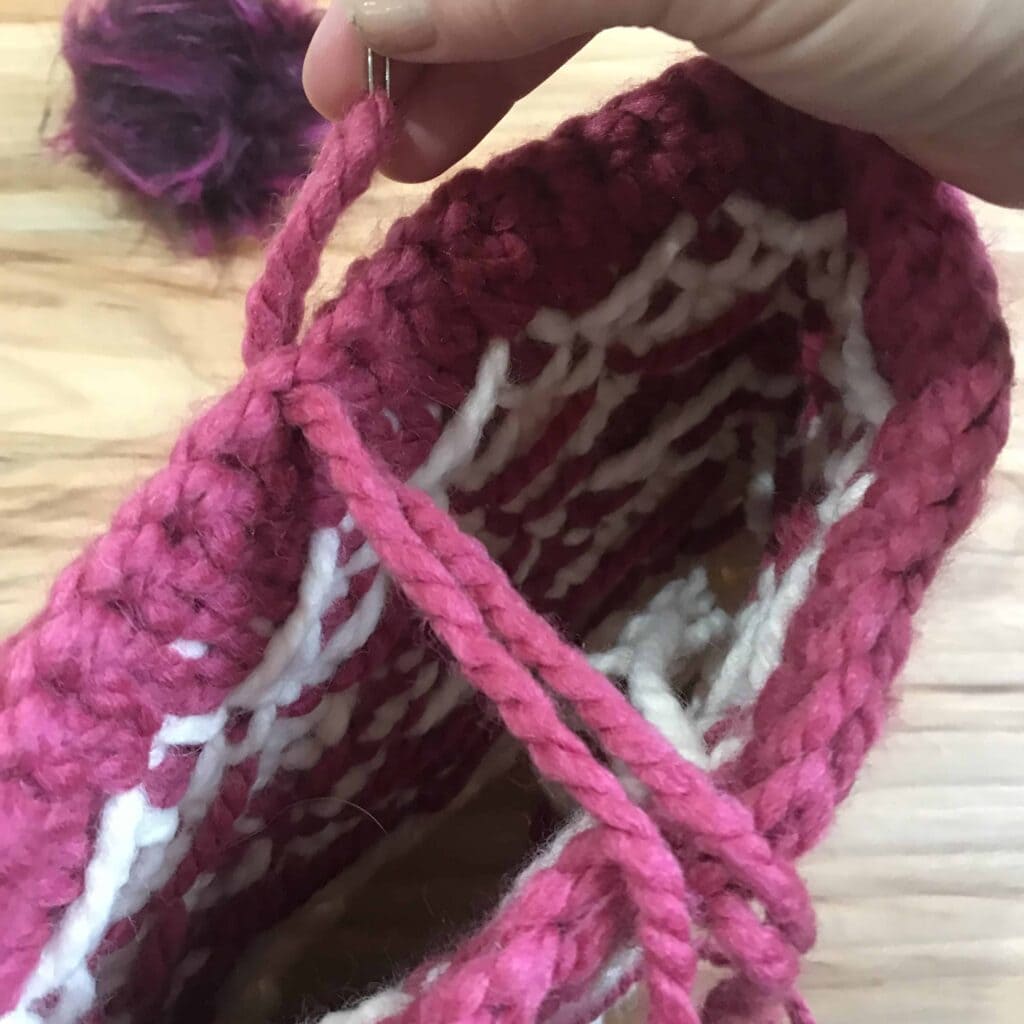
Sew together both pieces as pictured below, working through top loops of the stitches.
Start at one side, working toward the center.
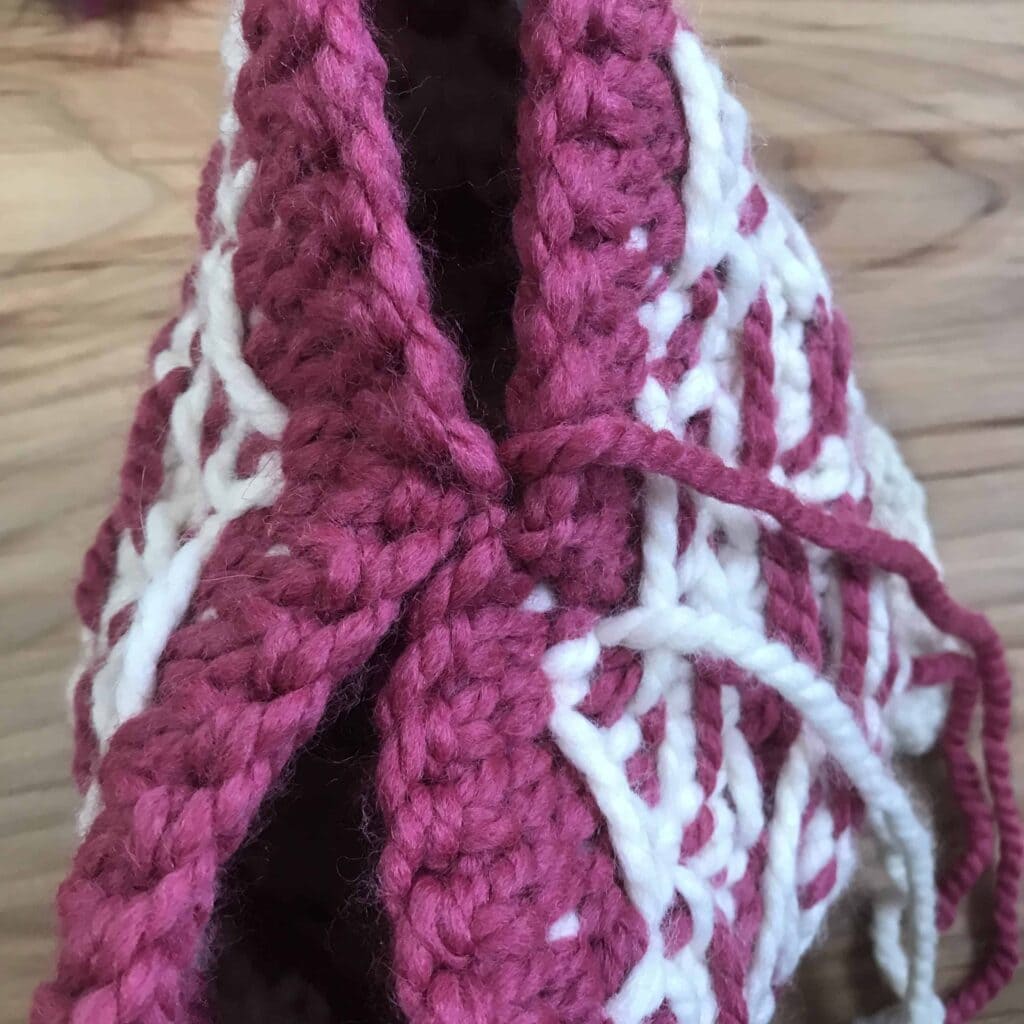
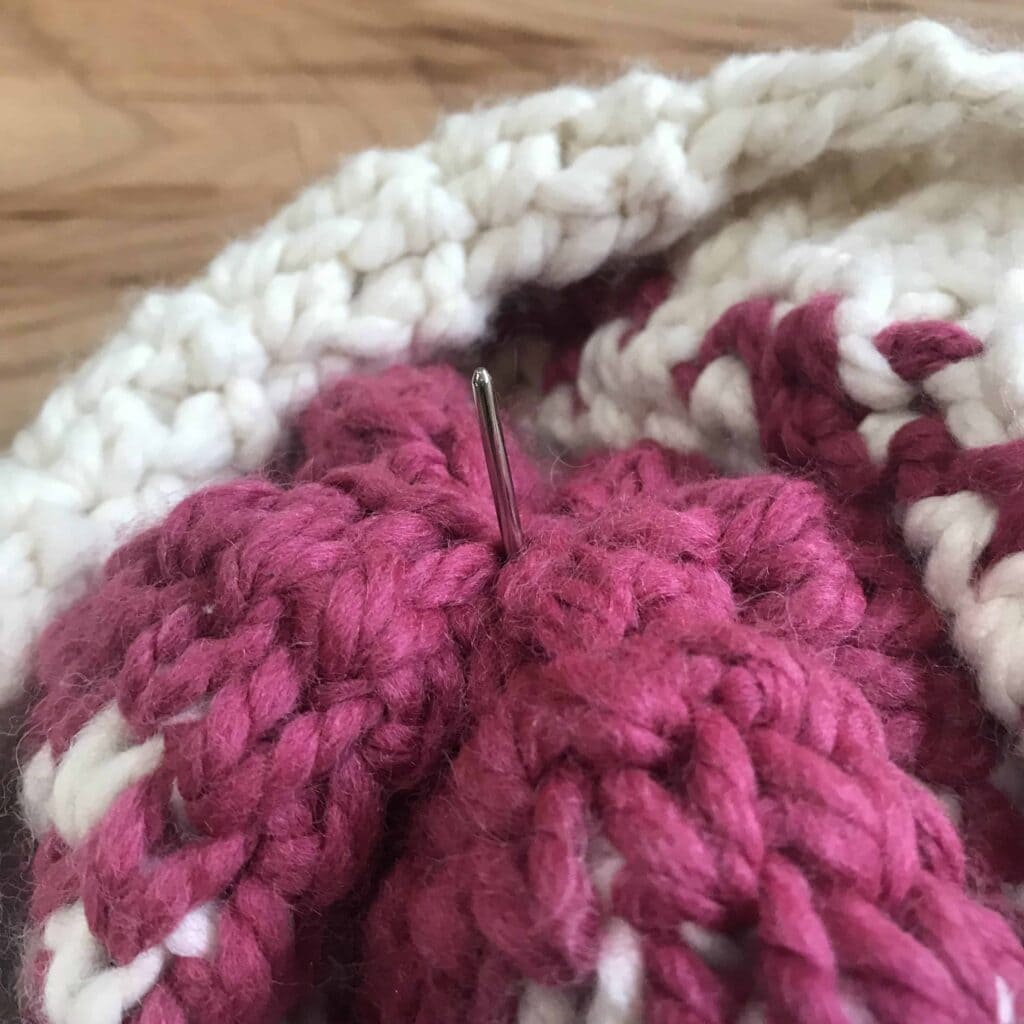
Sew through center…
Exit the other side, drawing both sides in when you pull the yarn tight.
Draw in and sew the other two corners to the center – to create an X with four corners.
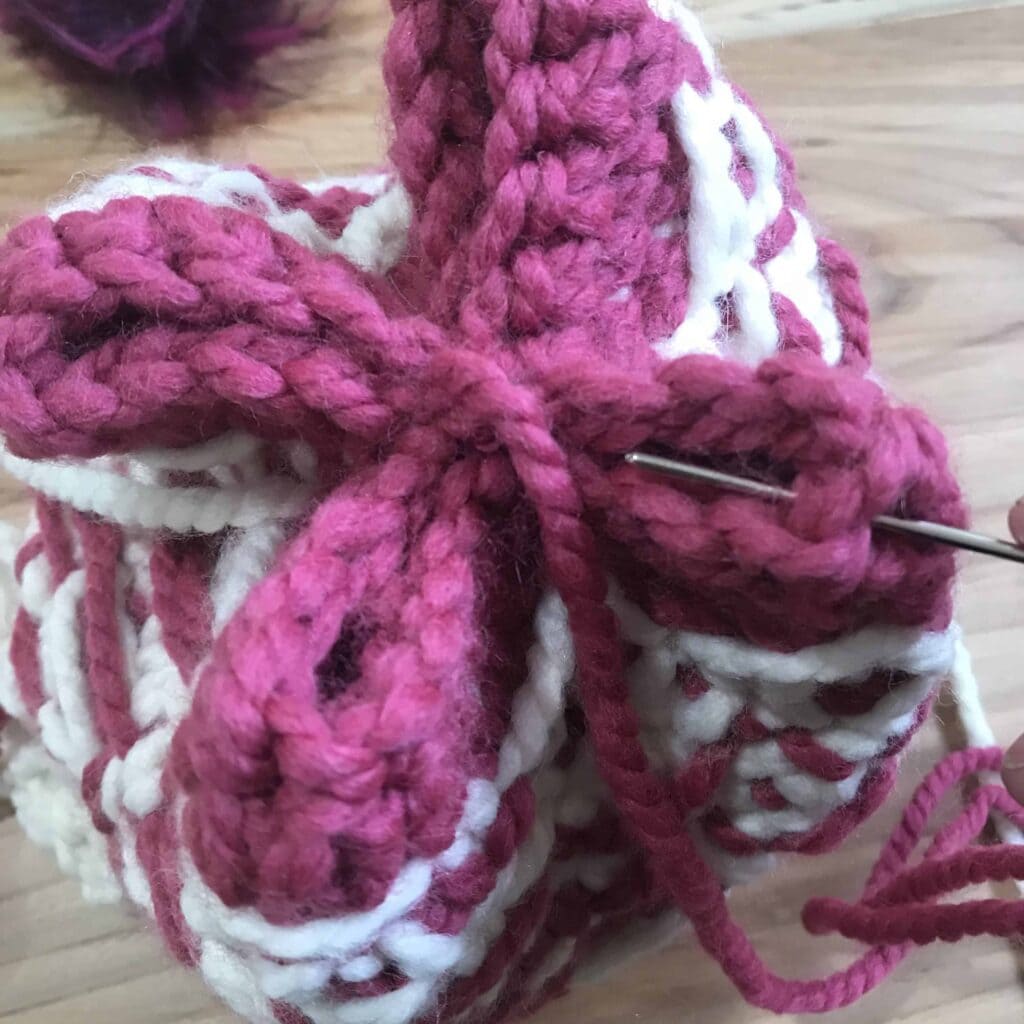
continue pulling in and sewing corners to the center, until all the corners are sewn in. Leave a long tail for attaching pom. It kind of looks like a mish mash, but just keep sewing up all the little holes.
Turn RS out.
Pom Pom is optional! I went ahead and bought some online at Amazon that have a little loop at the bottom, so I can safety pin it when I feel like a pom pom and just take it off when I don’t want one 😉.
weave in all your tails….and….
Congratulations! You’re finished!
Please create a project page on Ravelry,
I’d love to see your work!
#stardustgoldcrochet #countryheartsbeanie
Thanks for stopping by and making beautiful things with me,
If you’d like to collaborate with me, please send me a message or leave a comment, I would love to work with you!


All photos and pattern are property of Stardust Gold Crochet.
Feel free to sell items created from this pattern, but please do not copy, distribute, or sell this pattern as your own.
1 thought on “Country Hearts Chunky Beanie – Free Crochet Pattern”