


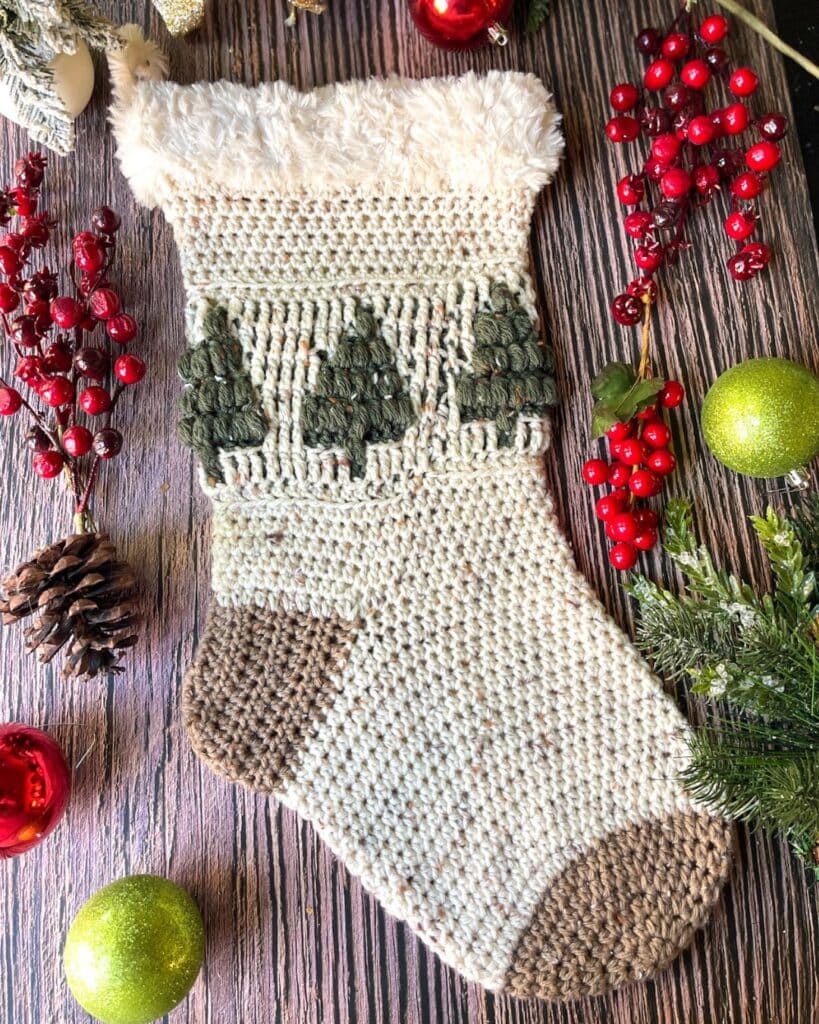
This cozy crochet Easy Puffy Pine Tree Crochet Christmas Stocking adds the perfect handmade touch to your holiday décor. With its soft faux-fur cuff, textured stitches, and rustic pine tree motif, it blends classic charm with a warm farmhouse feel. The natural tones and speckled yarn give it that cozy cabin look, perfect for hanging by the fireplace, gifting, or filling with festive treats.
Get notified of new pattern releases by becoming a Stargazer (my newsletter). Sign up here!. Grab all my patterns in the Lifetime Bundle! 137 patterns + ALL future patterns (excludes exclusive Colorwork Club patterns) – get 70% OFF NOW. Join the Colorwork Club here.
I hope you enjoy this easy pattern. Pattern support? Head over to Stardust Gold Crochet & Friends.
More Free Crochet Pattern You’ll Love


Easy puffy pine tree crochet Christmas Stocking Crochet pattern
All About the Yarn…
I used Impeccable Tweed in Taupe (CC1), Aran (MC), & Camo (CC2) – It’s a large stocking! If you want to tone it down in size, go down a hook size or two.
Materials & Notions
Suggested Yarn: I used 4-weight yarn (Impeccable Tweed in Taupe, Aran & Camo) with Go For Faux in Baked Alaska as the trim.
- Hook Size: 6 mm (US J-10)
- Scissors
- Darning Needle
Estimated Yardage:
- 2 Skeins – Aran
- 1 Skein – Taupe, Camo, Faux Fur
Sizes / Finished Measurements:
Approximately 21″ tall × 9″ wide (about 53 cm × 23 cm)
Gauge:
13 hdc × 10 rows = 4″ (10 cm) using 6 mm hook in BLO hdc.
Abbreviations
- ch(s) – chain(s)
- dc – drop down double crochet
- st(s) – stitch(es)
- yo – yarn over
- ddpuff – drop down puff stitch
- sl st – slip stitch
- sp – space
- MC – Main Color White Tweed
- CC1 – Contrasting Color 1 – Taupe Tweed
- CC2 – Contrasting Color 2 – Forest Tweed
- Hdc2tog – half double crochet 2 together
Stitch guide ✨:
Drop down puff stitch (ddpuff): Insert hook in the back loop only (anchoring the stitch) of the indicated stitch, yo, pull up a loop. (Yo, insert hook into the front loop only, two rows down, yo, pull up a loop) × 3.
Yo, pull through all but 1 loop, yo, pull through remaining 2 loops on hook – 1 puff created.
Sl st (slip stitch): Insert hook into stitch, yarn over, and pull through both the stitch and the loop on your hook. Used to join rounds or create a smooth edge.
Hdc2tog (half double crochet 2 together): Yo, insert hook in indicated stitch, yo, pull up a loop. Insert hook in next stitch, yo, pull up a loop. Yo, pull through all the loops on the hook.
Hdc (half double crochet): Yo, insert hook in indicated stitch, yo, pull through all loops on the hook.
Mosaic Stitches:
Dc (drop down double crochet): Double crochet in front loop of stitch 2 rows down.
Hdc (half double crochet back loop only): Yo, insert hook in back loop of indicated stitch, yo, pull through all three loops on the hook.
PATTERN: Easy puffy pine tree crochet Christmas Stocking Crochet pattern
Notes:
- Worked in the round (mark the first stitch of each round)
- 1st stitch of each round is made in marked stitch.
- Color changes: finish out the last stitch with the new color.

Toe:
Magic circle With CC1 (taupe or preferred color) – or ch 2 and work into 1st chain.
Rnd 1: Ch 1 (does not count as st), make 8 hdc in magic ring, join with sl st in first stitch. (8)
Rnd 2: (Begin working in the round – Mark first stitch of each round) 2 hdc in each st around. (16)
For the following rounds, you’re working in the round and the first stitch is made in marked stitch at the beginning of each round.
Rnd 3: Hdc, 2 hdc in next st, repeat around. (24)
Rnd 4: Hdc in each of the next 2 sts, 2 hdc in the next st, repeat around. (32)
Rnd 5: Hdc in each of the next 3 sts, 2 hdc in the next st, repeat around. (40)
Rnd 6: Hdc in each of the next 4 sts, 2 hdc in next st repeat 7 times (42 sts), then [hdc in next 5 sts, 2 hdc in next st] × 2. Close out last stitch with MC. (50)
Middle Section of Foot:
Remember to mark the first stitch of each round, and the first stitch is always made in marked stitch. Stitch count is 50 throughout.
Rounds 7- 21 (MC): Hdc in each stitch around. Sl st in marked stitch. Cut, tie off, weave in tail. (50)
Heel:
Using CC1, count 4 stitches back from the join, insert your hook and join the yarn. Count 25 stitches, including the one your hook is in to the left and place of stitch marker.
Row 1: Ch 1, hdc in the same as join. Hdc in next 24 sts, turn. (25)
Rows 2–5: Ch 1, turn, hdc in each st across. (25)
These rows form the straight part of the heel.
Row 6 – Begin shaping the curve: Ch 1, turn. Hdc in each of the next 8 sts, hdc2tog × 4, hdc in next 9 sts. (21)
This starts to pinch the center slightly to create the heel cup.
Row 7 – Tighten the curve: Ch 1, turn. Hdc in each of the next 7 sts, hdc2tog × 3, hdc in next 8 sts. (18)
Row 8 – Final shaping: Ch 1, turn. Hdc in next 5 sts, hdc2tog x4, hdc in each of the next 5 sts. (14)

Close the Heel:
Fold the heel in half (right sides together).
Slip stitch through both layers to close the heel. Leave a long tail, cut the yarn, and use a running or mattress stitch to reinforce the seam – or slip stitch down to the base if preferred..
Transition Back to Body (Round 1 of Leg)
With the heel seamed, turn your work so the seam is centered at the back.
Rejoin MC at the corner of the heel seam and work 50 hdc evenly around the opening as follows.
Rnd 1: Ch 1, hdc in the same as join. Hdc in the remaining 21 heel stitches, continue around working 28 stitches for a total of 50 stitches around.
Rnds 2 – 6: Continue working in the round and remember to mark the beginning of each round. (50)
Begin working the chart in Overlay Mosaic:
Just like regular mosaic, you’re going to bring up colors as needed. Just let the unused color drop at the beginning of each round. There is no beginning or ending border stitch since we are working in the round. 50 stitches total – chart is 10 stitches wide – work the chart 5 times.
If you are new to mosaic crochet, please head over for my mosaic crochet basics + I will be posting a tutorials for this soon and will update when it’s ready.
What is Overlay Mosaic Crochet?: Short Tutorial
Overlay mosaic crochet is a specific type of mosaic crochet where you work with two contrasting colors, but only one color per row. The magic happens by using a combination of single crochet (BLOsc) and front loop only dc (FLOdc) stitches to create the design. The FLOdc stitches are worked two rows below your current row, allowing the contrasting color from previous rows to peek through, creating the mosaic effect.
- Watch the Basic Mosaic Crochet Tutorial (Absolute Beginner)
- Watch the FULL video tutorial for 2 color overlay mosaic crochet
- Watch for Reversible Mosaic Crochet


Chart Written Instructions:
IMPORTANT: I used hdc (blo) for blank squares & ddpuff (drop down puff stitches) for the X’s.
Rnd 7 (MC): Begin working mosaic graph. (Row 1 of the chart is this round) Hdc (blo) in each stitch around. (50)
Rnd 8 (CC2): hdc x50.
Rnd 9 (MC): dc x5, [hdc x1, dc x9] x 4, hdc x1, dc x4.
Rnd 10 (CC2): hdc x5, [ddpuff x1, hdc x9] x 4, ddpuff x1, hdc x4.
Rnd 11 (MC): dc x2, [hdc x7, dc x3] x 4, hdc x7, dc x1.
Rnd 12 (CC2): hdc x2, [ddpuff x7, hdc x3] x 4, ddpuff x7, hdc x1.
Rnd 13 (MC): dc x2, [hdc x7, dc x3] x 4, hdc x7, dc x1.
Rnd 14 (CC2): hdc x3, [ddpuff x5, hdc x5] x 4, ddpuff x5, hdc x2.
Rnd 15 (MC): dc x3, [hdc x5, dc x5] x 4, hdc x5, dc x2.
Rnd 16 (CC2): hdc x4, [ddpuff x3, hdc x7] x 4, ddpuff x3, hdc x3.
Rnd 17 (MC): dc x4, [hdc x3, dc x7] x 4, hdc x3, dc x3.
Rnd 18 (CC2): hdc x5, [ddpuff x1, hdc x9] x 4, ddpuff x1, hdc x4.
Rnd 19 (MC): dc x5, [hdc x1, dc x9] x 4, hdc x1, dc x4.
Top of Stocking:
Rnd 20: Continue with MC, hdc (both loops) in each stitch around (50).
Rnd 21: Hdc (blo) in each stitch around.
Rnd 22 – 27: Hdc in each stitch around, finish last stitch with Faux Fur. (50)
Brim:
Using Faux Fur, hdc in each stitch around. I worked 3 rounds for the brim, but you can add more for a fluffier look.
To create the loop for hanging the stocking.
Once you finish the last stitch, pull up a long loop on your hook, cut the yarn from the ball, and weave in securely to form the hanging loop.
Thanks for making the Easy Puffy Pine Tree Crochet Christmas Stocking!


This pattern and its images are the property of Stardust Gold Crochet ©2025. It is for personal use only. Please do not copy/paste, distribute, or alter and claim as your own.
No permissions to mass produce or create a replica based on this pattern or design. You can sell finished items at markets with credit to the designer. I’d love to see your finished patterns! If you make this pattern, please email a picture to [email protected] and I will include it in a gallery on my website. You may post pictures on social media and tag @stardustgoldcrochet and use the hashtag.
#StardustGoldCrochet
You can also post pictures on my Facebook Page, or in the Stardust Gold Crochet & Friends Pattern Support Group – OR – the Crochet-a-long-with-US Community.
Let me know if you run into a problem. I respond quickly and will help any way I can to clarify any confusion or challenging stitches.