


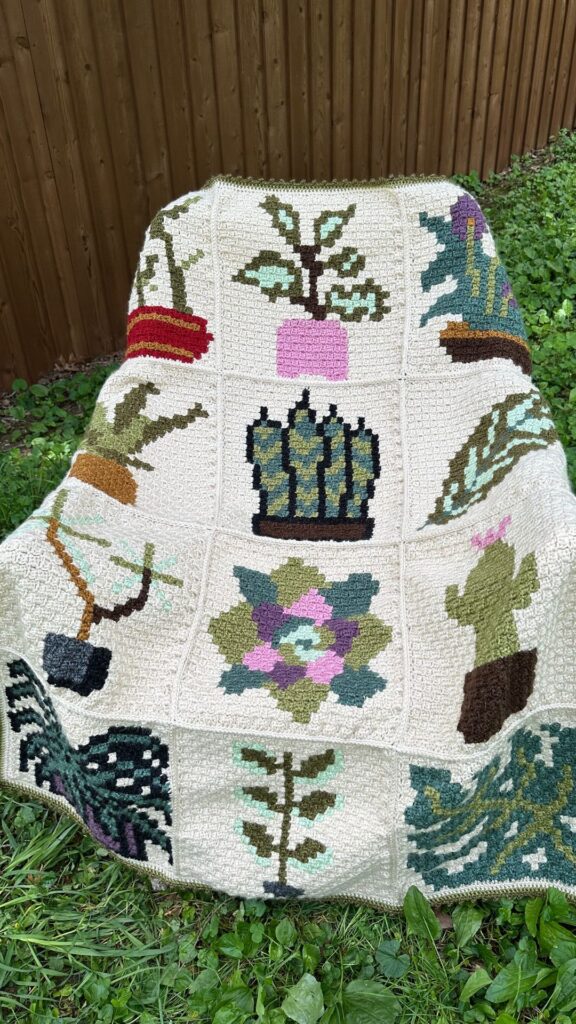
Welcome to the world of the Cottagecore Mosaic Crochet Blanket! 🏡✨ This free pattern will help you create a cozy and unique blanket using a cool technique called overlay mosaic crochet. The Cottagecore Mosaic Crochet Blanket is perfect to get started with mosaic crochet.
Get ready for a fun project filled with charming designs, beautiful colors, and the satisfaction of making something special for your home.
Whether you’ve done mosaic crochet before or are just starting out, this pattern will be your guide every step of the way.
You’ll learn how to use simple stitches and color changes to make a blanket you’ll treasure. Let’s begin! 😊
Get the Cottagecore Mosaic Crochet Blanket EBook and Work at Your Own Pace
Get the Cottagecore Mosaic Blanket eBook! Learn mosaic crochet with this comprehensive guide, complete with tutorials and helpful resources.
The Cottagecore Mosaic Blanket eBook includes:
- 11 Full Written Patterns & Charts
- 11 High Resolution Graphs
- Overlay Mosaic Crochet Tutorial
- Envelope Border Tutorial
- Border Ideas & Tutorial Links
- and more fun stuff!
GET THE EBOOK HERE.
-OR- click the image below.

Table of contents
- Get the Cottagecore Mosaic Crochet Blanket EBook and Work at Your Own Pace
- GET THE EBOOK HERE .
- Meet the Designers
- Grab The Yarn
- Yarn Pack
- Estimated Yardage, Color Palette & Yarn Packs:
- Color Palette
- How to Do Overlay Mosaic Crochet
- Learn to Change Colors
- Learn Mosaic Crochet Video Tutorial
- Abbreviations / Legend
- Stitch Guide
- Overlay Mosaic Crochet Visual Guide
- Starting Chains & Foundation Rows
- Starting Your Cottagecore Mosaic Crochet Blanket
- Cottagecore Mosaic Blanket Written Patterns HOW TO
- Working Off The Charts
- Working the Written Pattern
- Joining The Strips – Work As You Go Method
- Creating the Border
- Cottagecore Mosaic Crochet Blanket Patterns – Free Crochet Along
- Thanks Friends!


Meet the Designers
Get ready to be amazed! ✨ A group of incredibly talented mosaic crochet designers have joined forces to create a stunning blanket just for you! I’m absolutely thrilled to introduce this amazing collaboration and share their incredible work with you. 💖
- Viva Crochet
- SaAIsmi Dreamz in Yarn
- Stardust Gold Crochet

Grab The Yarn
Yarn Pack
I’m so excited and grateful the yarn pack is available for everyone – head over to Wool Warehouse to get it.
If you order the yarn from Wool Warehouse it comes pretty quick! So don’t worry, you can catch up quick. The prices are also super affordable and they are on sale right now! They are putting together some packs (hopefully) to make it easier to purchase all at once.
Wool Warehouse if releasing a pack on November 8th – it’s the same day we start, but their shipping is super FAST!
I created this yardage based on using Yarnsmiths Create (DK). These are the yarn details: Skein Weight: 3.52 oz. / 100 g Yardage: 317.24 yd. / 290 m
You can use any weight yarn you’d like of course, however, using a 4 weight or smaller yarn is recommended. Most people prefer to crochet mosaic crochet patterns using a DK (3-weight) yarn because using a worsted (4-weight) yarn can create a very large blanket and use a LOT of yarn.
The measurements I came up with for each stitch using a 4 mm hook are as follows:
- 3” (8 cm) per FPdc
- 1.5” (4 cm) per BLOsc, EBS and BBS
- 2” (5 cm) tails
Estimated Yardage, Color Palette & Yarn Packs:
Color Palette
I decided on these colors for my blanket but of course, you’re welcome to use whatever colors you’d like!
I didn’t include DARK HEATHER in my final blanket design, but kept it in the inspiration mood board because you may prefer it more than the Stone Grey.

Yardage & Skeins
I am using these colors and if you want to see my inspiration palette check it out below!
The yardage estimates here are for the colors I am using and lists the estimated final skein count per one-sided or reversible options.
These estimates are for DK weight yarn using 4 mm hook. These will vary depending on your yarn and hook choice of course.
The total yardages below are for the full 5 repeats.
Color A (MC – White): 2908 yds (2657 m) (without border) – approximately 10 skeins (without border) 12-14 (with border)
Color B (CC – whatever you’d like): 1783 yds (1629 m) (without border) – approximately 6 skeins (without border) 8-10 (with border)
You may want to add a few extra skeins for the border if you’d like to use the same colors.
Reminder:
These estimates are based on the length calculations above. Creating a swatch and measuring your stitch lengths may help you get a better idea of how much you’ll need to adjust. These yardages do not include the border either.
If you want to use different colors for each strip, the approximate yardage for each skein is as follows using DK / 4 mm hook:
These yardage estimates are listed PER STRIP.
| 5 Repeats Yardage Per Strip (Approximate) Pattern 1; A: 212 yds (193.8 m) / B: 203 yds (185.6 m) Pattern 2; A: 376 yds (343.7 m) / B: 169 yds (154.5 m) Pattern 3; A: 246 yds (224.8 m) / B: 108 yds (98.8 m) Pattern 4; A: 246 yds (224.8 m) / B: 134 yds (122.5 m) Pattern 5; A: 343 yds (313.5 m) / B: 142 yds (130.6 m) Pattern 6; A: 175 yds (160 m) / B: 150 yds (137.2 m) / C: 20 Pattern 7; A: 152 yds (138.9 m) / B: 108 yds (98.8 m) Pattern 8; A: 246 yds (224.8 m) / B: 134 yds (122.5 m) Pattern 9; A: 340 yds (310.8 m) / B: 211 yds (192.9 m) Pattern 10; A: 211 yds (192.9 m) / B: 255 yds (233.1 m) Pattern 11; A: 361 yds (329.9 m) / B: 169 yds (154.5 m) | 4 Repeats Yardage Per Strip (Approximate) Pattern 1; A: 170 yds (155.4 m) / B: 253 yds (231.3 m) Pattern 2; A: 301 yds (275.1 m) / B: 134 yds (122.5 m) Pattern 3; A: 198 yds (180.9 m) / B: 134 yds (122.5 m) Pattern 4; A: 197 yds (179.9 m) / B: 107 yds (97.8 m) Pattern 5; A: 275 yds (251.2 m) / B: 114 yds (104.2 m) Pattern 6; A: 120 yds (109.7 m) / B: 97 yds (88.7 m) / C: 20 Pattern 7; A: 121 yds (110.6 m) / B: 86 yds (78.6 m) Pattern 8; A: 197 yds (179.9 m) / B: 107 yds (97.8 m) Pattern 9; A: 272 yds (248.6 m) / B: 169 yds (154.5 m) Pattern 10; A: 169 yds (154.5 m) / B: 204 yds (186.5 m) Pattern 11; A: 288 yds (263.2 m) / B: 135 yds (123.4 m) |
Yarnsmith’s Create Yarn Color Palette Inspiration
| One Sided: Deep Ocean (3236): 372 yds (340.3 m) / 2 skeins Petrol (3234): 424 yds (387.7 m) / 2 skeins Steel Blue (3251): 319 yds (291.6 m) / 2 skeins Stone Grey (3015): 268 yds (244.9 m) / 1 skein Latte (3069): 250 yds (228.6 m) / 1 skein Rust (3074): 150 yds (137.2 m) / 1 skein Parchment (3060) (MC): 12 Skeins | Reversible: Deep Ocean (3236): 372 yds (340.3 m) / 4 skeins Petrol (3234): 424 yds (387.7 m) / 4 skeins Steel Blue (3251): 319 yds (291.6 m) / 4 skeins Stone Grey (3015): 268 yds (244.9 m) / 2 skein Latte (3069): 250 yds (228.6 m) / 2 skein Rust (3074): 150 yds (137.2 m) / 2 skein Parchment (3060) (MC): 22 Skeins |
How to Do Overlay Mosaic Crochet
What is Overlay Mosaic Crochet?
Overlay mosaic crochet is a specific type of mosaic crochet where you work with two contrasting colors, but only one color per row. The magic happens by using a combination of single crochet (BLOsc) and front loop only dc (FLOdc) stitches to create the design.
The FLOdc stitches are worked two rows below your current row, allowing the contrasting color from previous rows to peek through, creating the mosaic effect.
Changing Colors Mid-row
Someone brought this up today and I’d thought I would touch on it. So, in this example, the tester uses various colors instead of just two colors – which is a little more complicated and takes a little more forethought.
If you would like to create a multicolored mosaic, you’re welcome to do it. If you are JUST learning mosaic crochet I would stick to two colors until you get it down, then play around with it more.
Learn to Change Colors
Creating a multi colored mosaic can be achieved in various ways. Here they are:
- Plan your colors first. Where do you want the new color to appear?
- Since in mosaic we have 2 main colors (contrasting color and main color), you’ll want to follow the A and B on the chart but replace your contrasting color with the color of your choice. (you can see from the mushroom image below that she uses green and tan in the same row.)
- How to achieve it. Either carry both colors inside the stitches and pull it up as you need it by changing our the last part of your stitch with your new color as in traditional color changes.
- Or you use your main contrasting color and add your new color as needed (like the stem of the mushroom below), which looks like she added the color as needed without carrying it in the stitches. I say that because you can see that the green of the square motif and the bottom part of the stem overlap and are on the rows. So She either had to carry two yarns or add the stem yarn as she needed it.
- This will cause more tails to weave in, unless you carry them through.
I hope this helps and if you have any questions, please let me know.
Learn Mosaic Crochet Video Tutorial
Learn how to do mosaic crochet in video form >>> Mosaic Crochet Video Tutorial

Key Aspects Of Overlay Mosaic Crochet:
- One color per row: You cut the yarn after each row, then add the color to the beginning of the next row.
- No turning: You work each row from the right side (or “front”) of the fabric.
- Direction of Work: Right to left (can be worked left to right as well for the lefties out there!)
- Stitch combination: The interplay of BLOsc and FLOdc stitches creates the pattern.
- Charts: Overlay mosaic crochet patterns typically rely on charts to guide the placement of stitches and color changes, however, written patterns are also helpful.
Basic Mosaic Crochet Steps:
- Foundation chain: Start with a foundation chain (or chain + 1 for turning) in your main color. The number of chains will depend on the pattern.
- Border stitches: Most patterns begin and end each row with a border stitch (usually a single crochet placed diagonally into the V of the single crochet below to secure it).
- Follow the chart or written pattern: Use the chart to determine whether to work a BLOsc or a FLOdc in each stitch. Empty squares are BLOsc (regardless of what color the square is) and X’s are FLOdc regardless of what color the square is.
Tips for Success:
- Fixing mistakes: The beautiful thing about overlay mosaic crochet is it is easy to fix mistakes even from a few rows down. Simply untie the knot on the left side, rip back the first row, then do the same for the rows below until you reach the stitch you missed or made a mistake on. Fix it and finish crocheting the rows above.
- Read your chart carefully: Pay close attention to the symbols on the chart to ensure you’re working the correct stitches in the right places. Sometimes this can be confusing at first because the color of the square may not match – but trust the process.
Block your finished piece: Blocking will help even out your stitches and showcase the mosaic design.
Abbreviations / Legend
| Square | Abbreviation | Description |
| A | With Color A, BBS in 1st stitch | Beginning Border Stitch |
| B | With Color B, BBS in 1st stitch | Beginning Border Stitch |
| C | Carry Color C | Carry Color C |
| Empty Square (colored or not) | BLOsc | Back Loop Only Single Crochet |
| Squares with X (colored or not) | FLOdc | Front Loop Only Double Crochet |
| Blank + | EBS in the last stitch | Ending Border Stitch |
| Colored + | EBS in the last stitch | Ending Border Stitch |
| Yo | Yarn Over | |
| Dc | Double Crochet | |
| Sc | Single Crochet |
Stitch Guide
BBS – Beginning Border Stitch: It’s a single crochet stitch, placed between the V of the stitch below. Insert your hook into the designated stitch or space. Yo and pull up a loop. Yarn over again and draw the yarn through both loops on the hook. (it’s a single crochet)
BLOsc – Back Loop Only Single Crochet: Insert your hook into the back loop only of the designated stitch. Wrap the yarn over your hook and pull up a loop. Yarn over again and draw the yarn through both loops on the hook.
FLOdc – Front Loop Only Double Crochet (aka drop down dc): Yo, insert your hook into the front loop only 2 rows down. Yo and pull up a loop. Yarn over and draw through two loops on the hook.
EBS – Ending Border Stitch: Insert your hook into the designated stitch or space. Wrap the yarn over your hook and pull up a loop. Yarn over again and draw the yarn through both loops on the hook. Fasten off the yarn. (it’s a single crochet)
Dc – Double Crochet: Yo, insert hook in indicated stitch. Yo and pull up a loop. Yo and pull through two loops (2 times).Sc – Single Crochet: Insert hook in indicated stitch. Yo and pull up a loop. Yo and pull through both loops on the hook.
Overlay Mosaic Crochet Visual Guide

Starting Chains & Foundation Rows
I recommend using a foundation single crochet (<< learn how here) because it stretches easier and gives a better flow to a blanket. With foundation rows, you crochet the same number of stitches as your graph.
Foundation Rows To Start
- Single Motif: 51 chains
- 4 Repeats: 195 chains
- 5 Repeats: 243 chains
- 6 Repeats: 291 chains
Using A Chain To Start
However, if you prefer to use a starting chain use the following recommendations
- Single Motif: 52 chains (51 + 1 turning chain)
- 4 Repeats: 196 chains (195 + 1 turning chain)
- 5 Repeats: 244 chains (243 + 1 turning chain)
- 6 Repeats: 292 chains (291 + 1 turning chain)
Starting Your Cottagecore Mosaic Crochet Blanket
- First, let’s dream up your perfect blanket size! The pattern includes yardage estimates for 4 and 5 repeats.
- To get a sense of your finished size, whip up a quick 4″ x 4″ mosaic crochet swatch. This little swatch will help you gauge your tension and predict your blanket’s final dimensions.
Formula For Determining Blanket Size:
Blanket size will vary depending on your hook size, tension, and the yarn you choose. The majority of the testers measured the following:
- Worsted weight (4-5 mm hooks) = 12.5” (32 cm) wide, 7.5” (19 cm) tall
- DK weight (4 mm hook) = 10” (25 cm) wide, 6” (15 cm) tall
This can give you a good idea of how wide and tall your blanket will be based on how many motifs you’d like to crochet (3, 4, 5, 6, etc.)
Blanket Size Formula:
- Width: (Number of Motifs) * (Motif Width) + border size = Total Width
- Height: (11 Sections) * (Height of Motif) + border size = Total Height
Remember: This is an estimate, and your actual blanket size may vary slightly depending on your tension and hook size.
Cottagecore Mosaic Blanket Written Patterns HOW TO
You’re welcome to change the order of the strips and create a blanket special to your own unique style!
Working Off The Charts
Starting The Blanket
You can choose to work a foundation row or do a chain and work a row of single crochets back through the chain. Just remember that your first row of single crochet is the first row of your chart.
Foundation Crochet Row: After working your foundation row, begin working Row 2 of the chart.
Starting Chains: After crocheting your starting chain, sc in the 2nd ch from the hook and across. Tie off. Add your yarn and begin working Row 2 of the chart.
Working the Written Pattern
Follow the written instructions. Repeat the stitches between the […] 3, 4, or 5 times depending on how wide you’d like your blanket to be.
Joining The Strips – Work As You Go Method
You can be as creative as you’d like between the strips by using bobble stitches, X stitches, V stitches, or any combo to add some flare to your Cottagecore blanket. It’s completely up to you!
The most common way is to create a row of double crochet between the strips (keeping it simple) or just continue the strips one after the other.
Creating the Border
There are several ways to create borders for mosaic crochet patterns. We will go into more detail about border towards the end of the crochet along.
Because we are changing colors each row, it tends to leave a lot of tails. Here are 3 common ways to avoid weaving in all the tails:
- Envelope Border
- An envelope border encloses the tails by creating a surface slip stitch around the edge and then working a double crochet stitch into each back loop of the surface stitch. Then repeating that other side. Then join both flaps with a sc or hdc.
- Creating a Beginning, Before & After Border
- You can create a simple border by single crocheting 5 or 6 rows of single crochet (as seen below). Then begin your chart pattern 5-6 stitches in from the side. Leave 5-6 stitches at the end too. When you finish the last section, crochet 5 or 6 rows above the last row of the chart. This method allows you to hide the tails as you work.
- Tying the tails into tassels
- This is a simple method of tying the tails together to create secure tassels (as seen below)
Cottagecore Mosaic Crochet Blanket Patterns – Free Crochet Along
Here you will find links to ALL 11 sections of the blanket. Each are FREE on the blog – If you want to purchase the ebook, you can do that too!
Cottagecore Mosaic Crochet Blanket Mystery Crochet Along
Welcome to the Cottagecore Mosaic Crochet Blanket Mystery Crochet Along!
Starting November 8 and ending December 14 th. Learn the beautiful art of mosaic crochet in this 5 week crochet along hosted by Stardust Gold Crochet.
We have 11 amazing cottagecore inspired mosaic crochet blanket strips designed by 8 different incredible crochet designers.
Thanks for being here and we can't wait to see your finished blankets!
Sign up for the Cottagecore Mystery CAL to get notified when the patterns are released and join the FB group to post your photos!

Sleepy Snail Mosaic Crochet Blanket Pattern
The Sleepy Snail is number 1 of 11 in the Cottagecore Mosaic Crochet Blanket Mystery CAL! Thanks for being patient everyone! So happy to have it finished and so glad you are here!
Leaning Leaves - CottageCore Mosaic Mystery CAL
Leaning Leaves is a pretty mosaic design by SaiAIsmi Dreamz in Yarn! It's the second strip of 11 in the Cottagecore CAL.
Next pattern is released Nov. 13! Come back for more

Cottage Clovers Mosaic Crochet Blanket Pattern
#3 in the Cottagecore Mosaic Mystery CAL is the Cottage Clovers! Hope you're enjoying the CAL and remember to share your work with hashtag #stardustgoldcrochet or #cottagecoremysteryCAL
Happy crocheting friends!

Garden Teapot Mosaic Crochet Blanket Pattern
The Garden Teapot is pattern 4 in the Cottagecore Mystery CAL! Get the free pattern here >>>

Cottage Leaves Mosaic Crochet Blanket Pattern
#5 in the Cottagecore Mosaic Mystery CAL is the Cottage Leaves! Hope you're enjoying the CAL and remember to share your work with hashtag #stardustgoldcrochet or #cottagecoremysteryCAL
Happy crocheting friends!

Fall Plaid – Cottage Core Mosaic Crochet
It's Day 6 already! This is the plaid motif for the Cottagecore blanket - this one is a little more advanced and I'll be doing a "How to" tutorial today in the Crochet Along With US group on how to achieve this look! Happy crocheting friends and thanks for being here!

Little Shroom Cottage Mosaic Crochet Blanket Pattern
This cute little mushroom cottage was so much fun to make! I hope you love this one as much as I do! Head over and get the free pattern below.
Country Apples Mosaic Crochet Blanket Pattern
This is one my most favorite designs in this blanket! It's the decorations that I love so much about it. Hope you enjoy this one and remember to post your progress pics to the CAL group on Facebook!

Country Flowers Mosaic Crochet Blanket Pattern
It's Day 9 and we have the adorable Country Flowers Mosaic Blanket Strip! I think is my favorite so far. It was a little tricky doing the color changes though, I must say with a few more tails to weave in, but the result is so cute! Head over and make this cutie today!
Mellow Mushrooms Mosaic Crochet Blanket Pattern
The mellow mushrooms are my MOST favorite! I decided to use some red in this one just to make it pop! Don't tell anyone, but I orderd an entirely different colorway to make this blanket in again, just because I loved the red so much! Keep an eye out for that. Grab the free pattern below by clicking "get the pattern"

Sweet Strawberries Mosaic Crochet Blanket Pattern
Okay, I keep saying "this is my favorite" but this one is just so much fun and easy to make too! The Sweet Strawberries blanket strip is here! This is pattern 11 and our very last pattern! Keep an eye out on Wednesday for the border post and remember to post your progress pictures!
Collaboration Designer Crochet Blankets You May Like


Crochet Pattern Support
I hope you enjoy this easy pattern. Pattern support? Head over to Stardust Gold Crochet & Friends.
- If you are looking for a drama-free crochet group, check out my pattern support group, Stardust Gold Crochet & Friends
- We have fun and share crochet patterns, stories, and courses; you can ask me about any pattern in my library for support.
Thanks Friends!
Thanks so much for being here and I hope you enjoy the crochet along!


I am new to this. Where can I find the pattern for the owl and pumpkin? I am a little old to start this but I want to give a try. At my age I have a lot of free time.
How can a person get a copy of the original ebook? or at least the squirrel and owl mosaic charts?
I purchased the ebook but don’t know how to access it. Please help.
Hi I’m having trouble downloading your new mosaic afghan. I don’t understand what I’m doing wrong. I would appreciate any assistance you can give me.
Hi Joanie, did you get it worked out?
bonjour ou peut ton avoir la mise a jour du livre électronique que nous avons acheter étant française et comprend rien a l’anglais je suis perdu merci
Salut! J’ai envoyé l’ebook mis à jour, veuillez m’envoyer un e-mail à [email protected] et je m’assurerai que vous recevez la version mise à jour.
Hi Tasha, I bought the original e-book, and I was wondering if you are going to replace it with an updated version or with the two new patterns?
I sent out the email over a week ago, did you get it?
I bought the original ebook, haven’t received the new one. Can it be sent to me please. Tried to email you.
Hi Yvonne, I sent it out over a week ago, did you get it?
Based on using the 4mm hook, the suggested yarn and the one-sided blanket, what size did you get when you finished and does that include a border? If I can get an idea of your finished size with/without border, I then can estimate how much yarn I need to get. I know everyone’s tension is different, but it would be very helpful.
It’s about 64″ without border and add a couple of inches with border 🙂 I did all the calculations for the various repeats to make it easier. I’d just order a few extra skeins to get the border.