

Last Updated: April 4, 2023
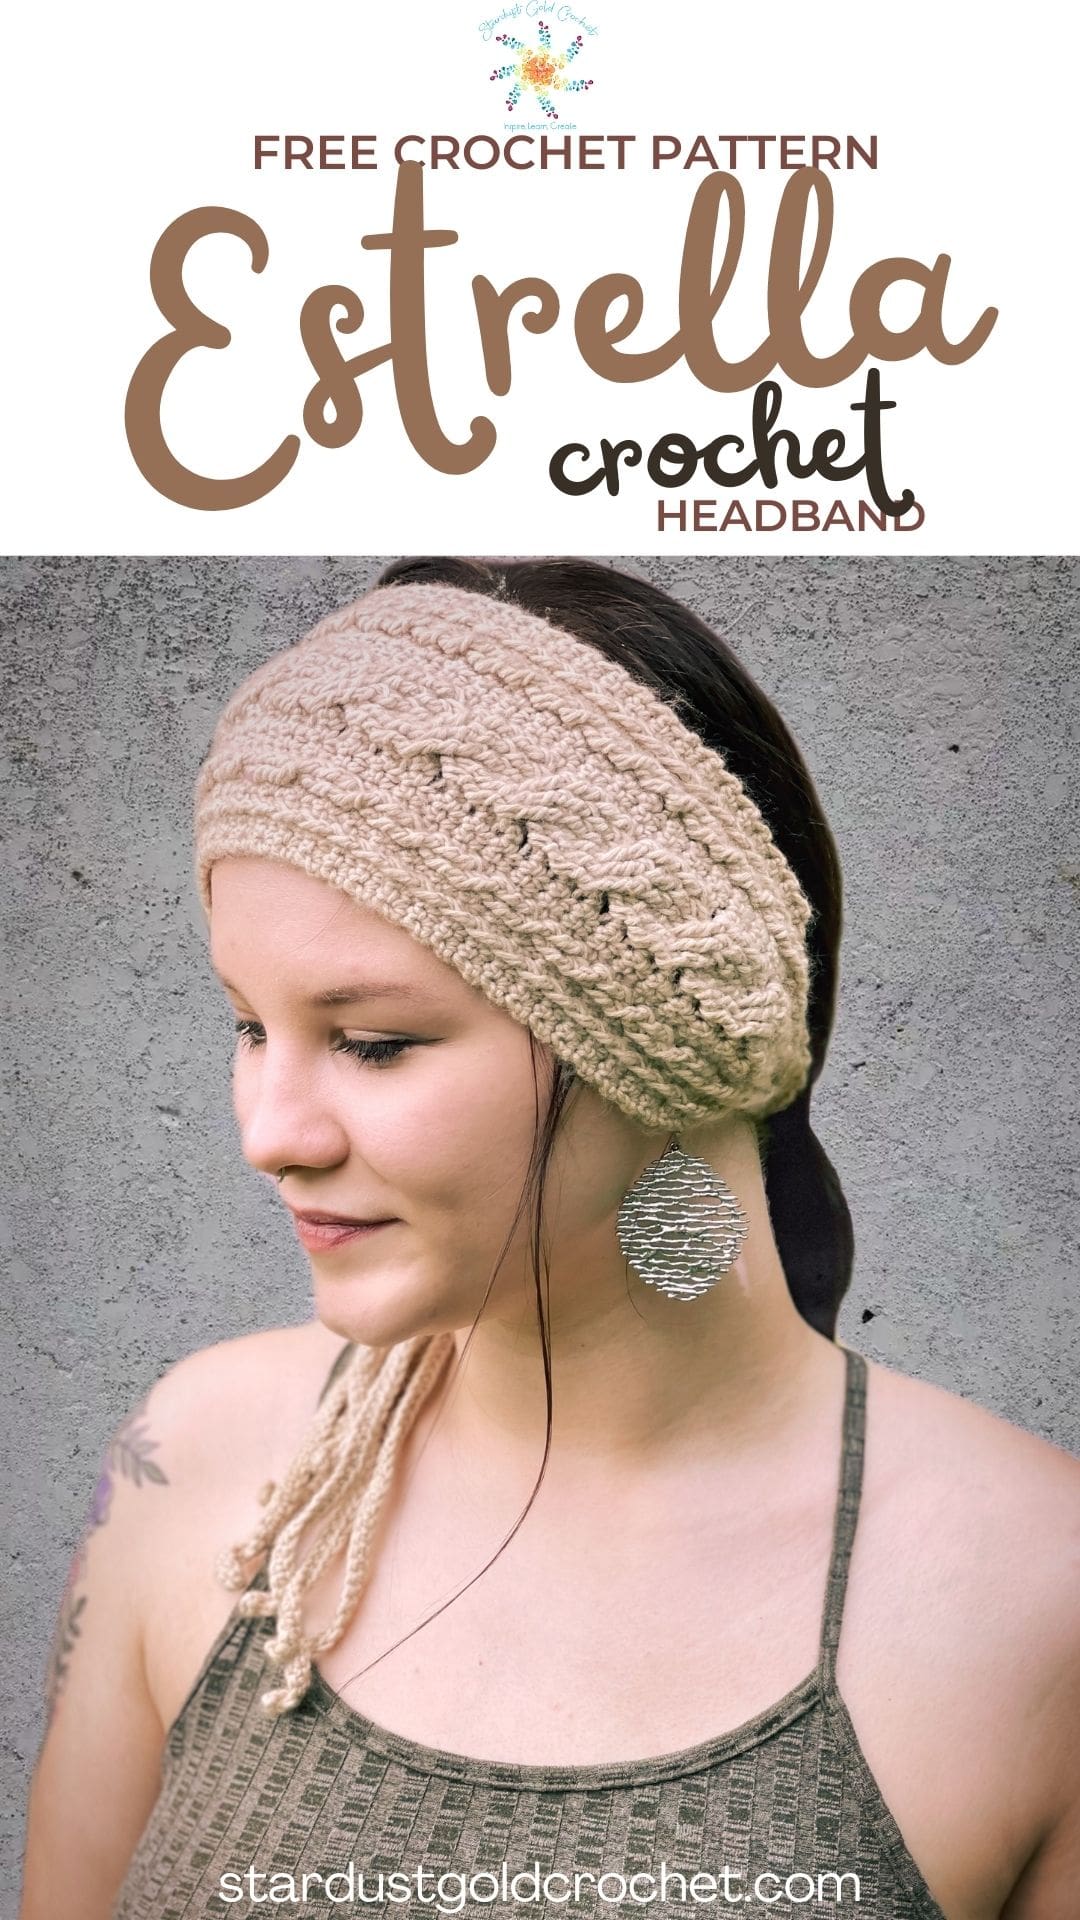
The Estrella Crochet Cables Stitch Headband pattern is finally here! Thank you so much to all the testers who made sure this pattern is good to go!
I started designing this pattern years ago. It’s been finished for a while now, but crochet cable patterns can be easy to draw, but not so easy to write out.
Therefore, testing the pattern and making sure it was perfect was so important to me.
I hope there are no mistakes! If you do notice one, please drop a comment and let me know so I can update it, because despite the best laid plans…

The Crochet Cables Headband Inspiration
Estrella means “Star” in Spanish. To be specific it means “Divine Strength” and is a symbol of hope and guidance. I recently found out we have Spanish ancestry too, which was really neat!
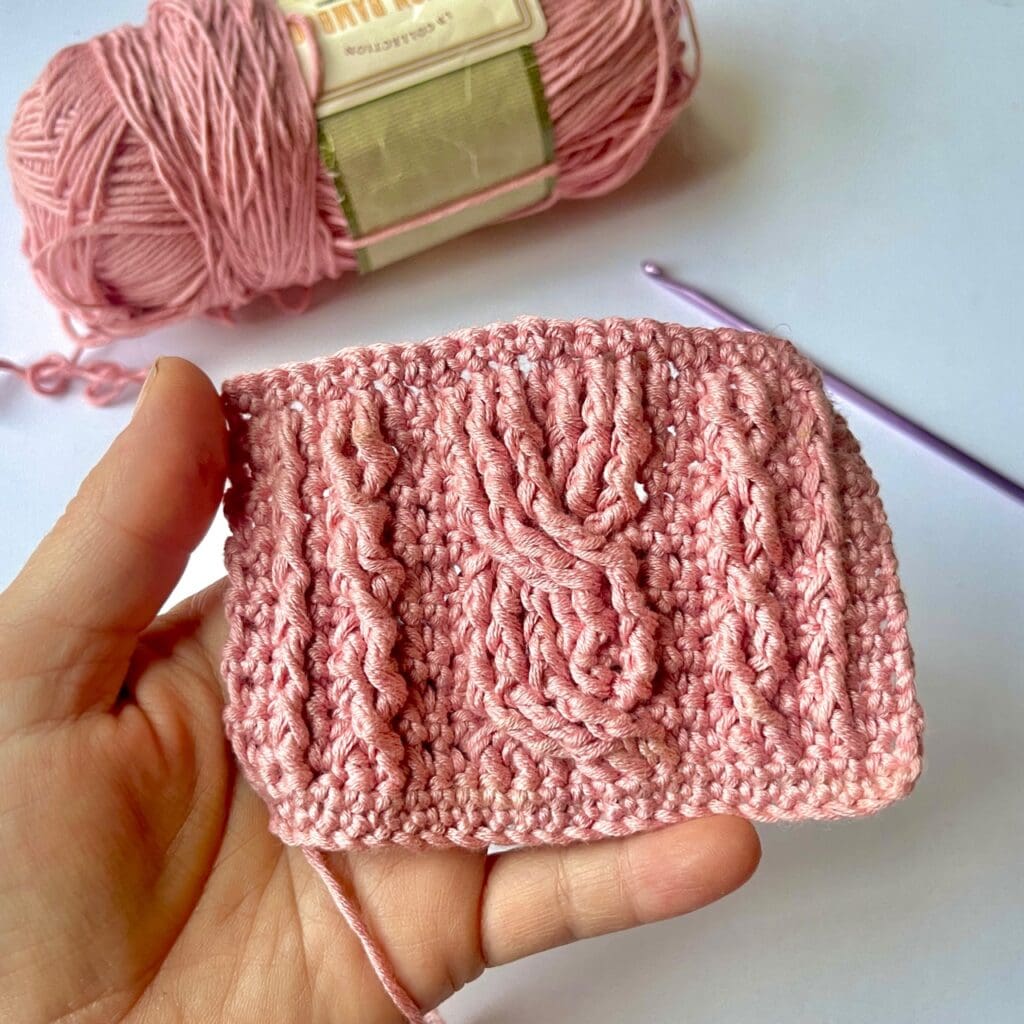
I love cable stitches and there are so many fun ways to create amazing cable patterns. Here is a sample of another crochet cable stitches I came up with – haven’t written this pattern up though!

Learn to Crochet Cables
If you are new to crocheting cables, I’ve put together a full tutorial on How to Crochet Cables. The individual stitch pattern tutorials will be ready soon, but in the meantime, this video tutorial will help immensely.
When you crochet this crochet cable stitch headband, you will learn the ins and outs of crochet cables!
Top 5 Tips on Crocheting Cables
Crocheting cables can be a bit challenging, but with practice and these tips, it can be a fun and rewarding skill to learn. Here are some tips to help you get started:
- Use stitch markers: Cables are made by crossing stitches over each other, and stitch markers can help you keep track of where you need to cross the stitches. Place a stitch marker on the stitch that needs to be crossed and move it to the other side once you’ve made the cross.
- Read the pattern carefully: Cable patterns can be tricky to read, so take your time and read the pattern carefully before you start.
- Make sure you understand the abbreviations and special stitches, and keep track of where you are in the pattern with a row counter.
- Keep your tension even: Tension is key when crocheting cables, as uneven tension can distort the cables and make them look wonky. Make sure your tension is even throughout the project, and adjust your hook size if needed to get the correct gauge.
- Use the right yarn: Cables tend to pull in on themselves, so it’s important to use a yarn with good stitch definition that will show off the cables. Avoid yarns that are too fuzzy or textured, as they can obscure the pattern.
Extra Tips on Crocheting Cables
- Practice on swatches: Before you start on a big project, practice on a small swatch to get a feel for the cables and make sure you understand the pattern. This helps you check your gauge and adjust your hook size if needed.
- Don’t be afraid to frog: If you make a mistake, it’s okay to rip it back and start again. It’s better to fix the mistake now than to have to deal with it later on in the project.
- Most importantly…Have fun!: Crocheting cables can be a challenging skill to learn, but it can also be a lot of fun. Don’t get too caught up in perfection and enjoy the process of creating something beautiful.
What skills do I need to Crochet Cables?
Crocheting cables is considered an intermediate/advanced crochet technique. It requires some knowledge of basic crochet stitches, such as single crochet, double crochet, and front/back post stitches, as well as the ability to read and interpret cable patterns.
Although, with a little bit of practice and lots of patience, crocheting cables can be mastered by crocheters of any skill level.
It’s important to start with simple cable patterns and gradually progress to more complex designs as your skill level improves.
The Estrella Crochet Cables Headband Pattern is an intermediate pattern.
How long will it take to crochet this cables headband?
That’s a good question! It depends on your crochet skill level and your speed. I am a medium to SLOW crocheter. I get easily distracted by things and life. So it took me around 3 – 4 hours to crochet this. My testers said it averaged around the same for them, with some of the faster crocheters averaging around 2 hours. That’s fast!
Check out their makes on the Ravelry Page here: Estrella Crochet Cables Headband Pattern Projects Page and see their reviews.
Speaking of… the pattern is available for download on Ravelry and in the Infinite Yarniverse.
The Do’s and Don’ts of Crocheting Cables
| To Do | Not To Do |
|---|---|
| Use a crochet hook appropriate for the yarn weight | Use a hook that is too small or too large |
| Work with a gauge swatch to ensure the cables are the correct size | Skip making a gauge swatch |
| Use a cable needle or stitch marker to keep track of where to cross the stitches, mark the stitch behind the tr and dtr stitches. | Try to cross the stitches without using a tool to help |
| Follow the cable chart or written instructions carefully. | Try to crochet the cables without following a pattern or instructions |
| Keep tension consistent throughout the project. | Let tension become too loose or too tight when working the cables |
| Block the finished project to help the cables stand out | Skip blocking the finished project |
Now that you have the lowdown on how to crochet cables, along with some basics tips and tricks…let’s move on to the pattern and start crocheting!
Download the PDF
You can find a written pattern PDF here: The Estrella Crochet Cables Headband Pattern.
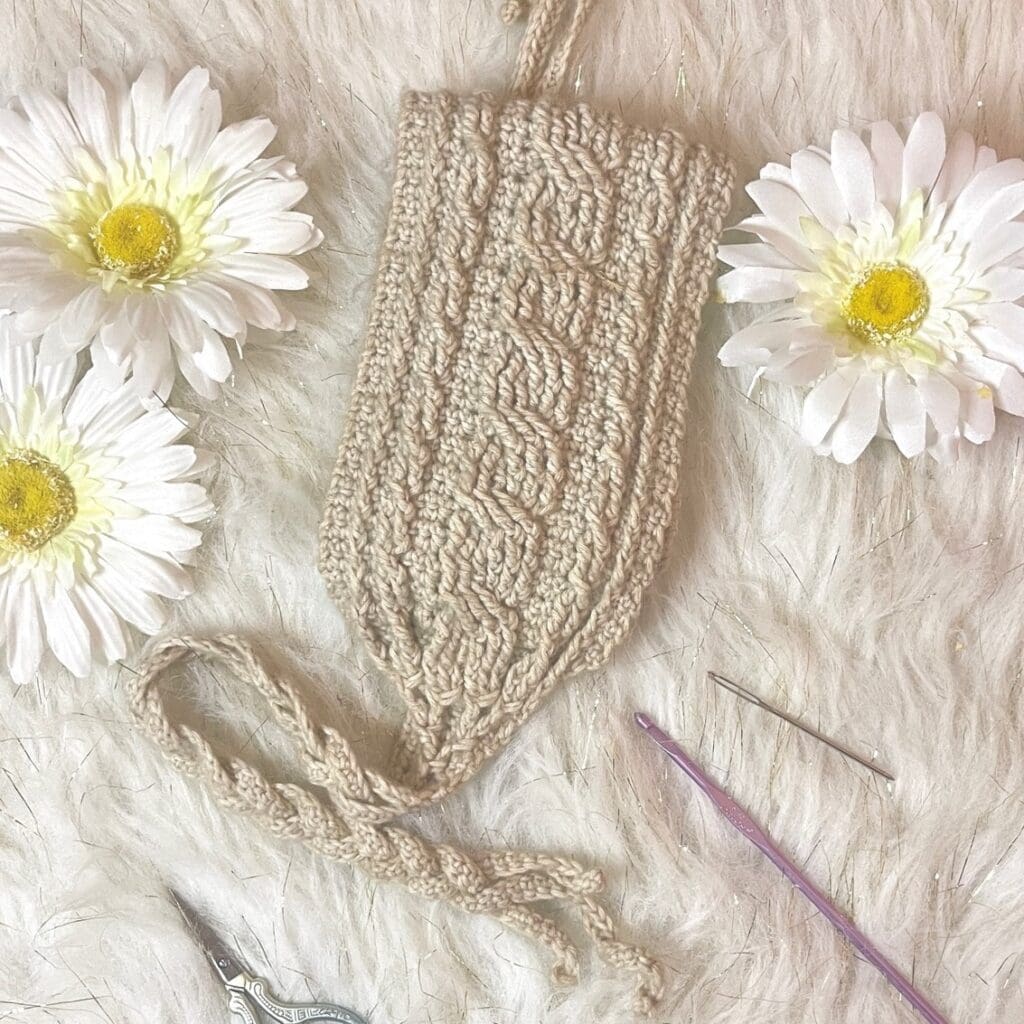
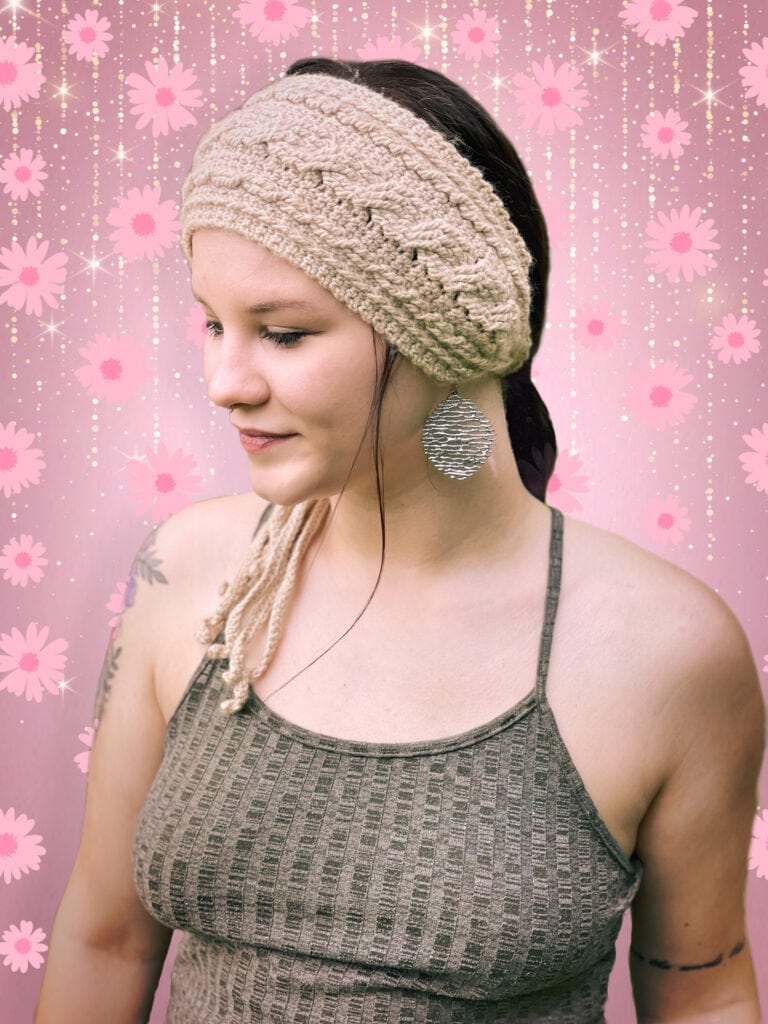
Estrella Crochet Cable Stitch Headband Pattern
PATTERN:
Materials & Notions
Suggested Yarn: Scheepjes Stonewashed (815) Axinite, 78% Cotton/22% Acrylic, 142yds (130m), 1.76oz (50g).
Yardage Needed: Approximately 185 – 200 yards using the recommended yarn. Yardage may vary depending on the yarn you use (the finished piece weighs 2.36 oz/66g in Scheepjes Stone Washed)
- Hook Size: 4 mm (USA G)
- Scissors
- Darning Needle
- Stitch Markers
- Flexible Measuring Tape
Gauge:
23 sts x 22 Rows = 4” x 4” (10 x 10 cm)
Sizes / Finished Measurements:
To create a child size, omit one repeat and continue to crochet the decreasing rows as normal.
Sizing is dependent on your yarn, hook size,
Without Tails: 20 – 22” (50 – 55 cm) long x 4 (10 cm) – 4.5” (26 cm) wide
With Tails: Approximately 35” (88 cm) x 4 (10 cm) – 4.5” (26 cm) wide
Abbreviations
- Ch (s) – Chain (s)
- Sc2tog – Single crochet 2 together
- Dc – Double crochet
- FPdc – Front post double crochet
- FPtr – Front post treble crochet
- FPdtr – Front post double treble crochet
- RS – Right side
- WS – Wrong side
- Sl st – Slip stitch
- Sk st – Skip stitch
- St (s) – Stitch(s)
- * – Repeat from * as many times indicated.
Stitch guide:
Underlined stitches are clickable (I haven’t added links yet)
sc – single crochet
insert hook in indicated stitch, yo, draw up a loop, yo draw through both loops on hook.
dc – double crochet
yo, insert hook in indicated stitch, yo, draw up a loop, *yo, draw through 2 loops* – repeat from * to * until you have one loop left on the hook.
Special Stitches:
The post stitch links will be updated this week with full walkthroughs. In the meantime, please check out the video tutorial and this tutorial; How to Crochet Cables will help you work this pattern.
sc2tog – single crochet 2 together
Insert hook in indicated stitch, yo, draw up a loop, insert hook in next stitch, yo, draw up a loop, yo and draw through both loops on hook.
FPdc – front post double crochet
yo once, insert hook in indicated stitch (from front to back and out the front again). *yo and draw through two loops* – rep *…* until only one loop on hook remains on hook.
FPtr – front post treble crochet
yo 2 times, insert hook around indicated stitch (from front to back and out the front again). *yo and draw through two loops* – rep *…* until only one loop on hook remains on hook.
FPdtr – front post double treble crochet
yo 3 times, insert hook around indicated stitch (from front to back and out the front again). *yo and draw through two loops* – rep *…* until only one loop on hook remains on hook.
Notes:
- Ch1 and turn at the beginning of each row.
- Front post stitches are always worked two rows down from the current row, unless otherwise indicated.
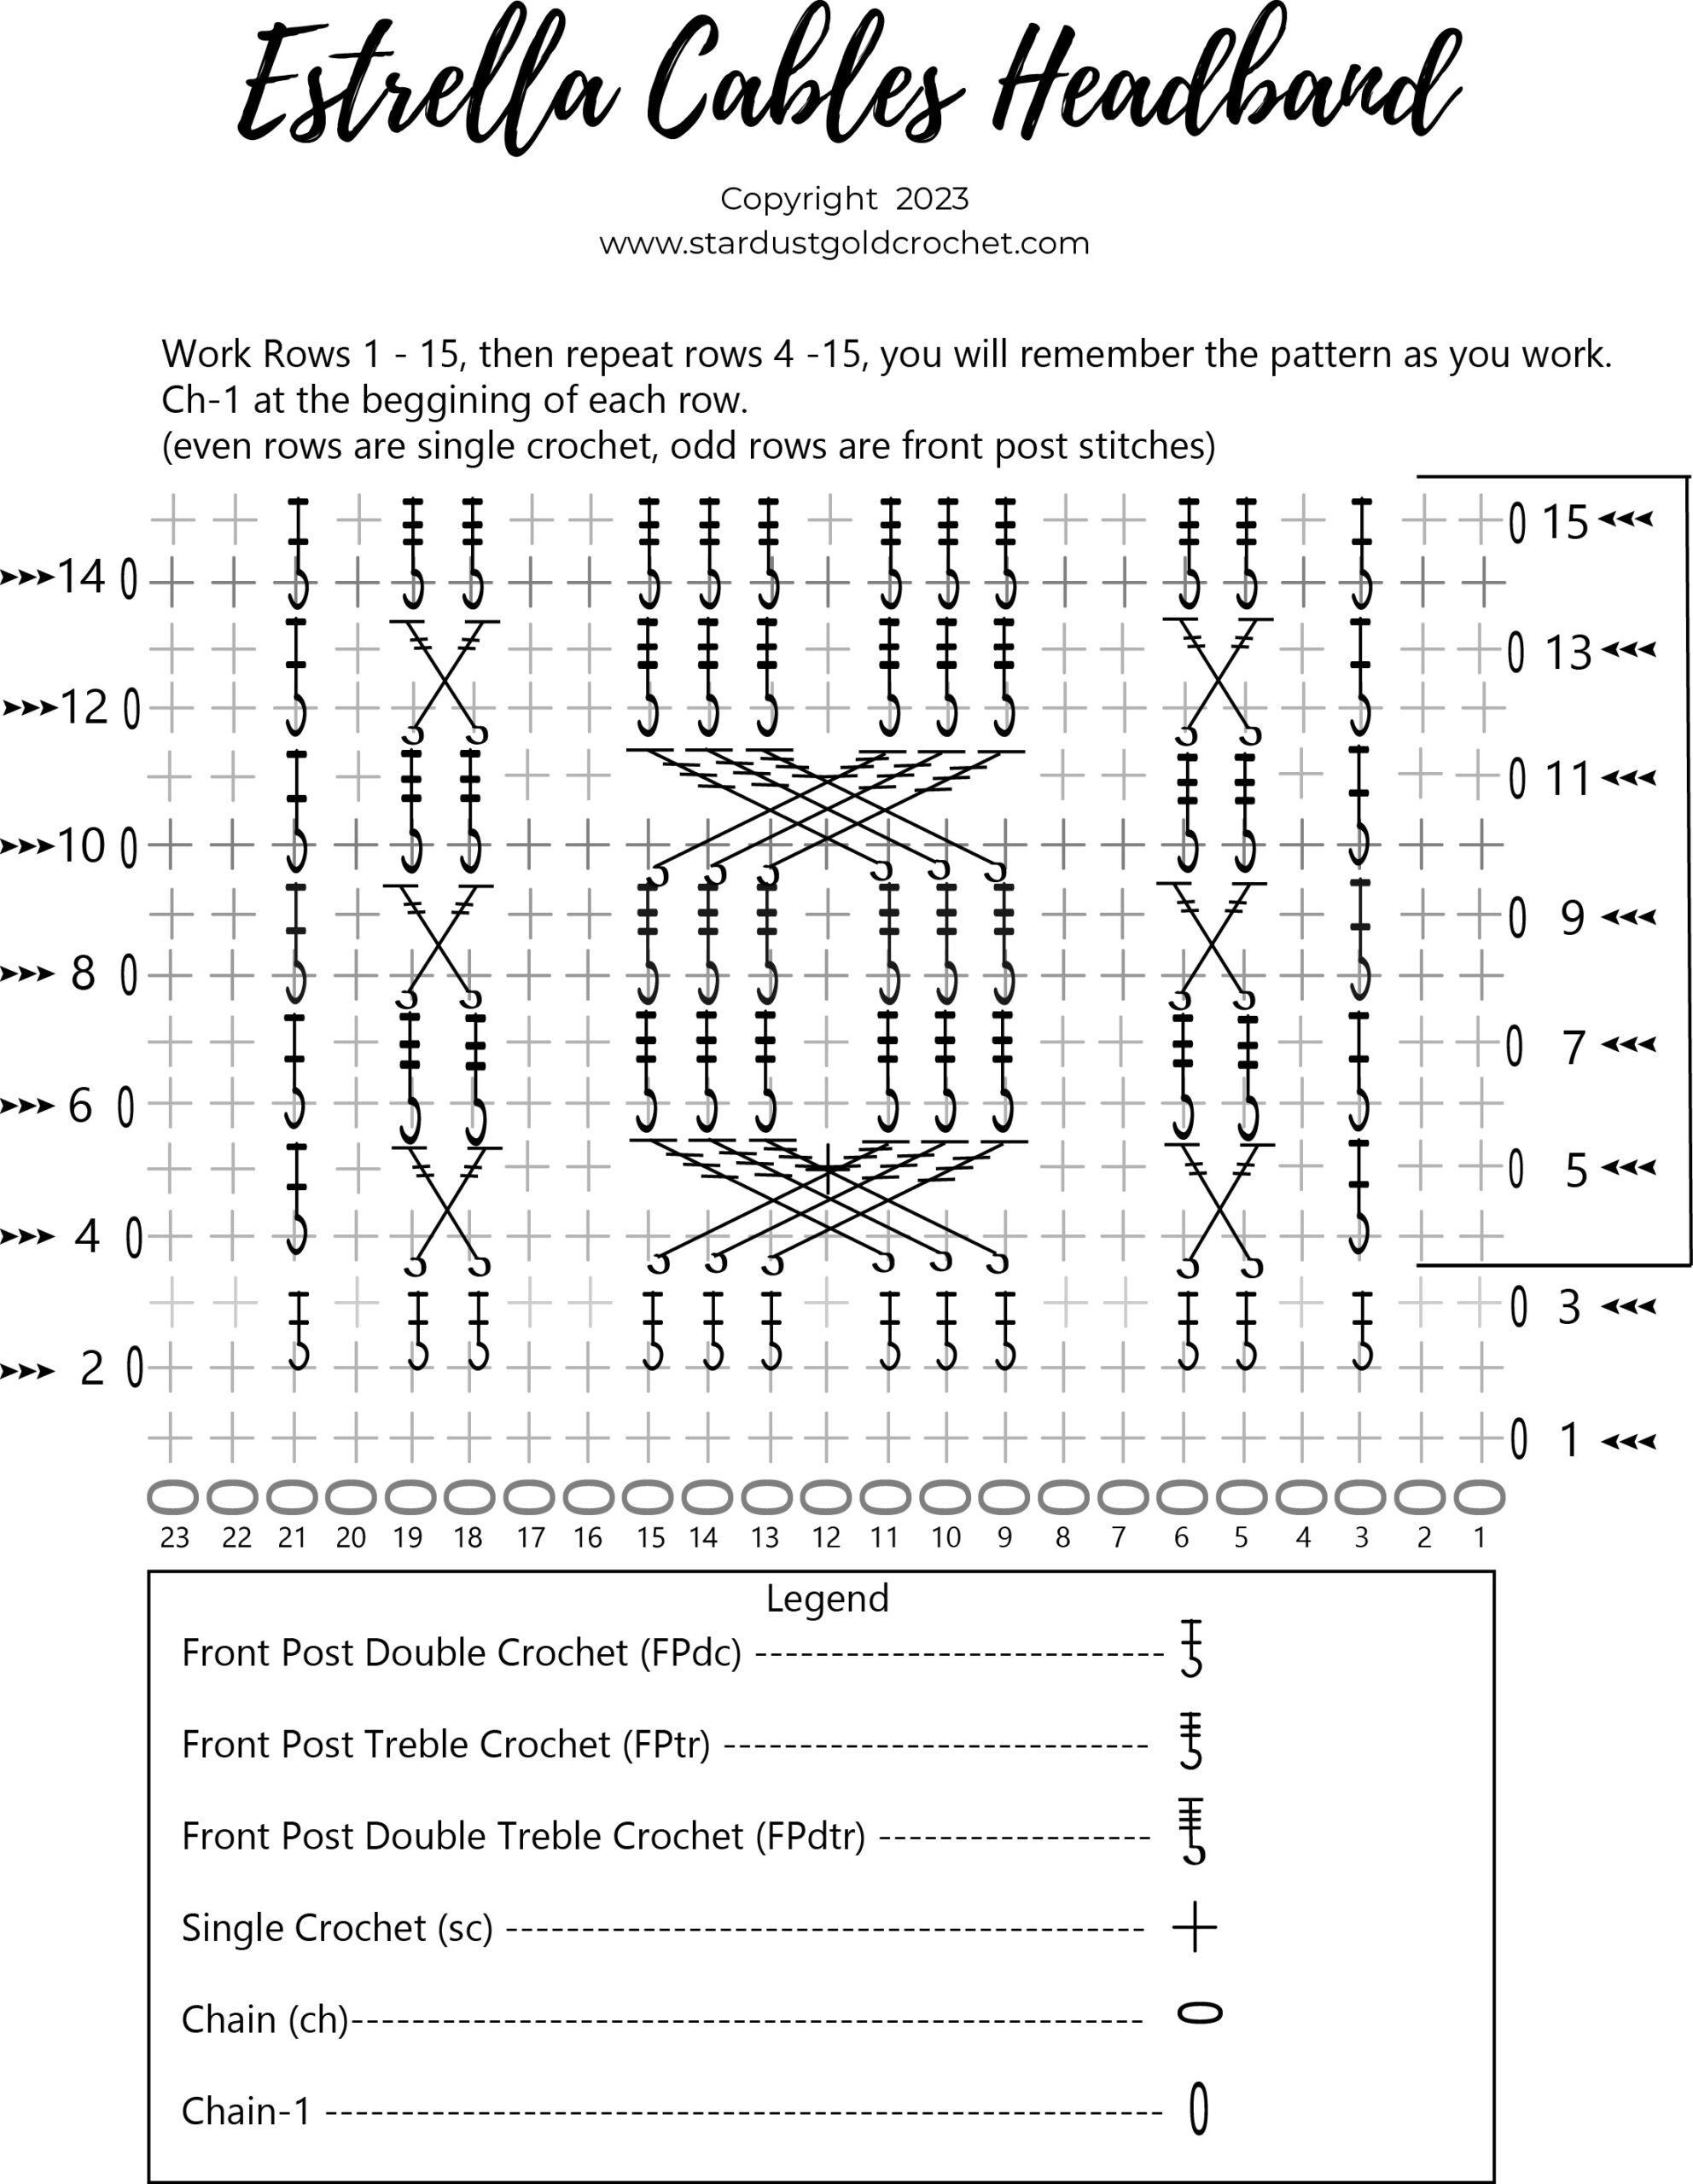
- Stitch columns are numbered right to left; 1 – 23 and noted in pattern when working the front post stitches. Refer to the chart for which front post stitch to wrap around.
- Skip stitches behind the front post stitches, unless otherwise indicated.
- Stitch count is 23 throughout cable design.
- All front post stitches are worked on the RS.
- Keep tension loose on front post stitches.
- Instructions for modifying size within the pattern.
- In the cable pattern, stitches are written as follows: sc 2 = 1 sc in each stitch, FPdc around 21 = make the front post stitch around the stitch in column 21 from two rows down.
- There is no increase in this pattern, so sc 2 does not mean to single crochet 2 in the same stitch.
PATTERN:
If you have any questions about this pattern, please leave a comment below. I am happy to answer any questions you have. I know you can conquer this crochet cable stitch headband, you got this!
Ch 23 + 1
Row 1 (RS): Sc in 2nd ch from hook and across.
Row 2 (WS): Sc in each stitch across.
Row 3 (RS): Sc 2, FPdc 1, sc 1, FPdc 2, sc 2, FPdc 3, sc 1, FPdc 3, sc 2, FPdc 2, sc 1,FPdc 1, sc 2.
Row 4 (WS): Sc in each stitch across.
Row 5 (RS): Sc 2, FPdc around 3, sc 1, FPtr around 6, FPtr around 5, sc 2, FPdtr around (13, 14, 15), sc 1 in 12, FPdtr around (9, 10, 11), sc 2, FPtr around 19, FPtr around 18, sc 1, FPdc around 21, sc 2.
Row 6 (WS): Sc in each stitch across.
Row 7 (RS): Sc 2, FPdc around 3, sc 1, FPtr around (5, 6), sc 2, FPtr around (9, 10, 11), sc 1, FPtr around (13, 14, 15), sc 2, FPtr around (18, 19), sc 1, FPdc around 21, sc 2.
Row 8: Sc in each stitch across.
Row 9 (RS): Sc 2, FPdc around 3, sc 1, FPtr around (6, 5), sc 2, FPtr around (9, 10, 11), sc 1, FPtr around (13, 14, 15), sc 2, FPtr around (19, 18), sc 1, FPdc around 21, sc 2.
Row 10 (WS): Sc in each stitch across.
Rows 11 – 15
Row 11 (RS): Sc 2, FPdc around 3, sc 1, FPtr around (5, 6), sc 2, FPdtr around (13, 14, 15), sc 1, FPdtr around (9, 10, 11), sc 2, FPtr around (18, 19), sc 1, FPdc around 21, sc 2.
Row 12 (WS): Sc in each stitch across.
Row 13 (RS): Sc 2, FPdc around 3, sc 1, FPtr around (6, 5), sc 2, FPtr around (9, 10, 11), sc 1, FPtr around (13, 14, 15), sc 2, FPtr around (19, 18), sc 1, FPdc around 21, sc 2.
Row 14 (WS): Sc in each stitch across.
Row 15 (RS): Sc 2, FPdc around 3, sc 1, FPtr around (5, 6), sc 2, FPtr around (9, 10, 11), sc 1, FPtr around (13, 14, 15), sc 2, FPtr around (18, 19), sc 1, FPdc around 21, sc 2.
Repeat Rows 4 – 15 until your piece measures around 15.5”
Each repeat measures approximately a little over 2.25”
Ending the repeat after an instance of Row 6 (a sc row).
To resize the headband, omit a repeat or two, continue with the rest of the pattern as normal.
Once your main body reaches 15.5” or you complete your desired repeats of Rows 4 – 15 + 1 sc row (39.37 cm) continue ON to decrease rows.
Estrella Crochet Cable Stitch Headband – Stitch Repeat – Rows 1 – 15
Decrease Rows (edging):
Row 1 (RS): Ch1, turn, (RS should be facing you now), sc2tog 6 times, sc in next stitch, sc2tog 5 times – 12 sts.
Row 2 (WS): Ch1, turn, sc in each stitch across – 12 sts.
Note: for this row, you will be crocheting your FPdtr’s around the FPdc’s from 3 rows down.
Row 3 (RS): Ch1, turn, sc in first stitch, loosely FPdtr around first FPdc, sc in stitch behind FPdtr just created, FPdtr around stitches (5, 6), sk 2 sts on current row, sc in next st, FPdtr around each of next 3 FPdtr, skip stitch on current row, sc in next stitch, FPdtr around each of next 3 FPdtr, sk st on current row, sc in next st, FPdtr around each stitch (18, 19), FPdtr around last FPdc, skip the 2 sts behind FPdtr’s just created, sc in last stitch – 18 sts.
Row 4 (WS): Ch1, turn, sc2tog 9 times – 9 sts.
Note: Row 5 creates a flap, as we are working front post stitches across. You can slip stitch into the first stitch, then continue with the front post stitches, and slip stitch into the last stitch.
Row 5 (RS): Ch1, turn, FPdc around each FPdtr from row 3 – 12 sts.
Row 6 (WS): Ch1, turn, sc2tog 6 times – 6 sts.
Row 7 (RS): Ch2, turn, dc in each stitch across – 6 sts.
Row 8 (WS): Ch1, turn, sc in each stitch across – 6 sts.
Note: The next row’s stitch count will increase by 2 sts. Also, you’ll be working *around* several front post stitches gathering them together.
Row 9 (RS): Ch1, turn, skip the first front post stitch below, FPdtr around both together of the 2nd and 3rd FPdc, sk st behind st just created, sc next, FPdtr around all three of next 3 FPdc from row 5 (gathering them together), sc behind st just created, FPdtr around all 3 of next FPdc from row 5 (gathering them together), sk st behind st just created, sc in next st, FPdtr around both together of the next 2 FPdc from row 5, sc in last sc – 8 sts.
Row 10 (WS): Ch 1, turn, sc in each stitch across – 8 sts.
Row 11 (RS): Ch 1, turn, sc in first stitch, FPdtr around first two FPdtr from row 9, sk st behind stitch just created, sc in next 3 sts, FPdtr around last two FPdtr from row 9, sk 2 sts, sc last stitch – 7 sts.
Row 12 (WS): Ch 1, turn, sc in each stitch across – 7 sts.
Row 13 (RS): Ch 1, turn, sc in next 3 stitches, FPdtr around both FPdtr from row 11, sk st behind stitch just created, sc in next 3 stitches – 7 sts.
At this point, you have two options.
- Join pieces with a slip stitch or sew them together using a mattress stitch (mine measures around 20.5” (cm) and allows for stretching). If you choose this option, remember to repeat the decrease Rows 1 – 13 on the other side, tie off, sew ends together, weave in all tails.
- OR Continue on to create the braided tails.
Creating the Tails:
Don’t cut yarn.
I crocheted a chain of 67, however, if you would like shorter tails, you can reduce the number of chains, or increase for longer tails.
Row 14 (WS): Ch 67, turn, sc in second ch from hook and in each ch across (working back toward main body of headband), sk st on main body, sl st in next 2 stitches, *ch 67, turn, sc in 2nd ch from hook and each chain across to base, sk st on base, sl st in next, repeat from * 1 more time. – 3 tails.
Repeat rows 1 – 13 on the other side of the headband – with RS facing you, attach yarn in the rightmost st, ch1, do not turn, then continue to crochet rows 1 – 13 of the decreasing rows.
Finishing:
Steam blocking or wet blocking the headband will help loosen the cables and make it look prettier.
Braiding the Tails (Optional)
If you want to create braided tails, make sure to straighten them out and pin them. Steam or wet block the tails before braiding them. Braid tails, then use a fisherman’s knot to tie around all three tails, pull tight.
Use fabric glue, making sure you secure the ends. Cut and unravel the ends to create tassels (after you secure with fabric glue)
It’s a wrap around and tie. I found it easier to tie without creating braids, but also love the look of the braids too.
Crochet Cables Chart
Congrats! You are finished!
Thanks for being here!


Hi, I bought this pattern and can’t wait to start crocheting.However, I need to know what stitch you used for the gauge.Thank you Kerrie
Hi, bought this pattern but need to know what stitch you used for the gauge.Kerrie
This headband looks so elegant and cozy! I’m inspired to try making it myself. Could you provide some tips on keeping the tension right while working on those cables?
I recommend watching the video for sure. There are tips and tricks in the video.
Love this pattern! I’m trying to adapt it into a border on a triangular shawl I’m making, but i don’t know how to turn a corner and keep this pattern going. Would you have any advice on how to do this? Thanks!
It looks lovely, and it looks beautiful on you; thanks for sharing x
Thank you so much!