

One of the most popular crochet stitches is the cable stitch. Although it takes practice, crocheters of any skill level can master this crochet technique. In this post, I will take the mystery away from crochet cable stitches and give you the skills to create your own beautiful crochet cables pattern.
I’ve created a crochet tutorial for you, along with a photo tutorial and companion video tutorial. Cables are a beautiful way to use the post of stitches in a creative way.
Table of contents
- What Are Cable Stitches?
- How are Crochet Cable Stitches Created?
- Crochet Projects That Use Cables
- The Tools You Need
- Tips and Tricks for Crocheting Cable Stitches
- The Stitches You Need to Know
- How to Read a Crochet Cables Chart
- How to Crochet Cable Stitches
- Tips on creating a longer chain look
- That’s a Wrap!
- Here are some free crochet cable patterns
What Are Cable Stitches?
Cable stitches are crochet stitches that create a cable-like pattern in the fabric. The braided crochet cable look is achieved by crossing over front-post double crochet and front-post treble crochet stitches.
When you follow the step-by-step tutorials laid out in this post, you will become a crochet cables expert.
After that, you will have the skills to create your own beautiful pattern using the braided cable stitch
This beginner’s guide will teach you everything you need to know about this popular crochet technique, including how to work front-post and back-post stitches.
This is a great tutorial for all crochet skill levels to learn the crochet cable stitch.
How are Crochet Cable Stitches Created?
Cable stitches are created by working on a base of single crochet rows that act as a backdrop to the raised front post double crochet stitches (or treble crochet stitches).
After creating a front post stitch, you skip the stitch behind the front post stitch, and work a single crochet into the next stitch.
Alternatively, the skipped stitches can be anchored to the previous row too, to close the gaps created by the skipped stitches. Therefore, I’ll explain a little more about that later in the post.
The cable design is created by working front post stitches around front post stitches from two rows down. Precise stitch counts are essential for successful cable-making, and one of the great features of crocheting cables is the short row repeat.
In the Estrella Headband pattern there is a 5 row repeat. It’s a free pattern, but you can grab the Estrella Cable Headband Pattern in the Infinite Yarniverse too.
Because you are working around the post stitches and not in the top two loops, the front posts create a raised look to your fabric. The resulting fabric has a lovely texture and a cable-like appearance.
Crochet Projects That Use Cables
Cables are a great way to add texture and interest to any crochet project. Afghans, sweaters, and other garments are often made with cable stitches.
Here are a few of the wonderful crochet projects you can add crochet cables to:
- Cuffs, collars, and pockets.
- Hats & mittens
- Blankets & Baby Blankets
- Booties
- Crochet Baskets
- Scarves & Headbands
Explore your creativity and see what you can come up with!
I used cable crochet in the Estrella Cables headband pattern (free crochet pattern) and also in my Kirra cardigan (free pattern)
The Tools You Need
The tools you need to crochet cable stitches are the same as for any basic crochet project. You will need a crochet hook, yarn, scissors, and a yarn needle.
You can crochet cable stitches with any type of yarn and hook, although a hook size that is slightly smaller than the hook size recommended for the yarn is better for working cables.
Tips and Tricks for Crocheting Cable Stitches
Before you begin crocheting a cable stitch, it’s important to keep a few tips and tricks in mind.
- First, be sure to count your stitches at the end of each row.
- Keep your tension loose on the long cross-over double and treble crochets
- Angle your hook slightly and bunch the work together to keep a tighter top stitch (see video tutorial for help on this one)
- Keep a consistent tension throughout.
- Treble crochet stitches can be a little tricky, so remember it’s okay to rip it out and practice again until you get it right.
- The wrong side of the work is always flat.
- The right side of the fabric has raised stitches.
The Stitches You Need to Know
If you want to learn how to do the crochet cable stitch, you need to first master some basic crochet stitches. Above all, here are the basic stitches to learn.
- Chain stitch
- Single crochet
- Double crochet
- Treble crochet.
These are all stitches that every beginner crocheter should master before attempting cables.
Basic Crochet Stitches Guide:
sc – single crochet: Insert hook in indicated st, yo, draw up a loop, yo draw through both loops on hook.
dc – double crochet: Yo, insert hook in indicated st, yo, draw up a loop, *yo, draw through 2 loops* – repeat from * to * until you have one loop left on the hook.
tr – treble crochet: Yo twice, insert hook in indicated st. yo, draw up a loop, *yo, draw through 2 loops* repeat from * to * 3 times.
How to Read a Crochet Cables Chart
You will find that In each cable pattern chart the even rows are single crochet rows, and the odd rows are where you crochet your front post stitches.
Although that may not be the case with every cables stitch chart, it is common.
Even though the symbols look complicated, they are not as confusing as they look.
Each symbol for the front post stitches have a line on top, then one to three horizontal lines in the center. At the bottom is a hook.
- Top line = the top of your stitch
- One line in center = yarn over once (for a double crochet)
- Two lines in center = yarn over twice (for a treble crochet)
- Three lines in center = yarn over three times (for a double treble)
- Hook at bottom = work around the post of the indicated stitch.
- Horizontal oval = chain stitch
- Vertical oval = chain 1 stitch
For example, here is a sample chart and the one we are going to use to make our simple cables. If you want a more challenging cable pattern, check out the Estrella Headband.

In this chart, the cross over stitches in the center are front post double treble crochets (FPdtr) – the ones in pink. Again, they are supposed to have 3 lines, but in this example, they only have two.
Thankfully, refore the written pattern describes the proper stitch to use.
Front Post Double Treble Crochet (FPdtr = Pink cross-over stitches in center)
Front Post Double Crochet (FPdc = Yellow)
Front post Treble Crochet = (FPtr = Outer pink cross-over stitches on Row 3)

Crochet Cable Chart Symbols

How to Crochet Cable Stitches
Once you have mastered the basic crochet stitches above, then you are ready to learn how to crochet cable stitches. Cable stitches use mostly double crochet and treble crochet stitches that cross over each other to create the illusion of a braid.
Without a doubt, it’s a wonderful crochet technique to learn and can be used with every type of yarn, including jumbo yarn, although using a thinner yarn can make the stitches more visible.
The crochet cable stitch pattern you decide to use is up to you…but here is an easy example to follow that will teach you how to work around and over other stitches to create a cabled chain.
Step 1
To begin, work a chain (ch) of 15 + 3 or any odd number + a turning chain (alternately, you can do a foundation row of 15 double crochet or whichever odd number you choose for your project). For this pattern, we are going to work 15.
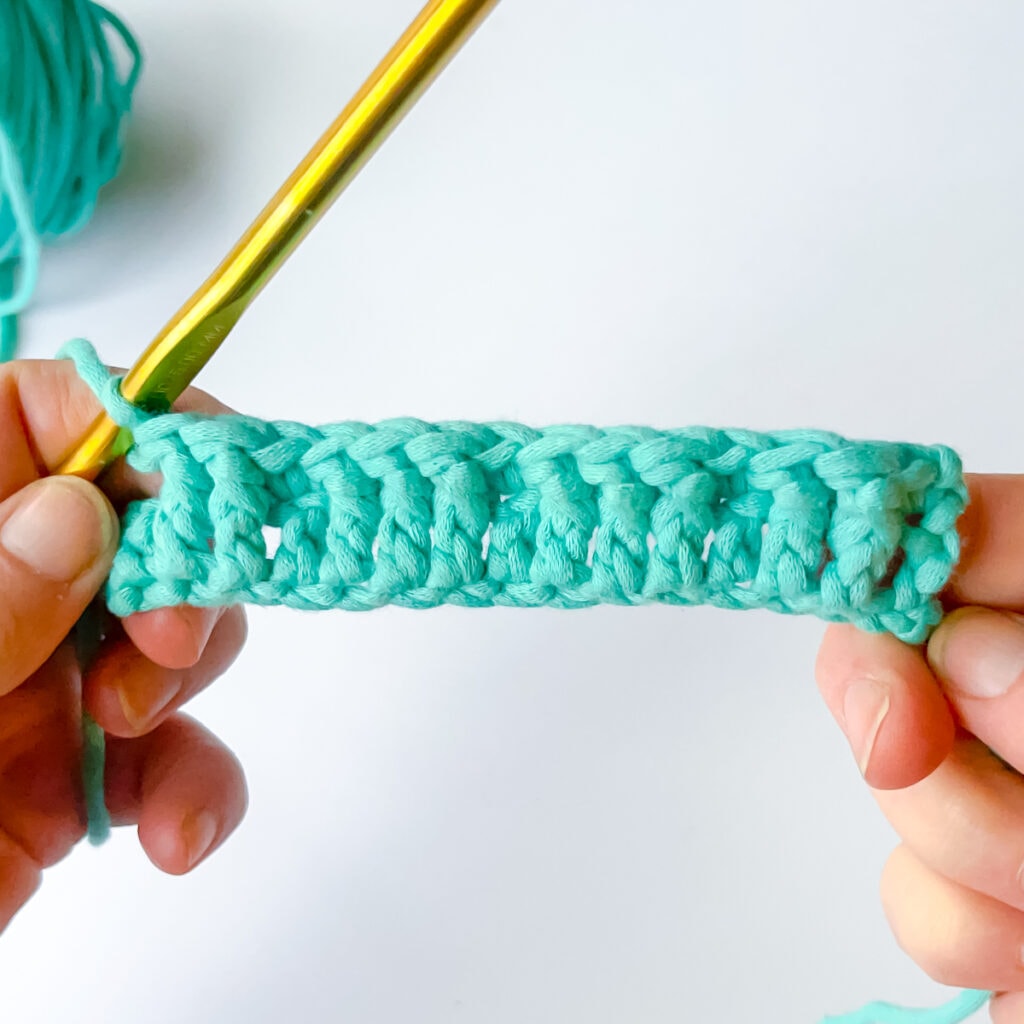
Step 2 – (Row 1) Double Crochet (dc) in 4th chain from the hook and across, 15 double crochet created.

Step 3 – (Row 2) Next, in this row, the front post stitches you create will be worked around the double crochets (dc) from Row 1. The single crochets (sc) will be worked on the top of the double crochet stitches as normal.
Ch 1, turn your work. Sc in the 1st stitch. Front post double crochet (FPdc) around the next 2 dc. Skip 1 dc. FPdc around the next 3 dc. Sc in next dc. FPdc around the next 3 dc. Sc in next dc. FPdc around next 2 dc. Sc in last dc. Row 2 is complete.
Step 4
(Row 3) Ch 1, turn your work. Sc in each stitch across – 15 single crochet total.

Step 5
(Row 4) Then, in this row, the front post stitches will be worked around the FPdc’s from Row 2 (two rows down).
Next, Ch 1, turn your work. Sc in 1st stitch. Now we are going to cross over our stitches to create a cable. Skip the first FPdc below. Front post treble crochet (FPtr) around the next. FPtr around skipped FPdc. Skip 2 stitches on the current row. Sc in next stitch.
Note:
Note: Notice we have 2 sets of 3 front post double crochets from row 2. I will refer to them as Set 1 & Set 2. Numbering them from 1 – 3. 1 being the first stitch of the set starting right to left.
Continue with a Front post double treble (FPdtr) around each stitch 1, 2, 3 of Set 2. Skip 3 stitches on Row 3 (these are located behind the stitches you just created). Sc in next stitch. Next, FPdtr around each stitch 1, 2, 3 of Set 1. Skip 3 stitches on the current row. Sc in next stitch. Skip the next FPdc from Row 3, FPtr around the next. FPtr around skipped FPdc. Skip 2 stitches on the current row (located behind the two stitches you just created). Sc in the last stitch.
Step 6
(Row 5) Next, Ch 1, turn your work. Sc in each stitch across – 15 single crochet.

Step 7
(Row 6) Ch 1, turn your work. Sc in 1st stitch.
Note: In this row, we are going to work front post double crochet stitches around each FPtr from Row 4.
Note: The twists make the first front post stitch a little hard to find. Find the top of your next stitch, follow it down, grab the front post stitch.
After that, FPdc around 1st FPtr FPdc around next FPtr. Skip 2 stitches on the current row. Sc in next stitch. FPdc around each of the next 3 FPdtr. Skip 3 stitches on the current row (located behind the stitches you just created). Sc in next stitch. FPdc around each of the next three FPdtr. Skip 3 stitches on the current row. Sc in next stitch. Skip next FPtr. FPdc around the next FPtr. FPdc around skipped FPtr. Skip 2 stitches on the current row. Sc in the last stitch.

You did it! You created your first cable stitches!
To continue and make it longer, repeat rows 3 to 6 until it reaches the length you desire, then finish it off with a row of dc or sc!
Tips on creating a longer chain look
Finally, you can repeat Row 6 one or two more times, then move on to repeating Rows 3 – 6 again. Get creative! Play around drawing cables in different ways, and once you learn the cross overs, you can create any stitch pattern you’d like!
That’s a Wrap!
Crochet cable stitches are a great way to add texture and interest to any crochet project. Whether you’re making a sweater, afghan, or other crochet garment, cable stitches are sure to spice up your project. Once you know how to crochet cable stitches, the possibilities are endless. With a little practice and patience, you’ll be a cable crochet expert in no time.
Here are some free crochet cable patterns
I created a roundup of 30 beautiful FREE crochet cable patterns! I hope you enjoy it and after you master crochet cables you will be able to crochet any cable pattern you’d like!


How to Crochet Cables (Crochet Cable Stitches)
This is a step-by-step tutorial on how to crochet cable stitches.
Materials
- Yarn
Tools
- Crochet Hook
- Scissors
Instructions
- To begin, work a chain (ch) of 15 + 3 or any odd number + a turning chain (alternately, you can do a foundation row of 15 double crochet or whichever odd number you choose for your project). For this pattern, we are going to work 15.

- (Row 1) Double Crochet (dc) in 4th chain from the hook and across, 15 double crochet created.
- (Row 2) Ch 1, turn your work. Sc in the 1st stitch. Front post double crochet (FPdc) around the next 2 dc. Skip 1 dc. FPdc around the next 3 dc. Sc in next dc. FPdc around the next 3 dc. Sc in next dc. FPdc around next 2 dc. Sc in last dc. Row 2 is complete.
- (Row 3) Ch 1, turn your work. Sc in each stitch across - 15 single crochet total
- (Row 4) In this row, the front post stitches will be worked around the FPdc’s from Row 2 (two rows down).
Ch 1, turn your work. Sc in 1st stitch. Now we are going to cross over our stitches to create a cable. Skip the first FPdc below. Front post treble crochet (FPtr) around the next. FPtr around skipped FPdc. Skip 2 stitches on the current row. Sc in next stitch.
Front post double treble (FPdtr) around each stitch 1, 2, 3 of Set 2. Skip 3 stitches on Row 3 (these are located behind the stitches you just created). Sc in next stitch. Next, FPdtr around each stitch 1, 2, 3 of Set 1. Skip 3 stitches on the current row. Sc in next stitch. Skip the next FPdc from Row 3, FPtr around the next. FPtr around skipped FPdc. Skip 2 stitches on the current row. Sc in the last stitch. - (Row 5) Ch 1, turn your work. Sc in each stitch across - 15 single crochet.
- (Row 6) Ch 1, turn your work. Sc in 1st stitch.
FPdc around 1st FPtr. FPdc around next FPtr. Skip 2 stitches on the current row. Sc in next stitch. FPdc around each of the next 3 FPdtr. Skip 3 stitches on the current row. Sc in next stitch. FPdc around each of the next three FPdtr. Skip 3 stitches on the current row. Sc in next stitch. Skip next FPtr. FPdc around the next FPtr. FPdc around skipped FPtr. Skip 2 stitches on the current row. Sc in the last stitch.


To continue and make it longer, repeat rows 3 to 6 until it reaches the length you desire, then finish it off with a row of dc or sc!
For more details and stitch instructions please see main post.
Recommended Products
As an Amazon Associate and member of other affiliate programs, I earn from qualifying purchases.
-
 (1 Skein) Lion Brand Yarn Comfy Cotton Blend Yarn, Chai Latte
 -
4 Pcs Sewing Embroidery Scissors with 4 Pcs Artificial Leather Cover 3.6 Inch Stainless Steel Stork Scissors Vintage Embroidery Scissors for Needlework, Manual Sewing Handicraft (Retro Colors)
-
Susan Bates Silvalume Soft Handle Aluminum Crochet Hook 5.5"-size 7/4.5mm


Hi, I just bought the Estrella cabled headband pattern and am looking forward to crocheting it.I would like to know what stitch you use for the gauge?Thank you.Kerrie