
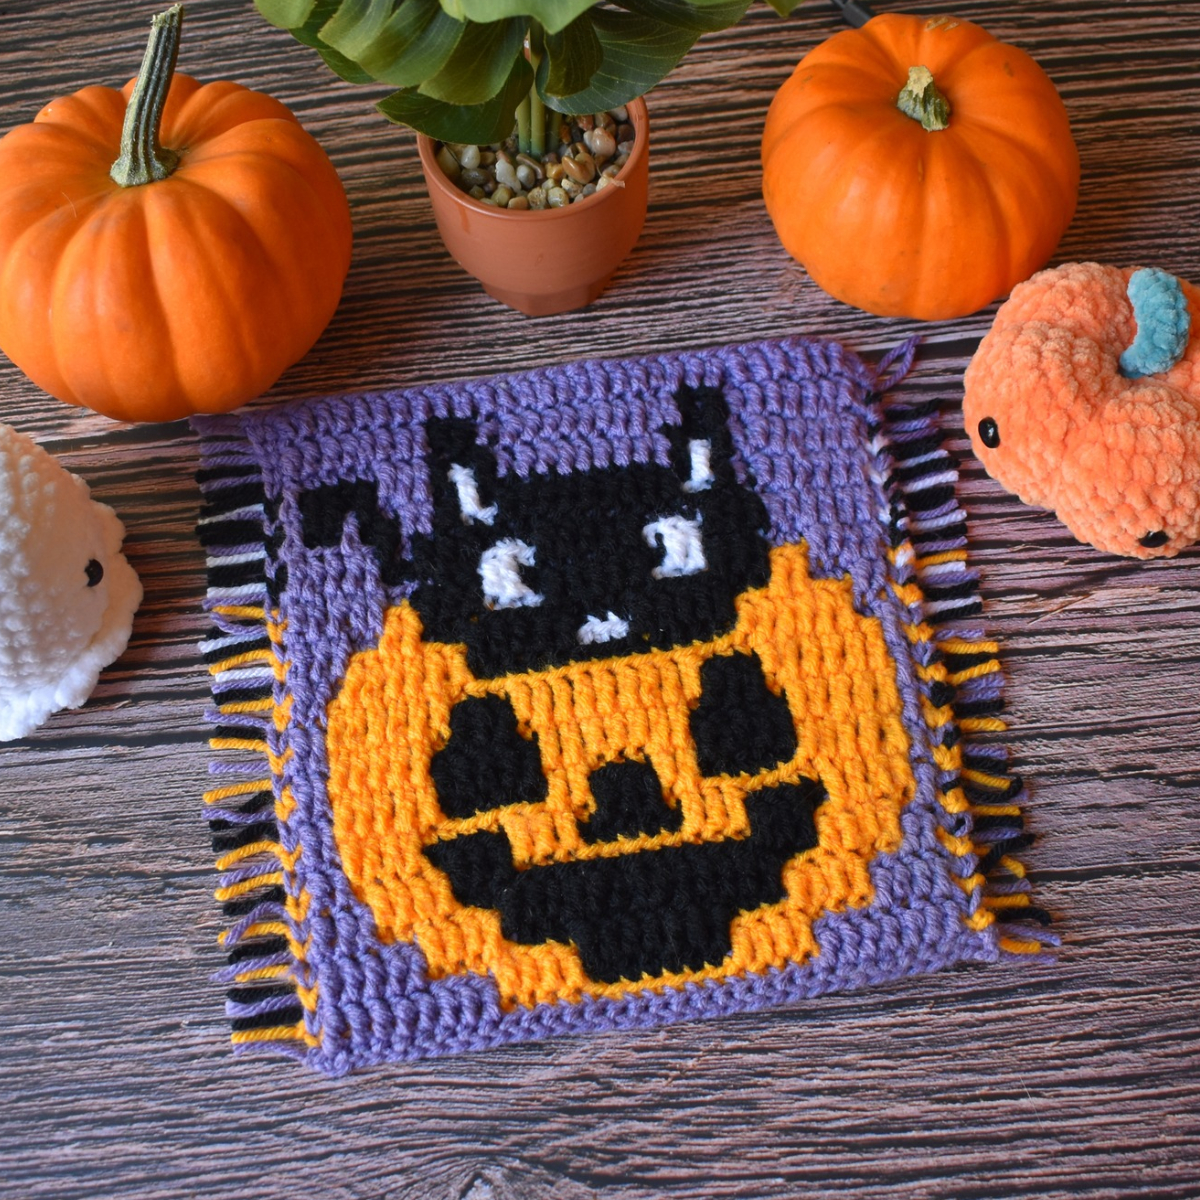
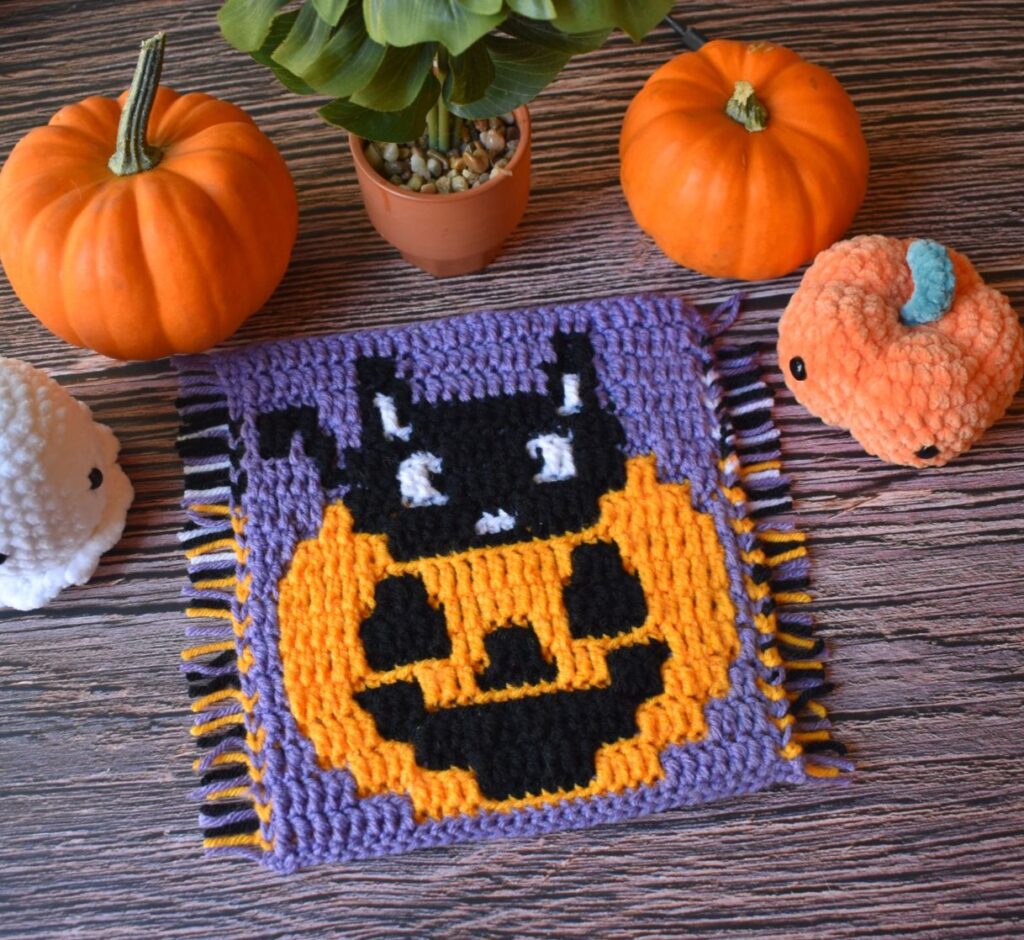
I am so excited to share this fun little project with you all. The Pumpkin Purr-Fect Kitty Mosaic Crochet Decoration (or trivet if you use cotton!) is here! If you love the classic look of a two-color design or want to dive into a vibrant four-color mosaic version, this adorable pattern features a cheeky black cat peering right out of a pumpkin.
In This Post
This post includes both charts and complete written instructions for the 4-color option and 2-color option so you can choose your own crochet adventure. It’s purr-fectly delightful for the season! 🎃🐾🧶✨
Chills & Thrills Blog Hoppers!
Hey friends, do me a solid and scroll down to the bottom of the page to get the link to the free pattern! But also, if you look around my site, you’ll find a ton of fun patterns too!
Pattern Notes (Please Read):
- I created the sample using a bulky yarn and a 5.5 mm hook (which makes it kind of large)
- I used Paintbox Simply Chunky to create the sample. Measuring around 9” wide x 9.5” tall (large).
- Mug Rug Size: Use a 2 or 3 weight yarn and a smaller hook (like 2.5 – 3 mm)
- Included:
- Graphs for 2 colors and 4 colors.
- Written pattern for 4 colors & 2 Color Version
What is Overlay Mosaic Crochet?: Short Tutorial (skip this if you know Mosaic already)
Overlay mosaic crochet is a specific type of mosaic crochet where you work with two contrasting colors, but only one color per row. The magic happens by using a combination of single crochet (BLOsc) and front loop only dc (FLOdc) stitches to create the design. The FLOdc stitches are worked two rows below your current row, allowing the contrasting color from previous rows to peek through, creating the mosaic effect.
- Watch for Basic Mosaic Crochet Tutorial (Absolute Beginner)
- Watch the FULL video tutorial for 2 color overlay mosaic crochet
- Watch for Reversible Mosaic Crochet
Key Aspects of Overlay Mosaic Crochet:
- One color per row: You cut the yarn after each row, then add the color to the beginning of the next row.
- No turning: You work each row from the right side (or “front”) of the fabric.
- Direction of Work: Right to left (can be worked left to right as well for the lefties out there!)
- Stitch combination: The interplay of BLOsc and FLOdc stitches creates the pattern.
- Charts: Overlay mosaic crochet patterns typically rely on charts to guide the placement of stitches and color changes, however, written patterns are also helpful.
Basic Steps for Mosaic Crochet:
- Foundation chain: Start with a foundation chain (or chain + 1 for turning) in your main color. The number of chains will depend on the pattern.
- Border stitches: Most patterns begin and end each row with a border stitch (usually a single crochet placed diagonally into the V of the single crochet below to secure it).
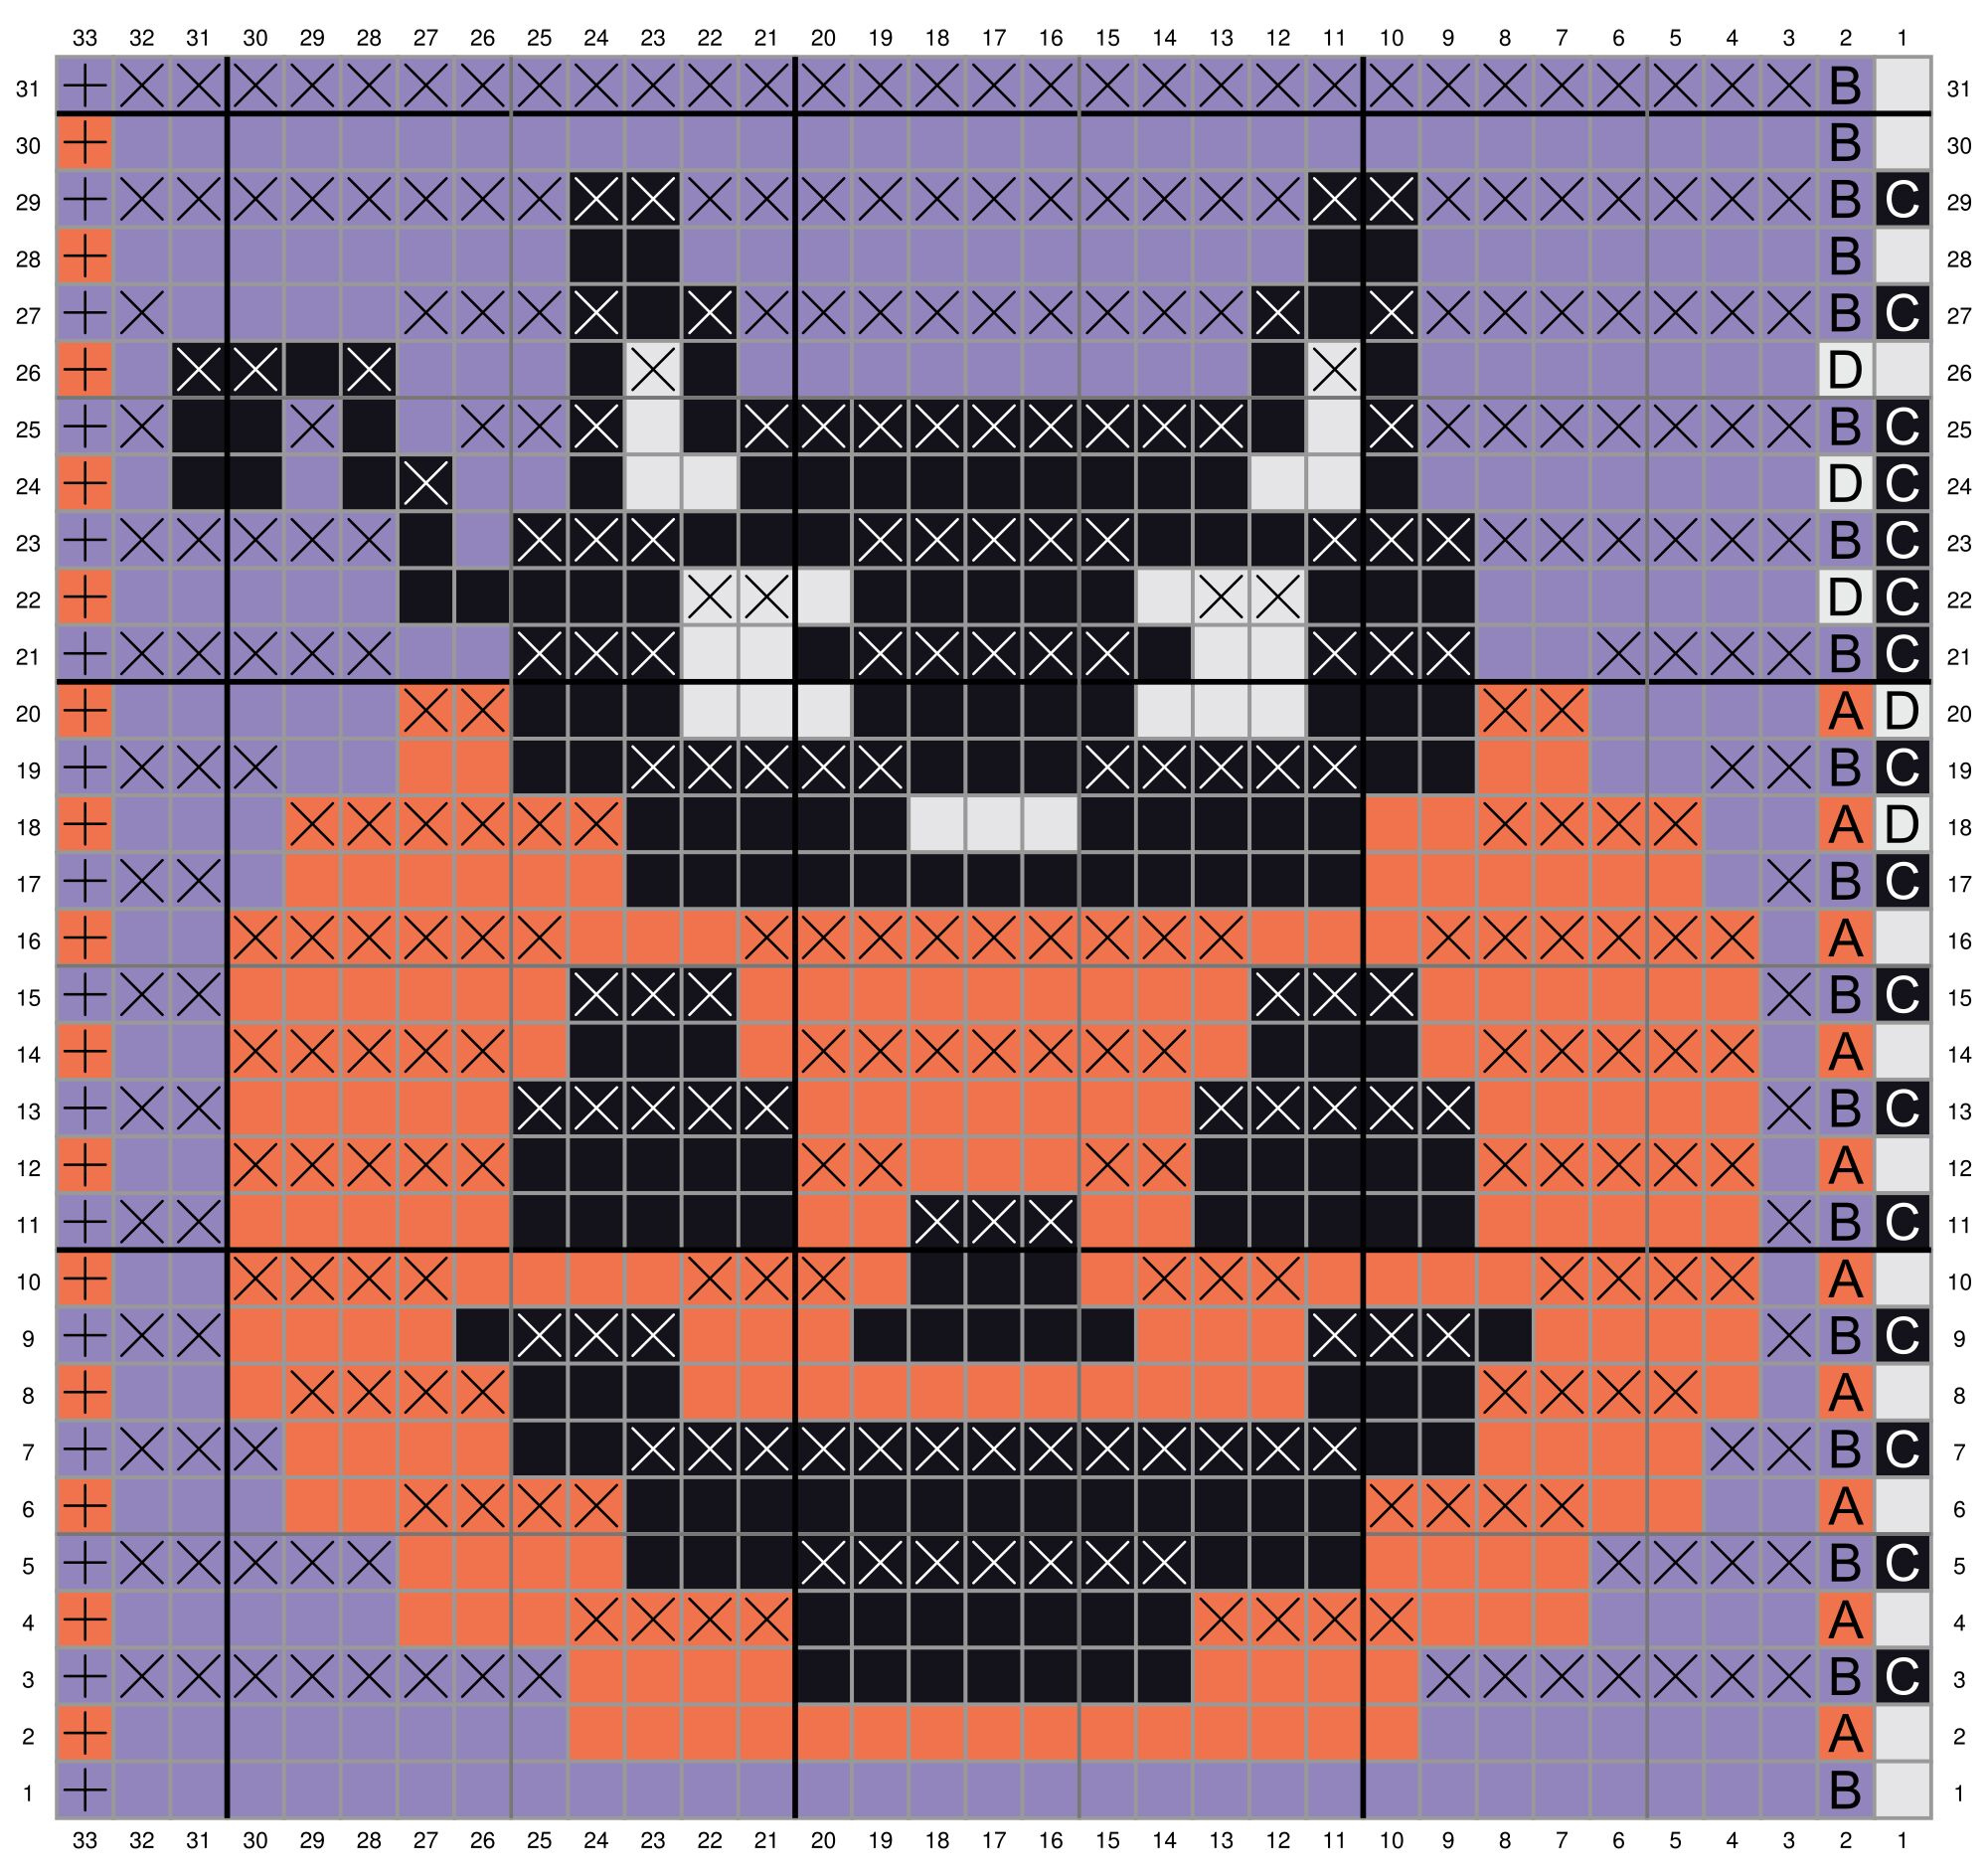
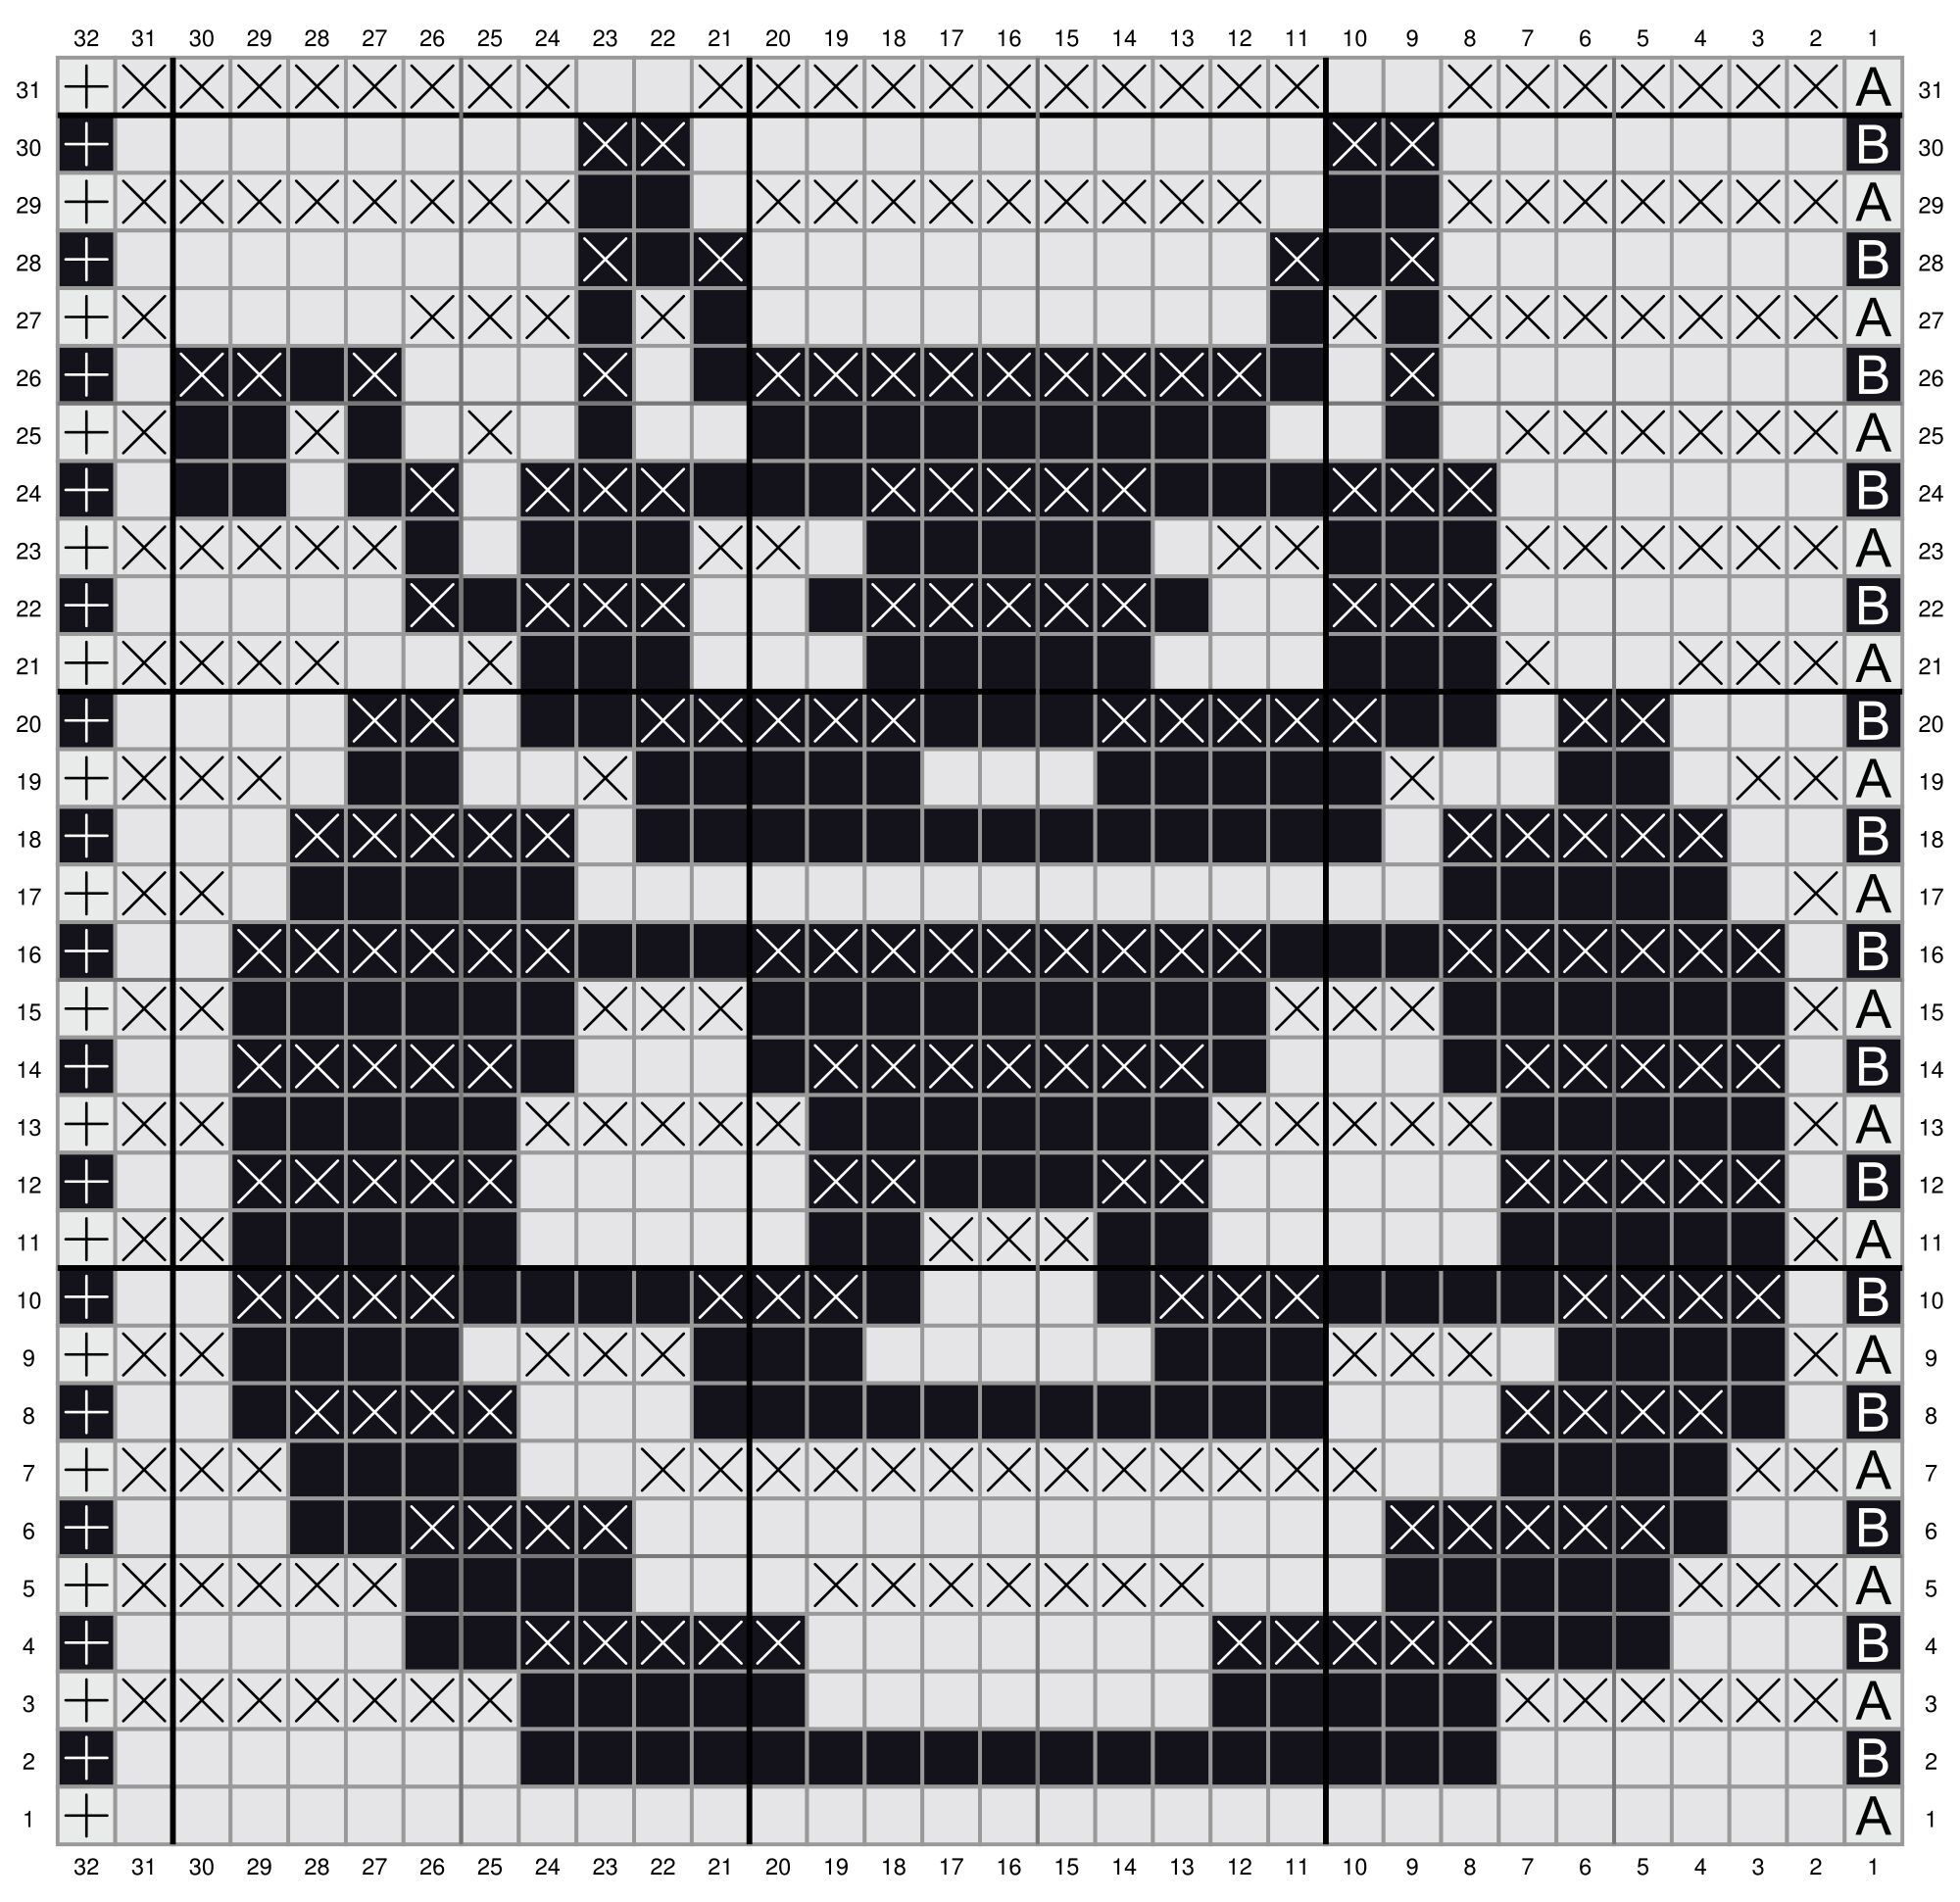
- Follow the chart or written pattern: Use the chart to determine whether to work a BLOsc or a FLOdc in each stitch. Empty squares are BLOsc (regardless of what color the square is) and X’s are FLOdc regardless of what color the square is.
Tips for Success:
- Fixing mistakes: The beautiful thing about overlay mosaic crochet is it is easy to fix mistakes even from a few rows down. Simply untie the knot on the left side, rip back the first row, then do the same for the rows below until you reach the stitch you missed or made a mistake on. Fix it and finish crocheting the rows above.
- Read your chart carefully: Pay close attention to the symbols on the chart to ensure you’re working the correct stitches in the right places. Sometimes this can be confusing at first because the color of the square may not match – but trust the process.
- Block your finished piece: Blocking will help even out your stitches and showcase the mosaic design.
Overlay Mosaic Crochet Guide
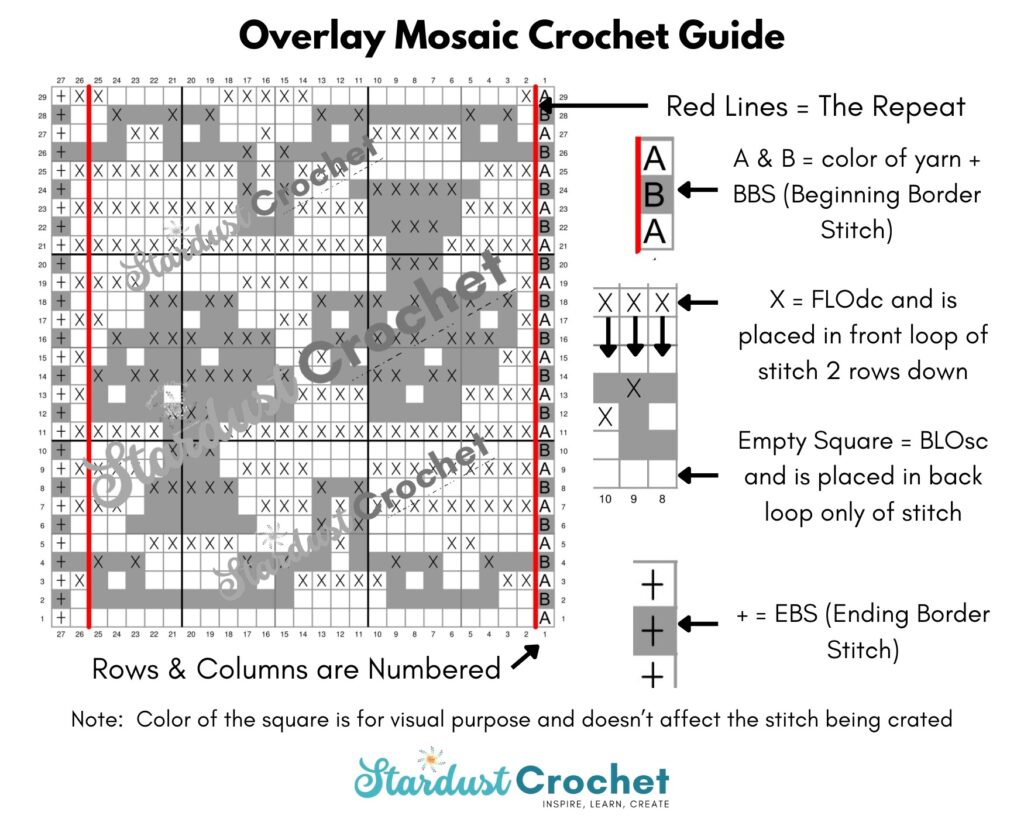
Abbreviations / Legend
*** Refer to the chart and written pattern for the colors to carry.
| Square | Abbreviation | Description |
| A (Orange) | With Color A, BBS in 1st stitch | Beginning Border Stitch |
| B (Purple) | With Color B, BBS in 1st stitch | Beginning Border Stitch |
| C (Black) | With Color C, BBS in 1st | Beginning Border Stitch |
| D (White) | With Color D, BBS in 1st stitch | Beginning Border Stitch |
| Empty Square (colored or not) | BLOsc | Back Loop Only Single Crochet |
| Squares with X (colored or not) | FLOdc | Front Loop Only Double Crochet |
| Blank + | EBS in the last stitch | Ending Border Stitch |
| Colored + | EBS in the last stitch | Ending Border Stitch |
| Yo | Yarn Over | |
| Dc | Double Crochet | |
| Sc | Single Crochet | |
| Hdc | Half Double Crochet | |
| BLO | Back Loop Only |
Stitch Guide
BBS – Beginning Border Stitch: It’s a single crochet stitch, placed between the V of the stitch below. Insert your hook into the designated stitch or space. Yo and pull up a loop. Yarn over again and draw the yarn through both loops on the hook. (it’s a single crochet)
BLOsc – Back Loop Only Single Crochet: Insert your hook into the back loop only of the designated stitch. Wrap the yarn over your hook and pull up a loop. Yarn over again and draw the yarn through both loops on the hook.
FLOdc – Front Loop Only Double Crochet (aka drop down dc): Yo, insert your hook into the front loop only 2 rows down. Yo and pull up a loop. Yarn over and draw through two loops on the hook.
EBS – Ending Border Stitch: Insert your hook into the designated stitch or space. Wrap the yarn over your hook and pull up a loop. Yarn again and pull yarn through both loops on the hook. Fasten off the yarn. (it’s a single crochet)
Dc – Double Crochet: Yo, insert hook in indicated stitch. Yo and pull up a loop. Yo and pull through two loops (2 times).
Sc – Single Crochet: Insert hook in indicated stitch. Yo and pull up a loop. Yo and pull through both loops on the hook.
Hdc – Half Double Crochet: Yo, insert hook in indicated stitch. Yo and pull up a loop. Yo and pull through all three loops on the hook.
Surface Stitch: Create a slip knot, remove it from your hook. Insert your hook into the indicated stitch. Add slip knot back on hook and pull to the surface of your work. Insert hook in next indicated space, grab yarn from below and pull up through your work and immediately through the loop on your hook. Repeat that around your work as needed.
Fsc – Foundation Single Crochet: Step 1: Create a slip knot. Ch 2. Insert the hook in the 1st chain. Yo, draw up a loop. Ch 1. Yo, draw through both loops on the hook. Step 2: (2nd st) Insert hook in the bottom two loops of the ch-1 created in Step 1. Yo, draw up a loop. Ch 1. Yo, draw through both loops (2 fsc created).
Recommended Yarn & Yardage Details:
I created this sample using Paintbox Yarn Simply Chunky.
I’m not going to recommend a specific yarn for this project, because if you want to make a smaller project (like for a mug rug) using a smaller yarn is better.
Yarn Details: 100% Acrylic, 149 yds (136 m) per 3.5 oz (100 g) skein
You can use any weight yarn you’d like of course, however, using a 3 weight or smaller yarn is recommended for a mug rug.
Size Measurements:
- 9” (23 cm) x 9.5” (24 cm) approximately
Estimated Yardage:
Color A (Blood Orange – 319): Less than a skein.
Color B (Dusty Lilac – 346): Less than a skein.
Color C (Pure Black – 301): Less than a skein.
Color D (Paper White): Less than a skein.
Hook Size:
I used 5.5 mm (USA I crochet hook) for the sample.
4 Color Pumpkin Purr-Fect Mosaic Crochet Chart
2-Color Halloween Kitty Pumpkin Graph
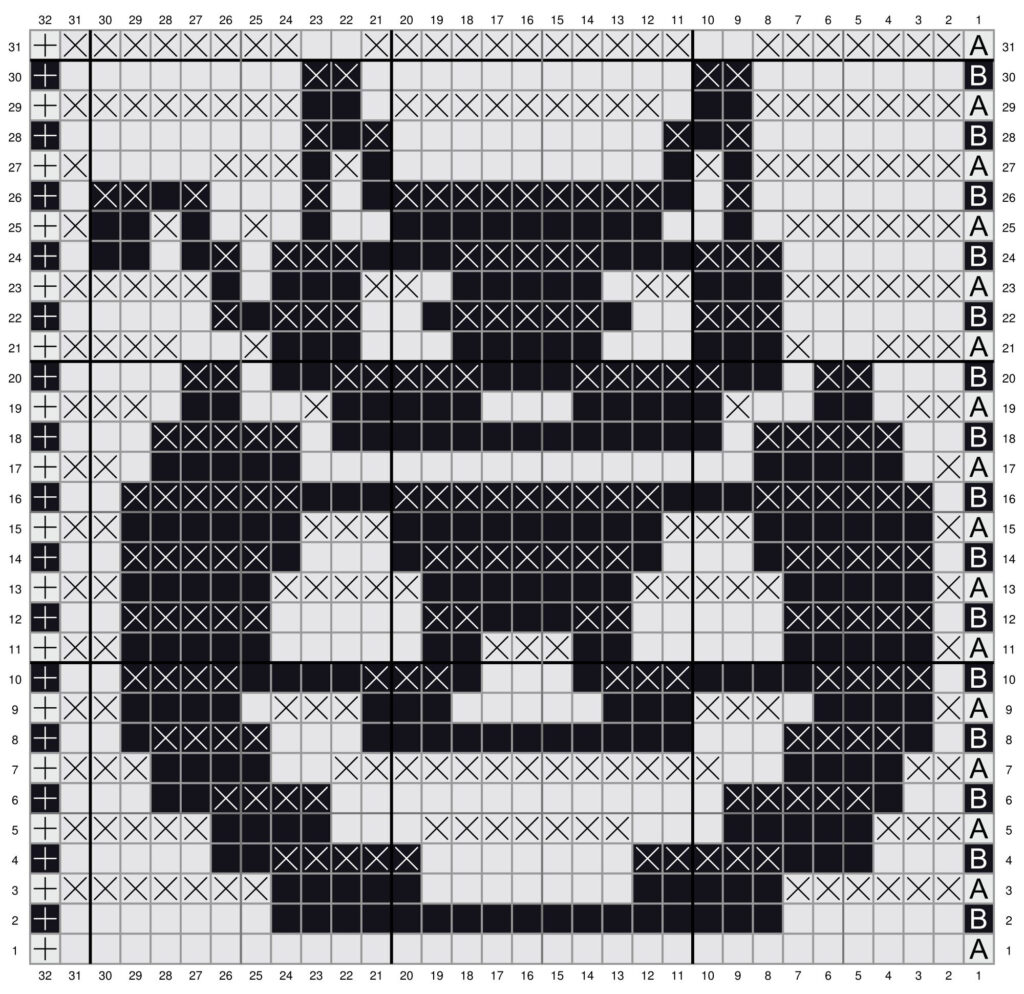
Pumpkin Purr-Fect Mosaic Crochet Pattern
Pattern Notes:
- Work from Right to Left – leaving a short tail on each end.
- Ch 1, cut & tie off at the end of each row.
- Repeat the stitches between the […].
- Envelope border instructions are below along with other border ideas and picture tutorials.
- 4 Color Stitch Fiddle Progress Tracker >>> Here. (for chart only, written pattern is not accurate for this graph, refer to written pattern below for that).
- 2 Color Stitch Fiddle Progress Tracker >>> Here.
How to Start the Pumpkin Purr-fect Mosaic Crochet Pattern
I worked it up one sided for quickness, but you can always work up the 2 color one in reversible. I haven’t (to date) created a 3 or 4 color mosaic in reversible form.
Starting Row:
- You can choose to work a Foundation Single Crochet Row of 33 or do a chain of 34 and work a row of single crochets back through the chain, starting at 2nd ch from hook.
- Just remember that your first row of single crochet is the first row of your chart.
- Foundation Crochet Row: After working your foundation row, begin working Row 2 of the chart.
- Starting Chains: After crocheting your starting chain, sc in the 2nd ch from the hook and across. Tie off. Add your yarn and begin working Row 2 of the chart.
Pumpkin Purr-Fect 4 Color Version
← Row 1 [RS]: With Color B, BBS in 1st stitch, BLOsc x30, EBS in last
← Row 2 [RS]: With Color A, BBS in 1st stitch, BLOsc x30, EBS in last
← Row 3 [RS]: With Color C (Carry Color B) BBS in 1st, (Col B) FLOdc x7, BLOsc x4, (Col C) BLOsc x7, (Col B) BLOsc x4, FLOdc x8, EBS in last
← Row 4 [RS]: With Color A, BBS in 1st stitch, [BLOsc x7, FLOdc x4] 2 times, BLOsc x8, EBS in last
← Row 5 [RS]: With Color C (Carry Color B) BBS in 1st, (Col B) FLOdc x4, BLOsc x4, (Col C) BLOsc x3, FLOdc x7, BLOsc x3, (Col B) BLOsc x4, FLOdc x5, EBS in last
← Row 6 [RS]: With Color A, BBS in 1st stitch, BLOsc x4, FLOdc x4, BLOsc x13, FLOdc x4, BLOsc x5, EBS in last
← Row 7 [RS]: With Color C (Carry Color B) BBS in 1st, (Col B) FLOdc x2, BLOsc x4, (Col C) BLOsc x2, FLOdc x13, BLOsc x2, (Col B) BLOsc x4, FLOdc x3, EBS in last
← Row 8 [RS]: With Color A, BBS in 1st stitch, BLOsc x2, FLOdc x4, BLOsc x17, FLOdc x4, BLOsc x3, EBS in last
← Row 9 [RS]: With Color C (Carry Color B) BBS in 1st, (Col B) FLOdc x1, BLOsc x4, (Col C) BLOsc x1, FLOdc x3, BLOsc x11, FLOdc x3, BLOsc x1, (Col B) BLOsc x4, FLOdc x2, EBS in last
← Row 10 [RS]: With Color A, BBS in 1st stitch, BLOsc x1, FLOdc x4, BLOsc x4, FLOdc x3, BLOsc x5, FLOdc x3, BLOsc x4, FLOdc x4, BLOsc x2, EBS in last
← Row 11 [RS]: With Color C (Carry Color B) BBS in 1st, (Col B) FLOdc x1, BLOsc x5, (Col C) BLOsc x5, BLOsc x2, FLOdc x3, BLOsc x7, (Col B) BLOsc x5, FLOdc x2, EBS in last
← Row 12 [RS]: With Color A, BBS in 1st stitch, BLOsc x1, FLOdc x5, BLOsc x5, FLOdc x2, BLOsc x3, FLOdc x2, BLOsc x5, FLOdc x5, BLOsc x2, EBS in last
← Row 13 [RS]: With Color C (Carry Color B) BBS in 1st, (Col B) FLOdc x1, BLOsc x5, (Col C) FLOdc x5, BLOsc x7, FLOdc x5, (Col B) BLOsc x5, FLOdc x2, EBS in last
← Row 14 [RS]: With Color A, BBS in 1st stitch, BLOsc x1, FLOdc x5, BLOsc x5, FLOdc x7, BLOsc x5, FLOdc x5, BLOsc x2, EBS in last
← Row 15 [RS]: With Color C (Carry Color B) BBS in 1st, (Col B) FLOdc x1, BLOsc x6, (Col C) FLOdc x3, BLOsc x9, FLOdc x3, (Col B) BLOsc x6, FLOdc x2, EBS in last
← Row 16 [RS]: With Color A, BBS in 1st stitch, BLOsc x1, FLOdc x6, BLOsc x3, FLOdc x9, BLOsc x3, FLOdc x6, BLOsc x2, EBS in last
← Row 17 [RS]: With Color C (Carry Color B) BBS in 1st, (Col B) FLOdc x1, BLOsc x7, (Col C) BLOsc x13, (Col B) BLOsc x7, FLOdc x2, EBS in last
← Row 18 [RS]: With Color A (Carry Col D), BBS in 1st stitch, BLOsc x2, FLOdc x6, BLOsc x5, (Col D) BLOsc x3, (Col A) BLOsc x5, FLOdc x6, BLOsc x3, EBS in last
← Row 19 [RS]: With Color C (Carry Color B) BBS in 1st, (Col B) FLOdc x2, BLOsc x4, (Col C) BLOsc x2, FLOdc x5, BLOsc x3, FLOdc x5, BLOsc x2, (Col B) BLOsc x4, FLOdc x3, EBS in last
← Row 20 [RS]: With Color A (Carry Col D), BBS in 1st stitch, BLOsc x4, FLOdc x2, BLOsc x3, (Col D) BLOsc x3, (Col A) BLOsc x5, (Col D) BLOsc x3, (Col A) BLOsc x3, FLOdc x2, BLOsc x5, EBS in last
← Row 21 [RS]: With Color C (Carry Color B) BBS in 1st, (Col B) FLOdc x4, BLOsc x2, (Col C) FLOdc x3, BLOsc x3, FLOdc x5, BLOsc x3, FLOdc x3, (Col B) BLOsc x2, FLOdc x5, EBS in last
← Row 22 [RS]: With Color D (Carry Col C), BBS in 1st stitch, (Col D) BLOsc x9, FLOdc x2, BLOsc x7, FLOdc x2, (Col C) BLOsc x10, EBS in last
← Row 23 [RS]: With Color C (Carry Color B) BBS in 1st, (Col B) FLOdc x6, (Col C) FLOdc x3, BLOsc x3, FLOdc x5, BLOsc x3, FLOdc x3, (Col B) BLOsc x2, FLOdc x5, EBS in last
← Row 24 [RS]: With Color D (Carry Col C), BBS in 1st stitch, (Col D) BLOsc x24, (Col C) FLOdc x1, BLOsc x5, EBS in last
← Row 25 [RS]: With Color C (Carry Color B) BBS in 1st, (Col B) FLOdc x7, (Col C) FLOdc x1, BLOsc x2, FLOdc x9, BLOsc x2, FLOdc x1, (Col B) FLOdc x2, [BLOsc x2, FLOdc x1] 2 times, EBS in last
← Row 26 [RS]: With Color D (Carry Col C), BBS in 1st stitch, BLOsc x8, FLOdc x1, BLOsc x11, FLOdc x1, BLOsc x4, (Col C) FLOdc x1, BLOsc x1, FLOdc x2, BLOsc x1, EBS in last
← Row 27 [RS]: With Color C (Carry Color B) BBS in 1st, (Col B) FLOdc x7, (Col C) FLOdc x1, BLOsc x1, FLOdc x1, (Col B) FLOdc x9, (Col C) FLOdc x1, BLOsc x1, FLOdc x1, (Col B) FLOdc x3, BLOsc x4, FLOdc x1, EBS in last
← Row 28 [RS]: With Color B, BBS in 1st stitch, BLOsc x30, EBS in last
← Row 29 [RS]: With Color C (Carry Color B) BBS in 1st, (Col B) FLOdc x7, (Col C) FLOdc x2, (Col B) FLOdc x11, (Col C) FLOdc x2, (Col B) FLOdc x8, EBS in last
← Row 30 [RS]: With Color B, BBS in 1st stitch, BLOsc x30, EBS in last
← Row 31 [RS]: With Color B, BBS in 1st stitch, FLOdc x30, EBS in last
Tie off and weave in all tails, then move on to creating the border below…
Pumpkin Purr-Fect 2 Color Version
← Row 1 [RS]: With Color A, BBS in 1st stitch, BLOsc x30, EBS in last stitch
← Row 2 [RS]: With Color B, BBS in 1st stitch, BLOsc x30, EBS in last stitch
← Row 3 [RS]: With Color A, BBS in 1st stitch, FLOdc x6, BLOsc x17, FLOdc x7, EBS in last stitch
← Row 4 [RS]: With Color B, BBS in 1st stitch, BLOsc x6, [FLOdc x5, BLOsc x7] 2 times, EBS in last stitch
← Row 5 [RS]: With Color A, BBS in 1st stitch, FLOdc x3, BLOsc x8, FLOdc x7, BLOsc x7, FLOdc x5, EBS in last stitch
← Row 6 [RS]: With Color B, BBS in 1st stitch, BLOsc x3, FLOdc x5, BLOsc x13, FLOdc x4, BLOsc x5, EBS in last stitch
← Row 7 [RS]: With Color A, BBS in 1st stitch, FLOdc x2, BLOsc x6, FLOdc x13, BLOsc x6, FLOdc x3, EBS in last stitch
← Row 8 [RS]: With Color B, BBS in 1st stitch, BLOsc x2, FLOdc x4, BLOsc x17, FLOdc x4, BLOsc x3, EBS in last stitch
← Row 9 [RS]: With Color A, BBS in 1st stitch, FLOdc x1, BLOsc x5, FLOdc x3, BLOsc x11, FLOdc x3, BLOsc x5, FLOdc x2, EBS in last stitch
← Row 10 [RS]: With Color B, BBS in 1st stitch, BLOsc x1, FLOdc x4, BLOsc x4, FLOdc x3, BLOsc x5, FLOdc x3, BLOsc x4, FLOdc x4, BLOsc x2, EBS in last stitch
← Row 11 [RS]: With Color A, BBS in 1st stitch, FLOdc x1, BLOsc x12, FLOdc x3, BLOsc x12, FLOdc x2, EBS in last stitch
← Row 12 [RS]: With Color B, BBS in 1st stitch, BLOsc x1, FLOdc x5, BLOsc x5, FLOdc x2, BLOsc x3, FLOdc x2, BLOsc x5, FLOdc x5, BLOsc x2, EBS in last stitch
← Row 13 [RS]: With Color A, BBS in 1st stitch, FLOdc x1, BLOsc x5, FLOdc x5, BLOsc x7, FLOdc x5, BLOsc x5, FLOdc x2, EBS in last stitch
← Row 14 [RS]: With Color B, BBS in 1st stitch, BLOsc x1, FLOdc x5, BLOsc x5, FLOdc x7, BLOsc x5, FLOdc x5, BLOsc x2, EBS in last stitch
← Row 15 [RS]: With Color A, BBS in 1st stitch, FLOdc x1, BLOsc x6, FLOdc x3, BLOsc x9, FLOdc x3, BLOsc x6, FLOdc x2, EBS in last stitch
← Row 16 [RS]: With Color B, BBS in 1st stitch, BLOsc x1, FLOdc x6, BLOsc x3, FLOdc x9, BLOsc x3, FLOdc x6, BLOsc x2, EBS in last stitch
← Row 17 [RS]: With Color A, BBS in 1st stitch, FLOdc x1, BLOsc x27, FLOdc x2, EBS in last stitch
← Row 18 [RS]: With Color B, BBS in 1st stitch, BLOsc x2, FLOdc x5, BLOsc x15, FLOdc x5, BLOsc x3, EBS in last stitch
← Row 19 [RS]: With Color A, BBS in 1st stitch, FLOdc x2, BLOsc x5, FLOdc x1, BLOsc x13, FLOdc x1, BLOsc x5, FLOdc x3, EBS in last stitch
← Row 20 [RS]: With Color B, BBS in 1st stitch, BLOsc x3, FLOdc x2, [BLOsc x3, FLOdc x5] 2 times, BLOsc x3, FLOdc x2, BLOsc x4, EBS in last stitch
← Row 21 [RS]: With Color A, BBS in 1st stitch, FLOdc x3, BLOsc x2, FLOdc x1, BLOsc x17, FLOdc x1, BLOsc x2, FLOdc x4, EBS in last stitch
← Row 22 [RS]: With Color B, BBS in 1st stitch, BLOsc x6, FLOdc x3, BLOsc x3, FLOdc x5, BLOsc x3, FLOdc x3, BLOsc x1, FLOdc x1, BLOsc x5, EBS in last stitch
← Row 23 [RS]: With Color A, BBS in 1st stitch, FLOdc x6, BLOsc x3, FLOdc x2, BLOsc x7, FLOdc x2, BLOsc x5, FLOdc x5, EBS in last stitch
← Row 24 [RS]: With Color B, BBS in 1st stitch, BLOsc x6, FLOdc x3, BLOsc x3, FLOdc x5, BLOsc x3, FLOdc x3, BLOsc x1, FLOdc x1, BLOsc x5, EBS in last stitch
← Row 25 [RS]: With Color A, BBS in 1st stitch, FLOdc x6, BLOsc x17, [FLOdc x1, BLOsc x2] 2 times, FLOdc x1, EBS in last stitch
← Row 26 [RS]: With Color B, BBS in 1st stitch, BLOsc x7, FLOdc x1, BLOsc x2, FLOdc x9, BLOsc x2, FLOdc x1, BLOsc x3, FLOdc x1, BLOsc x1, FLOdc x2, BLOsc x1, EBS in last stitch
← Row 27 [RS]: With Color A, BBS in 1st stitch, FLOdc x7, BLOsc x1, FLOdc x1, BLOsc x11, FLOdc x1, BLOsc x1, FLOdc x3, BLOsc x4, FLOdc x1, EBS in last stitch
← Row 28 [RS]: With Color B, BBS in 1st stitch, BLOsc x7, FLOdc x1, BLOsc x1, FLOdc x1, BLOsc x9, FLOdc x1, BLOsc x1, FLOdc x1, BLOsc x8, EBS in last stitch
← Row 29 [RS]: With Color A, BBS in 1st stitch, FLOdc x7, BLOsc x3, FLOdc x9, BLOsc x3, FLOdc x8, EBS in last stitch
← Row 30 [RS]: With Color B, BBS in 1st stitch, BLOsc x7, FLOdc x2, BLOsc x11, FLOdc x2, BLOsc x8, EBS in last stitch
← Row 31 [RS]: With Color A, BBS in 1st stitch, FLOdc x7, BLOsc x2, FLOdc x11, BLOsc x2, FLOdc x8, EBS in last stitch
Total: FLOdc x352, BLOsc x578, EBS in last stitch x31, With Color A, BBS in 1st stitch x16, With Color B, BBS in 1st stitch x15
Envelope Border Instructions
If you want to add a border to this – here is a quick tutorial!
🌸 Step 1: Create the Surface Stitch Border
- Follow the Envelope Border technique (below) to add a surface stitch along both sides of your project.
- Side 1: I start in the top right corner and work through two loops of 36. Side 2: Work into the ch 1 spaces created at the end of each row. Side 3 (bottom): Work through 2 loops of foundation row. Side 4: Same as Side 2.
- Turn your piece as needed to work along the edges.
🌸 Step 2: Work Half Double Crochets
- After making the surface stitch, work half double crochets (hdc) into the back loop only of the surface stitch around – do 3 hdc in the corner stitches to round it out.
🌸 Step 3: Side 2
- Flip your project over.
- Repeat Steps 1 & 2.
- When creating the surface stitch on the second side, align it directly underneath the stitch from the first side to keep the border neat and uniform.
🌸 Step 4: Finish the Sides
- Once both sides are bordered with hdc in the back loops, tie off the yarn and weave in any loose tails.
🌸 Step 5: Join and Close the Borders
- Join a Color A or Color B (your choice – I used ecru for my join on this one) in the stitch just to the left of your corner stitches along the top right edge.
- Holding the front and back of the envelope border together, work half double crochets through both layers to join them — this also encloses any yarn tails inside.
🌸 Step 6: Final Touches
- Tie off and weave in all remaining tails.
- You’re done!
Steam blocking or wet blocking makes it look picture perfect!
Enclosing the Tails
This pattern contains an envelope border to enclose the tails. I recommend tying and securing the tails before creating the envelope border, but it’s not necessary – picture tutorial is below for how to create the border. It’s easier than you think!
Envelope Border Pattern
Watch the tutorial video on YouTube here >>> Easy Envelope Border Tutorial to get you up to speed on creating this fun border to hide those pesky crochet tails! Then come back here and follow the written instructions.
- Follow instructions in the stitch guide to begin working the surface stitch, then…
- Work surface stitch around the entire pattern, join into the first surface stitch, cut & tie off.
- Round 1: (RS) Insert hook in any surface stitch (BLO). Hdc (BLO) in each surface stitch around, creating 3 hdc in each corner, join with a slip stitch in 1st hdc.
- Flip to the WS and repeat Steps 1 – 2, work your surface stitch just below the horizontal surface stitches from Round 1..
- After both sides are complete, insert hook in 1st stitch to the left of any corner, ch 1, hdc through the top two loops of each WS & RS all the way around, tucking tails in as you go.
- Join with invisible join, tie off and weave in any leftover tails.
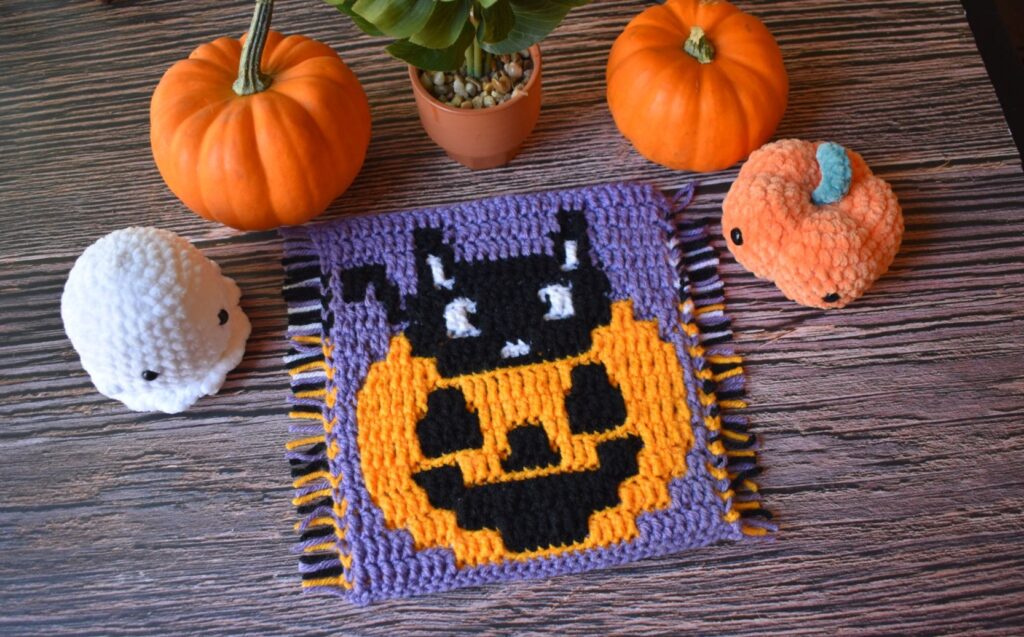
Thanks for being here and I hope you like this pattern!
Chills & Thrills Blog Hoppers!
Hey friends! This is a brand spanking new pattern and hope you love it. Please head over to the Infinite Yarniverse to get the PDF here >> Pumpkin Purr-Fect Kitty Mosaic Crochet Pattern

Thanks for being here friends! Show me your work, please tag me!