
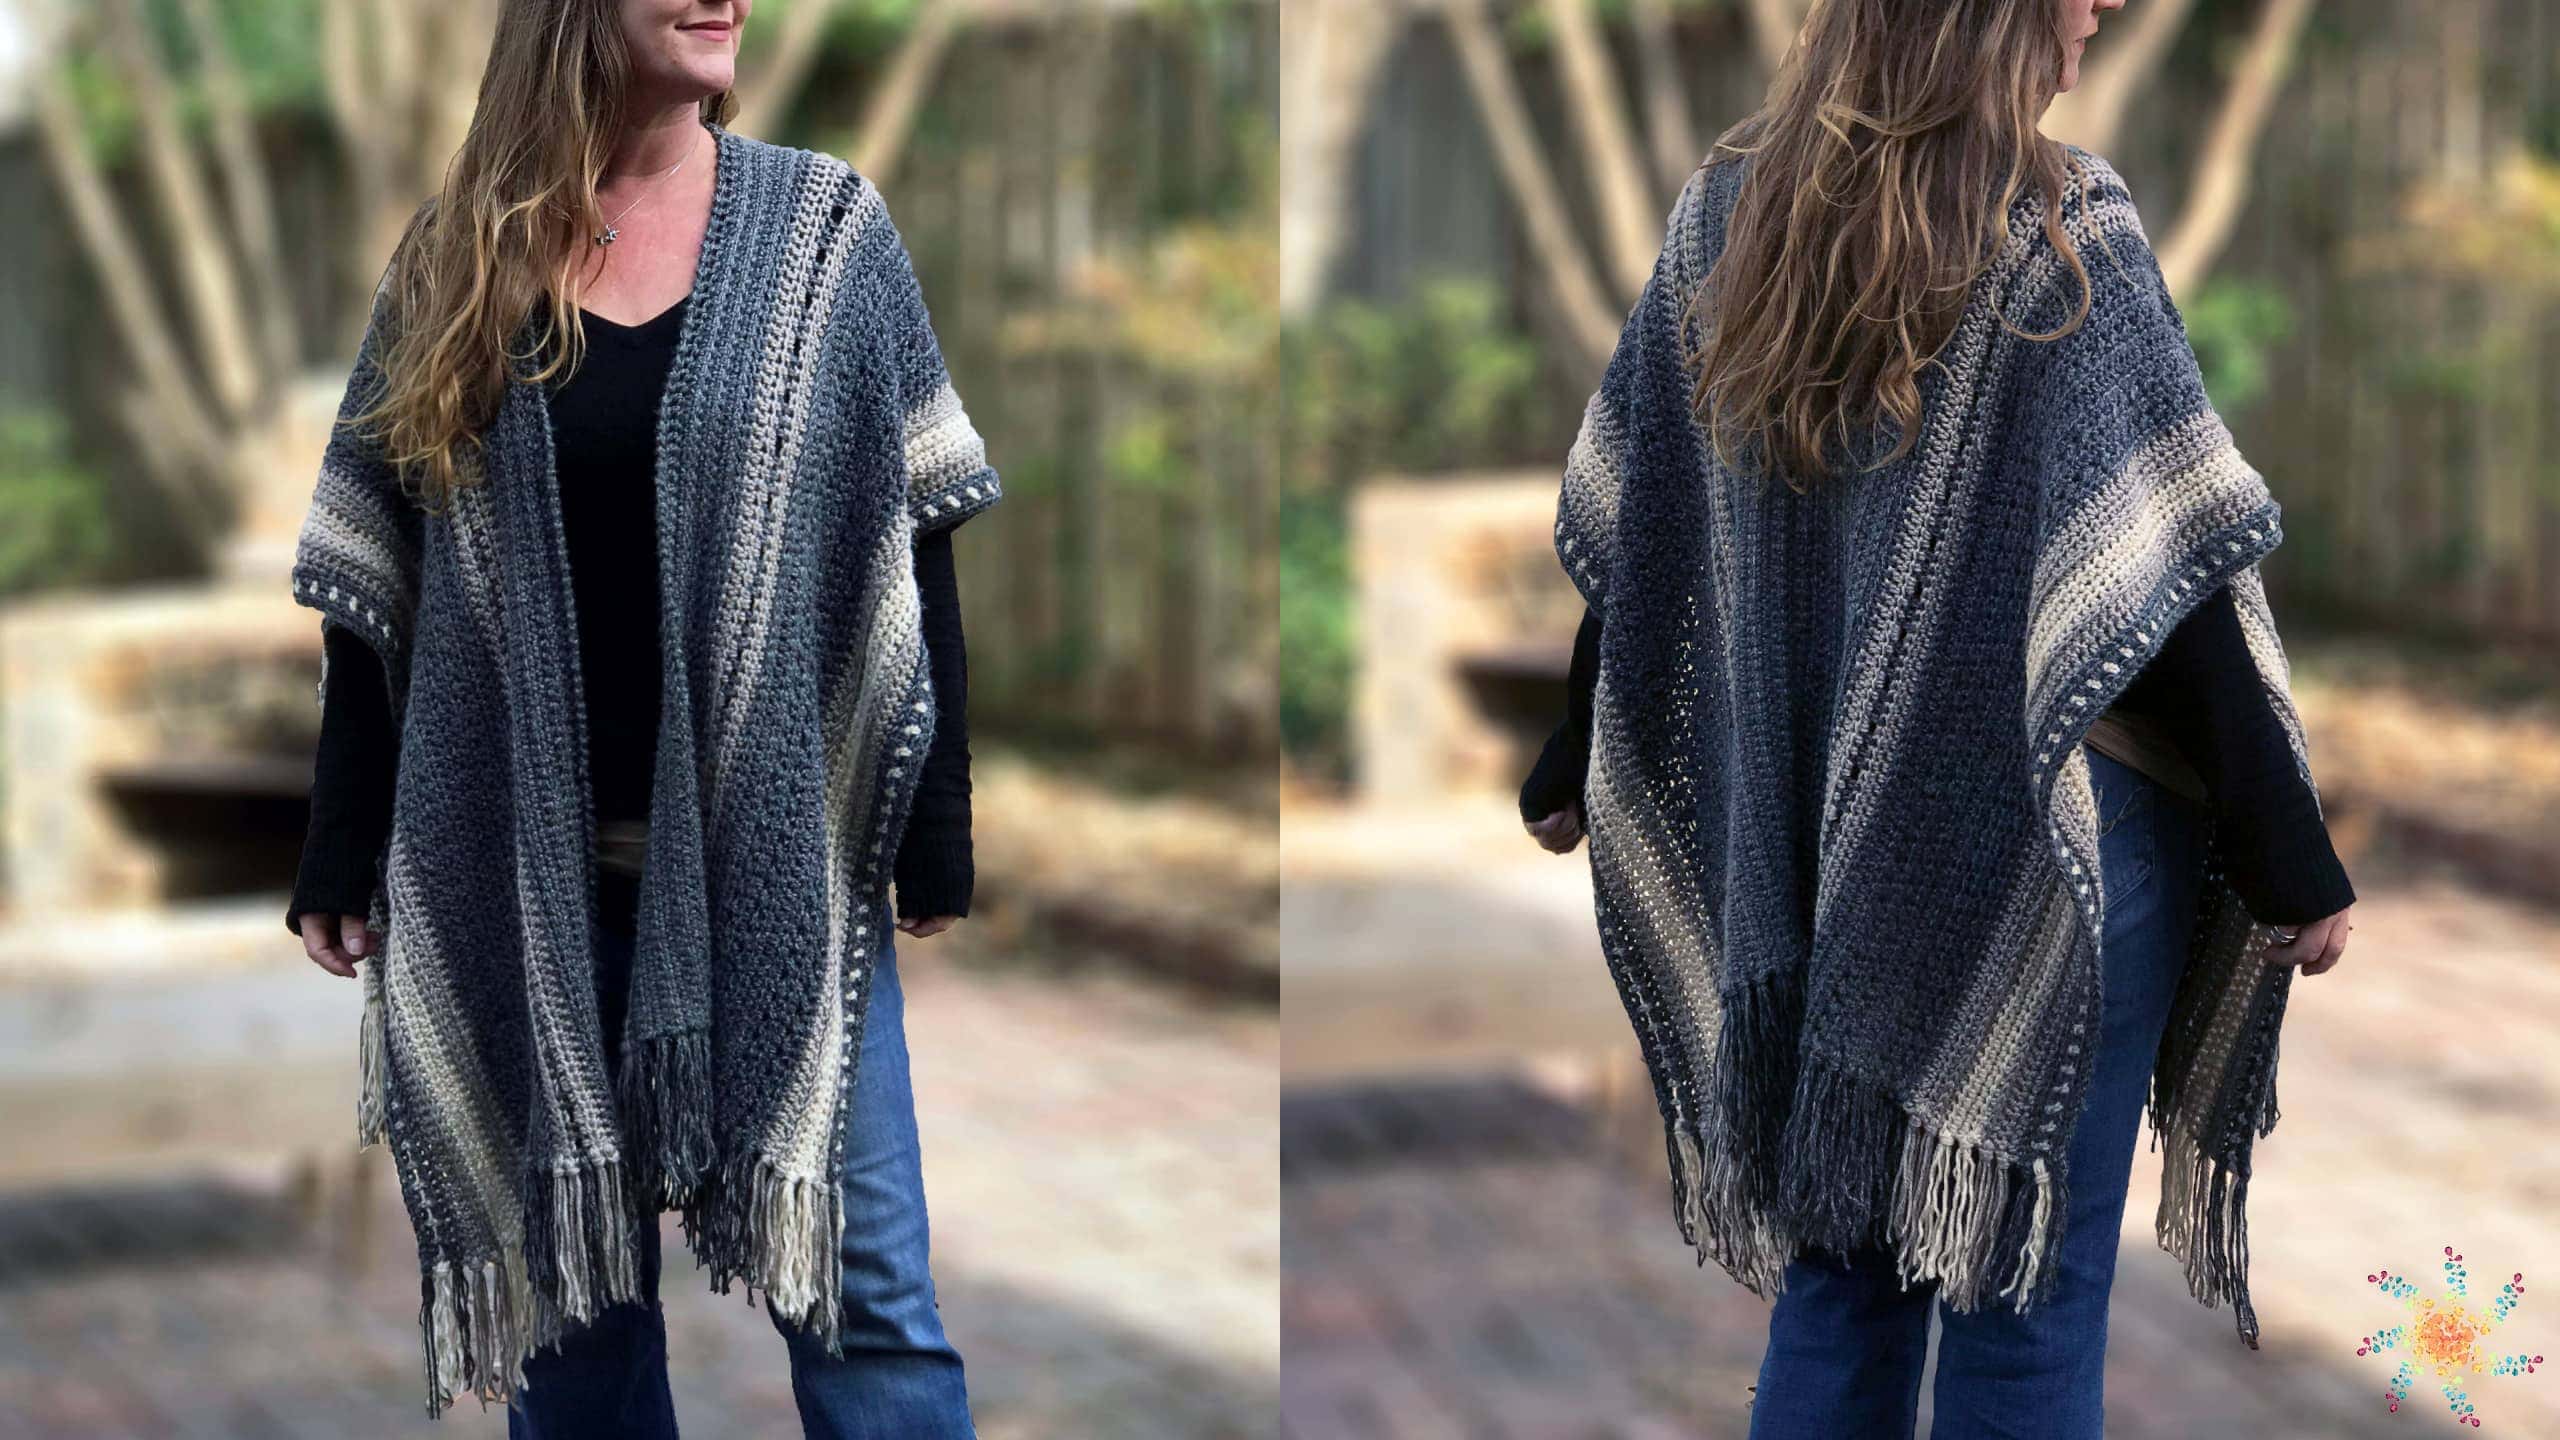

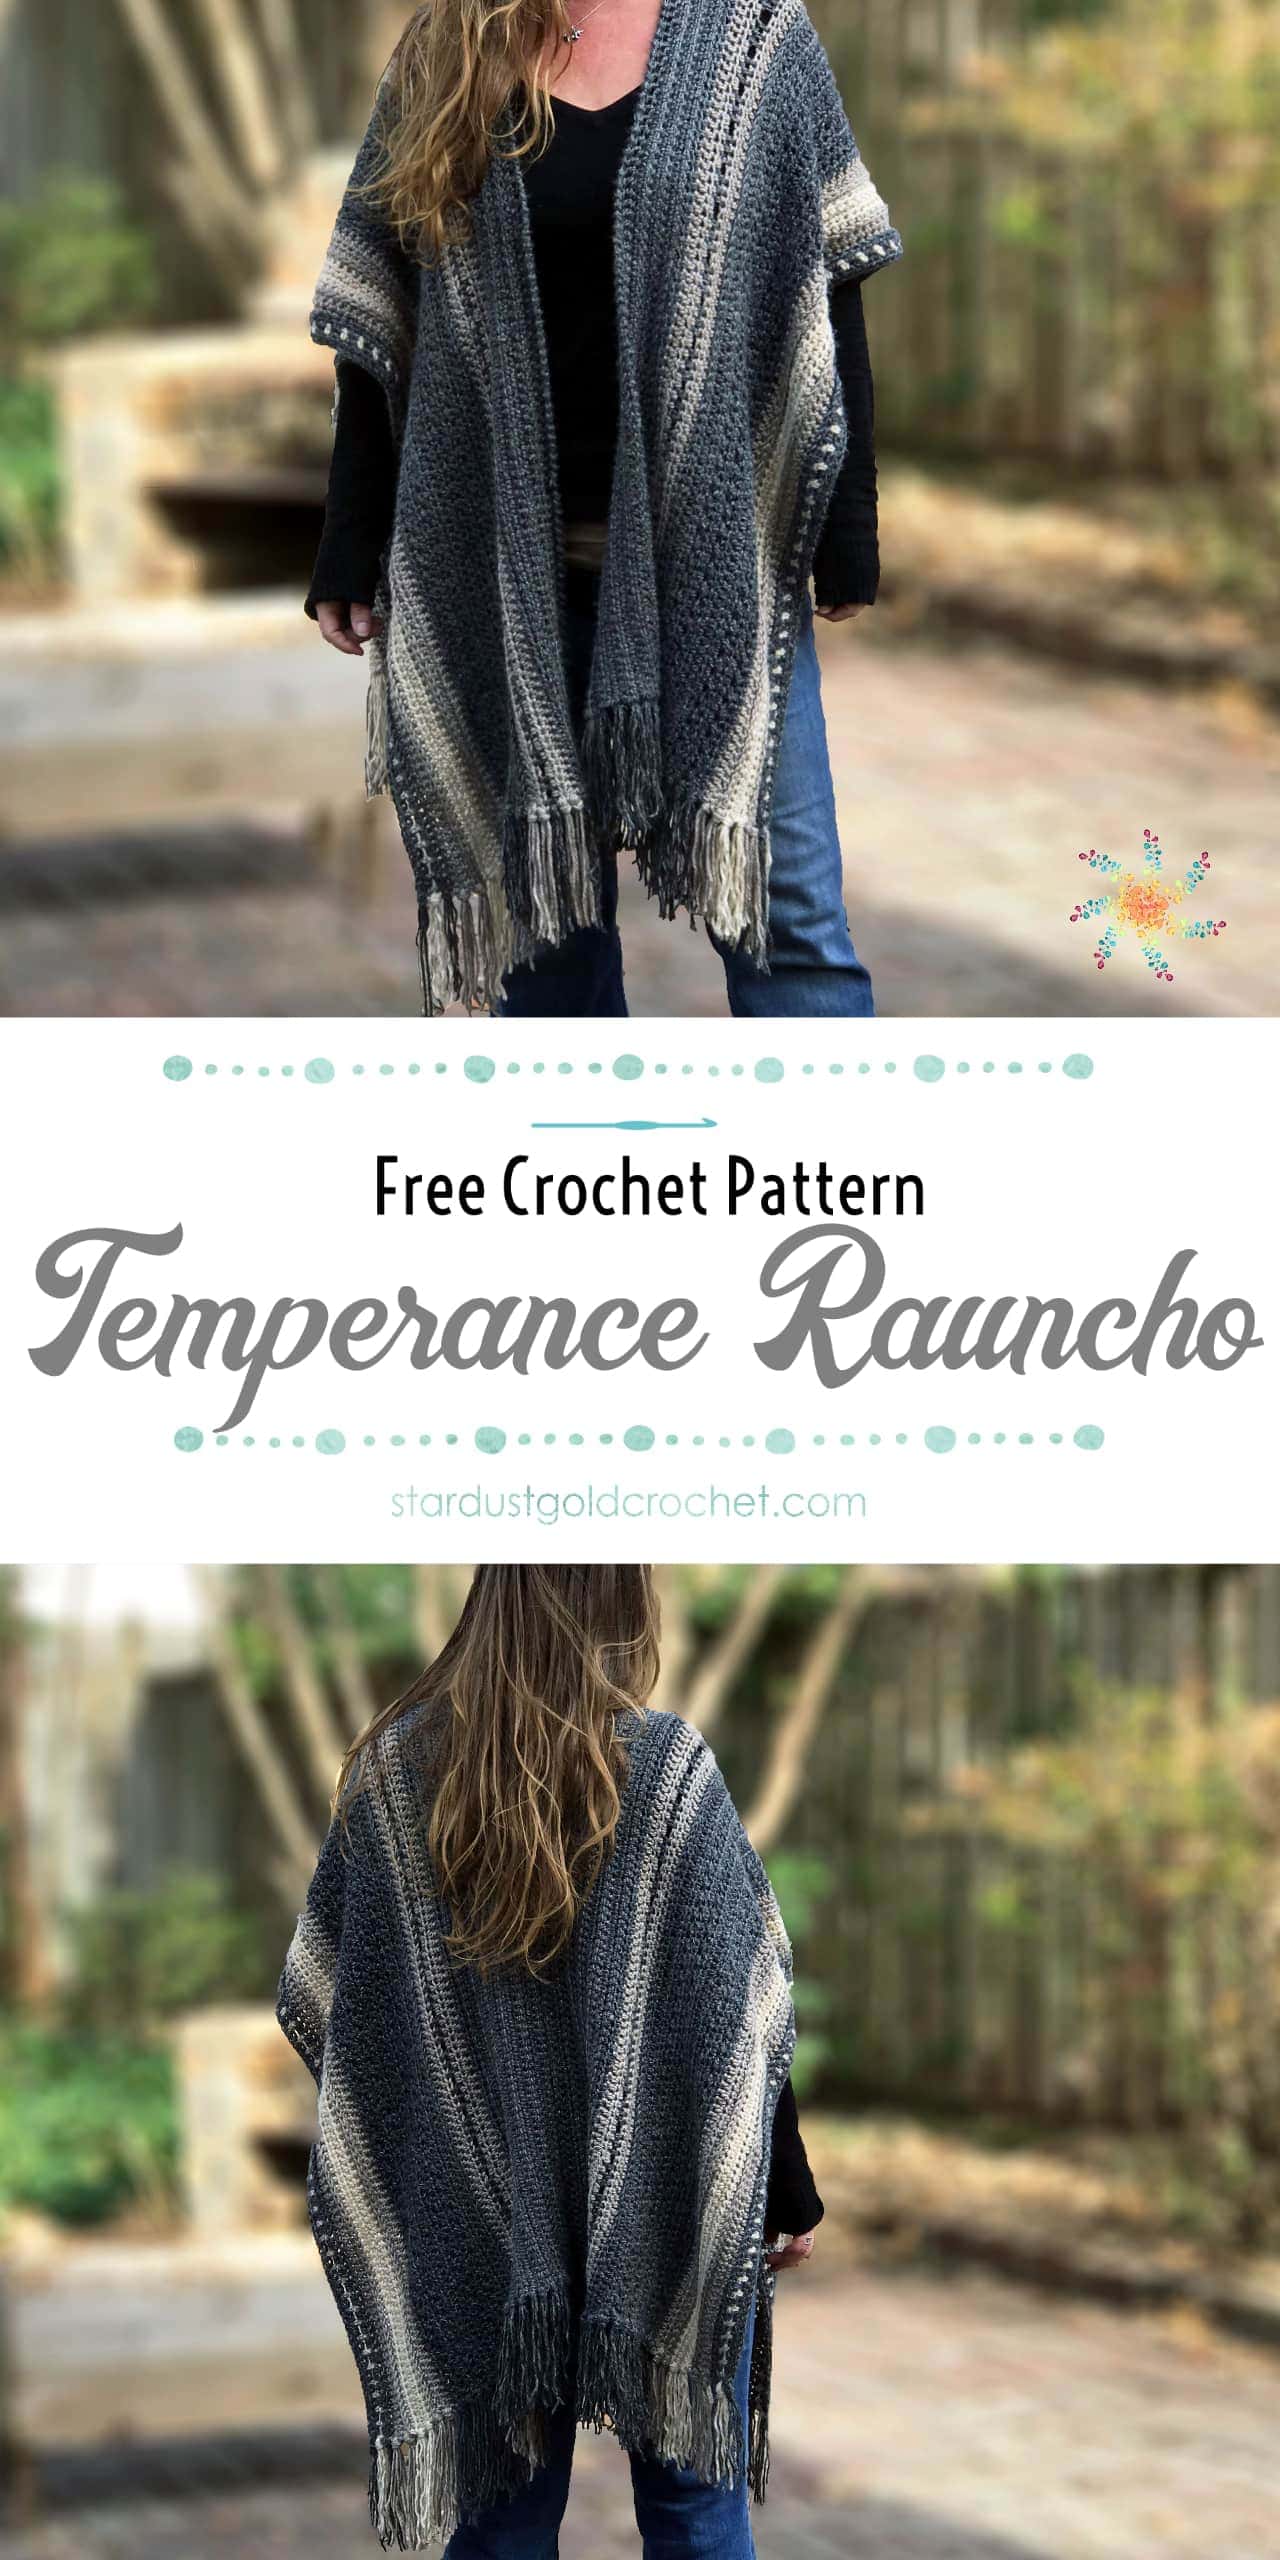
The Temperance Rauncho is a simply elegant design you can dress up or dress down with jeans. The name has a great story! It’s also a super easy crochet poncho / ruana.
My friend Crystal’s daughter’s name is Temperance (after Temperance Brennan from the show Bones), she’s 3 years old. She said, “It’s a rauncho!” because she tried to say ruana and poncho at the same time 😊, it was too cute!
The Temperance Rauncho was born! This has to be my new favorite go-to for going out, and if it isn’t too cold, it’s perfect. It’s great for wearing around the house too and will perfect for the office. It’s such an easy crochet poncho, you just won’t believe it.
Hashtag #TemperanceRauncho or #StardustGoldCrochet so I can see your creations!
Table of contents
A little bit about the yarn…
I used Lion Brand’s Heartland yarn. This is one of my favorite yarns on the market. It is so easy to work with, and the color selections are very earthy, which I love. It comes in a wide variety of tones, with solids, tweeds, and flecks of other colors throughout. You shouldn’t have any issues with this yarn at all. It also rips back easy, so that’s a positive too! 
Yarn subs for the Temperance Rauncho…
The best place to check for other yarn substitutes is the YarnSub website here.
The beauty of this pattern is you can sub out just about any worsted (4) weight yarn and create it. However, I do recommend trying to match the gauge if you do sub.
My tester, Crystal used a Red Heart yarn and a larger hook (because she crochets SUPER tight). Her holes for the beginning border were fairly large, so she modified hers by working Row 3’s stitches into the skipped hdc’s from Row 1 to close the gaps. (see photo below)


Mind you, this will change the look of the pattern slightly.

A little note about how this pattern is written…
As mentioned in the pattern notes below, the pattern is worked in rows. Which makes it a super easy crochet poncho.
You work the left panel first, then the right panel. You assemble the two panels with a running stitch, then work the border, adding the tassels at the very end.


More Holiday Crochet Patterns You May LOVE!


Gauge
2” = 4 rows or 12 fhdc = 4” (10 cm) Adjust hook size if necessary, to
obtain gauge.
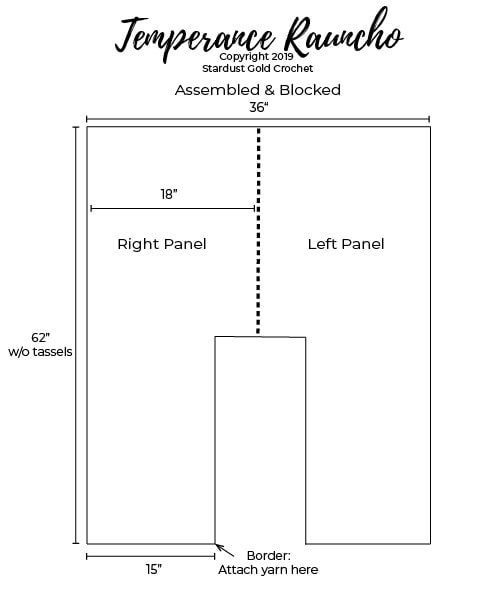
Sizes and Finished Measurements
Blocked and Assembled – Width: 36” (91 cm) x Tall: 62” (157 cm)
Materials
Suggested Yarn and Yardage
Lion Brand Heartland Yarn Solids: 100% Acrylic Tweeds: 94% Acrylic, 6% Rayon 5 oz, 251 yds per skein.
Colors Used In Pattern
- Color A: Great Smokey Mountains – 3-4 skeins (800-1000 yds)
- Color B: Acadia – 1 skein (251 yds)
- Color C: Grand Canyon – 1 skein (251 yds)
Other Materials
- Hook Size: US Size J (6 mm) crochet hook
- Scissors
- Darning Needle
Abbreviations
| fsc | foundation single crochet |
| sc | single crochet |
| hdc | half double crochet |
| dc | double crochet |
| ldc | linked double crochet |
| rvsc | reverse single crochet (crab stitch) |
| blo | back loop only |
| rep | repeat |
| beg | beginning |
| st(s) | stitch(es) |
| ch(s) | chains(s) |
| ea | each |
| *…* | rep instructions between asterisk however many times indicated. |

Stitch Guide
Stitches in pink are clickable links to a tutorial on how to create the stitch.
Sc – single crochet – insert hook in indicated st, yo, draw up a loop, yo draw through both loops on hook.
Hdc – half double crochet – yo, insert hook in indicated st, yo, draw up a loop, yo, draw through all three loops on hook.
Dc – double crochet – yo, insert hook in indicated st, yo, draw up a loop, *yo, draw through 2 loops* – rep from * to * until you have one loop left on the hook.
Special Stitches
(click stitch to see the tutorials)
fsc – foundation single crochet – create a slip knot. ch 2, insert hook in 1st
chain. yo, draw up a loop. ch 1, yo, draw through both loops on hook. (2nd st) insert hook in bottom two loops of ch 1. yo, draw up a loop, ch 1, yo, draw through both loops (2 fsc created).
rvsc – reverse single crochet – don’t turn your work to start. loosen loop on hook just a tad and working left to right. insert hook in indicated st. yo, draw up a loop (make it loose), yo, draw through both loops on hook.
ldc – linked double crochet – step 1: ch 3, insert hook in 2nd chain from hook, yo, pull up a loop, insert hook in same st as ch 3, yo, pull up a loop, *yo, pull through 2 loops* two times (1 ldc created) step 2: insert hook in front horizontal bar of ldc just created, yo, pull up a loop, insert hook in next st, yo, pull up a loop, *yo, pull through 2 loops* two times – rep step 2 for each new st.

Pattern Notes + Please Read
Skill Level: Easy to Intermediate
- Rauna is constructed by working 2 panels and sewing them together, then working a border around inside perimeter – tassels are optional and added later.
- Sizing is written in one size, see sizing adjustments below to modify.
- Foundation hdc row is counted in row count.
- Stitch count is 157 throughout, unless otherwise indicated.
Get the Printable PDF
You can purchase the PDF on Ravelry & Etsy and in the Infinite Yarniverse.
Ready? Let’s make it!
Temperance Rauncho – A Rauna & a Poncho all-in-one!

Pattern
with 6 mm hook… with Color A
Sizing Adjustments:
Length: Add foundation hdc in multiples of 2. Width: Add additional rows to between rows 23 – 25, which is a repeat of row 15.
Left Panel:
Mark RS with st marker
- Row 1 (WS): With Color A: Fhdc 157, finish last stitch with Color B.
- Row 2 (RS): Ch 2, turn. *hdc 1, ch 1, sk 1* – repeat from *…* across, ending with 1 hdc in last st, finish last stitch with Color A – 79 hdc, 78 ch sp’s – 157 sts total.
- Row 3: Ch 2, turn. *hdc 2 in next ch sp, rep from *…* across, ending with 1 hdc around ch- 2, finish last stitch with Color C – 157 hdc.
- Row 4: Ch 2, turn, hdc 1 (blo) in ea st across, hdc 1 in
last stitch – 157 hdc.
(Your rows should measure around 2” at this point).
Rows 5 – 19
- Row 5: Ch 1, turn, sc 1 in ea st across – 157 sc.
- Row 6: Ch 2, turn, hdc 1 in ea st across, finish last st with color B – 157 hdc.
- Row 7: Ch 2, turn, hdc 1 in ea front loop (camel hump) across, ending with 1 hdc in last stitch – 157 hdc.
- Row 8: Ch 1, turn, sc 1 in ea st across – 157 sc.
- Row 9: Ch 2, turn, hdc 1 in ea st across, finish last st with color C – 157 hdc.
- Row 10: Ch 2, turn, hdc 1 in each st across, ending with 1 hdc in last st – 157 sts.
- Row 11: Ch 1, turn, sc 1 in front loop (camel hump) of ea st across, sc 1 in last stitch – 157 sc.
- Row 12: Ch 2, turn, hdc 1 in each st across, finish last st with color A – 157 hdc.
- Row 13: Ch 2, turn, hdc 1 in ea st across – 157 hdc.
- Row 14: Ch 2, sk 1 st, dc 1 in next st, hdc 1 (working behind dc) into skipped st, *sk 1, dc 1, hdc 1 in skipped st (working behind dc)*, rep from *…* across, ending with 1 dc in last st – 157 sts.
- Row 15: Ch 2, hdc 1 in ea st across – 157 hdc.
- Row 16: Repeat Row 14.
- Row 17 – 19: Repeat Row 15.
(if you drop a stitch on this row, add one hdc at end).
Rows 20 – 32
- Row 20: Repeat Row 14.
- Row 21: Repeat Row 15.
- Row 22: Repeat Row 14.
- Row 23 – 25: Repeat Row 15 (on row 25, finish last st with color C).
- Row 26: Ch 2, turn, hdc 1 (blo) in ea st across – 157 sts.
- Row 27: Ch 2, hdc 1 in ea st across, finish last st with color A – 157 hdc.
- Row 28: Ch 2, turn, hdc 1, ch 1, sk 1, [hdc 2, ch 1, sk 1] 2 times, [hdc 3, sk 1, ch 1] 35 times, [hdc 2, ch 1, sk 1] 2 times hdc 1 in last 3 sts, finish last st with color C – 157 sts.
- Row 29: Ch 2, turn, hdc 1 in ea of next 2 sts, *hdc 2 in ch sp, hdc 1 in next st* (2 more times), *hdc 1 in ea of next 2 sts, hdc 2 in ch sp* (35 times), *hdc 1 in next st, hdc 2 in ch sp* (2 times), hdc 1 in last st – 157 sts.
- Row 30: Ch 2, turn, hdc 1 in ea st across, finish last st with color A – 157 hdc.
- Row 31: Ch 2, turn, hdc 1 in ea st across – 157 hdc.
- Row 32: Ch 3, turn, ldc 1 in ea st across – 157 ldc.
(my stitches went down to 156, so you need to work in the end chain as the last stitch for these rows)
Rows 33 – 42
- Row 33 – 37: Repeat Row 32.
- Row 38: ldc 1 in ea of next 78 sts – 78 ldc.
- Row 39: Ch 3, turn, ldc 1 in ea of next 78 sts – 78 ldc.
- Row 40 – 42: Repeat Row 39.
fasten off, weave in tails.
Right Panel:
Work rows 1-37, cut, fasten off.
Lay flat with RS up, starting at top left, count over 78 sts to the right and attach yarn in 78th st.
- Row 38: Ch 3, ldc 1 in same as join, ldc 1 in ea of next 77 sts – 78 ldc.
- Row 39: Ch 3, turn, ldc 1 in ea of next78 – 78 ldc.
- Row 40 – 42: Repeat Row 39.
Finishing & Assembly:
Assemble panels as seen in diagram below, sew along dotted line.
Creating the Neckline border:
Border: with RS facing up, attach yarn in bottom corner of right panel (see diagram above).
Row 1: Ch 2, dc 1 in same as join, dc 1 in ea of next 76 sts, dc3tog over next two sts, and beg of neck, dc 1 in ea of next 19 sts, dc3tog over next neck st and in next two sts on left panel, dc 1 in ea of next 77, do not turn – 156 sts
Row 2: Rvsc 1 in each st around – 156 rvsc
– cut, tie off, weave in all tails.
Tassels
Cut 3 strands around 11-12″ long, fold over and create the tassel. I extended the colors down from the pattern. I added one tassel at the end of each row. When folded over, they measure around 5-6″ long. I didn’t trim them after I attached them, however, I did wet block it. They still have a little bit of a curl to them despite the blocking, but I like that  .
.
Congratulations! You’re Finished!
I hope you enjoyed creating this pattern! Please share your finished works with me by using the hashtags mentioned above, I would love to see them. Pretty please share! Pin it, Instagram it with #temperancerauncho – sharing really is caring in the crochet world.
If you have any questions about this pattern, please join my pattern support group Stardust Gold Crochet & Friends here. 
I’d love to see your work! Use hashtags on FB & IG #stardustgoldcrochet #temperancerauncho
Thanks for stopping by and making beautiful things with me, PLEASE SHARE AND PIN! IT’S HOW I KEEP MY PATTERNS FREE!
If you’d like to collaborate with me, please send me a message or leave a comment, I would love to work with you!


All photos and pattern are property of Stardust Gold Crochet. Feel free to sell items created from this pattern, but please do not copy, distribute, or sell this pattern as your own. This post contains affiliate links, if you happen to purchase from my links, I will earn a few cents :). Thank you for that!
The link to the free PDF for the Ariana pattern is not working. Have tried several times on different devices and nothing! I’d appreciate if you would send me the PDF by email or fix the link, please.
I started this a few years ago, I got frustrated and put it away. I felt it was time to take it out again and finish it. I found some of the rows difficult to understand how to do them. I’ve ripped it apart so many times. I’m putting it down now for a while..I wish there was a tutorial for this pattern.
Edited to add.Specifically rows 28 and 29. I could not get row 29 to come out right…I’m very frustrated at this point
Never got the pattern 🙁 since the day it came out I tried the link still doesn’t work today
The links that should work for this pattern still don’t, but if you scroll down to the heading, “ Get The Printable PDF “ and click on the link for the Infinite Yarniverse, it will take you to a page where you can get the ruana pattern by subscribing to her newsletter. Or just go here: https://community.stardustgoldmedia.com/temperance-rauncho
Thank you for the link, it did work!
Did anybody ever get a reply on the problem of the link not working? I emailed the creator yesterday with no response.
The links that should work for this pattern still don’t, but if you scroll down to the heading, “ Get The Printable PDF “ and click on the link for the Infinite Yarniverse, it will take you to a page where you can get the ruana pattern by subscribing to her newsletter. Or just go here: https://community.stardustgoldmedia.com/temperance-rauncho
The links still don’t work for the Ruana pattern, but this is how you get it: Scroll down to the heading, “Get The Printable PDF“. Under that you will see this option: “You can purchase the PDF on Ravelry & Etsy and in the Infinite Yarniverse.” Clicking on the Infinite Yarniverse link will take you to a page where you can get the PDF pattern by signing up for her email.
Many thanks for this. Was stuck in an endless loop of being redirected back to the page and didn’t think to click on any of those links.
Glad I could help. It was quite frustrating.
Link for the blog hop is here: https://community.stardustgoldmedia.com/temperance-rauncho
Laura, I see you beat me to it, and in a much more straightforward manner. Hopefully people who want the pattern will follow your link.
Hello Tasha, the link didn’t work yesor today. I did reply to the email but no response yet.
Link for the Autumn blog hop didn’t work for me either.
So disappointed this link doesn’t work, I’ve tried so many times as I’d love to make this ruana
Have tried many times to get this pattern. Link doesn’t work.
Been trying since yesterday to get a working link. It’s been close to if not over 24 hours and the link still isn’t working.
HiI’m also having trouble downloading this one!I’ve also been trying since yesterday morning uk time to this morning.
Hi! As the others have said, the link is broken. Will this be available tomorrow? Thank you for the blog hop!
Link is still not working
Link is not working for the Autumn blog hop.
I’m with the others. I’ve tried various times today with the link, but it didn’t work for the direct download of the PDF for the bloghop.
Sadly, link still not working 😢
I have been trying to get in todays pattern, but the ( Blog Hop Pattern link still not working) Temperance Rauncho/Ruana Free Crochet pattern by Stardust Gold crochet I hope you can help. Thank you
Blog Hop Pattern link still not working 🙁
Link STILL not working, how sad, would have liked the Pdf.
Link not working. Sad
Link is still not working
The link is not working dear! Thought you should know.
link for today’s bloghop not working
If this is a PDF the link for it is not working
The link is not working.
The link for the pattern isn’t working.
Hello. My name is Carol, and I’m excited to start on this pattern once I get the yarn. I’m just wondering why the yarn on the pattern is grey, but the picture shows it as blue.
It’s grey yarn. It has blue undertones for sure.
It’s not blue. It’s grey, perhaps it’s the computer tone or image colors?
Hi, this is one of the first times I’m crocheting with a written pattern. I’m having trouble understanding row 14. I don’t think I’ve ever come across this type of pattern stitch. Is there a video or any other reference you can give so I can learn how to do it.
This piece is so beautiful! I’m new to crochet and don’t know how to read patterns yet but I’ve saved it when I can! Thanks for sharing🌸
I’m not sure the gauge information makes sense. If 12 hdc = 4″, and you have a starting chain of 157 hdc, then that would come out to only 52″ tall rather than 62″ as you say. Can you advise?
Hdc usually stretches. I went by my finished piece to get the measurements. You know how crochet is…
I can’t believe the one pictured that you are wearing is only 157 stitches long. It seems to hang much lower than what I worked up as 157 stitches. I increased the project to 207 stitches. Although I am 5’9”. 😁 Not quite done with it and so far it is working up beautifully. Only downside is , I have to buy more yarn to complete it. 🤷♀️
Hi, I would like the yarn name and colors used in the pictures. They have a blue grayish color to them. Thank you.
I hope I understand what you’re referring to. The colors in the main picture are the ones listed. They have a blue undertone, but they are actually grey.
Hi, would you tell me the names of the testers colors she used. Thank you.
I’ll ask her!
I LOVE this pattern! It was easy to make, with great instructions, yet kept my interest with the different stitches. Turned out really well and I get a ton of compliments. Can’t wait for cold weather so I can start wearing it again!
Thank you! This is one of my favorite designs and it was definitely a labor of love for me (I like quick projects!) :). I wanted to do linked double crochet because I wanted it to be functional too ya know? Warm :). I wear mine ALL the time. Please show me yours! I want to see it! Message me on Facebook, or send via e-mail. Pretty Please!