
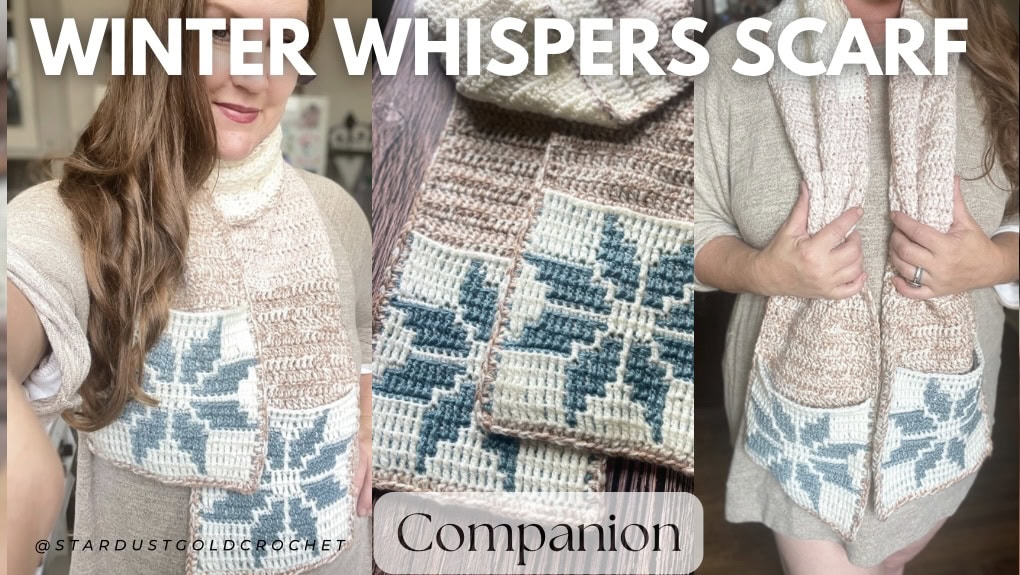
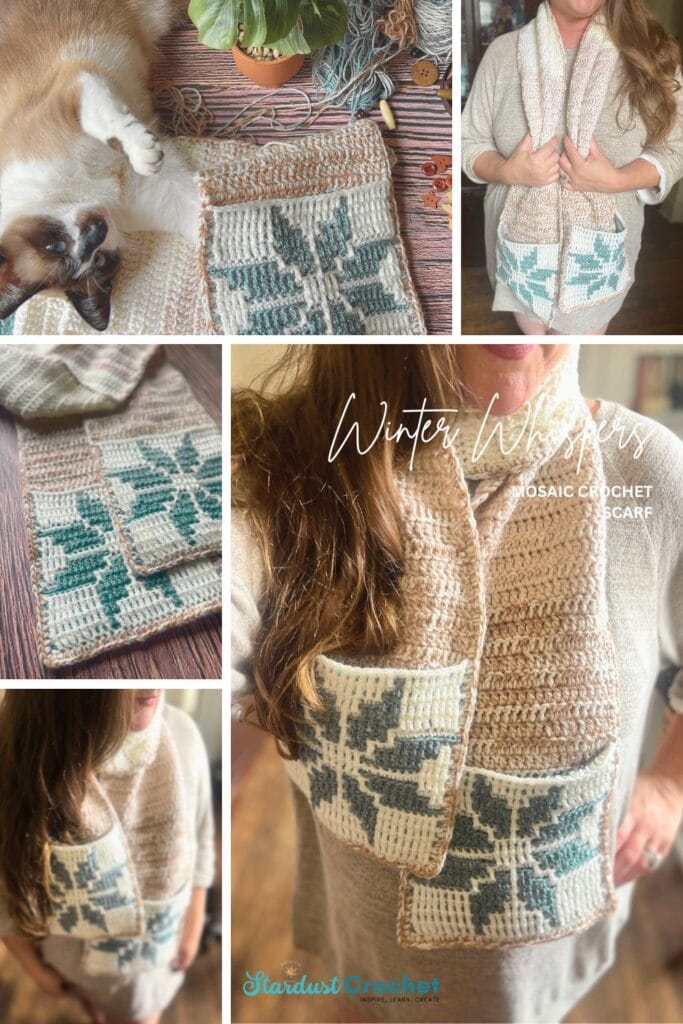
Welcome friends! It mixes traditional and mosaic crochet techniques. Sprinkle some winter enchantment into your crochet with the Winter Whispers pocket scarf! ❄️✨
This stunning mosaic crochet pattern brings the magic of a snowy wonderland to life, creating a scarf that’s as delightful to wear as it is to make. Choose your adventure with both charted and written instructions and craft a cozy accessory that’s sure to be a favorite for the chilly season. Get ready to create a truly magical crochet treat! 🧶💖Includes video tutorials to help you create the mosaic crochet portion too!
GET THE PDF HERE
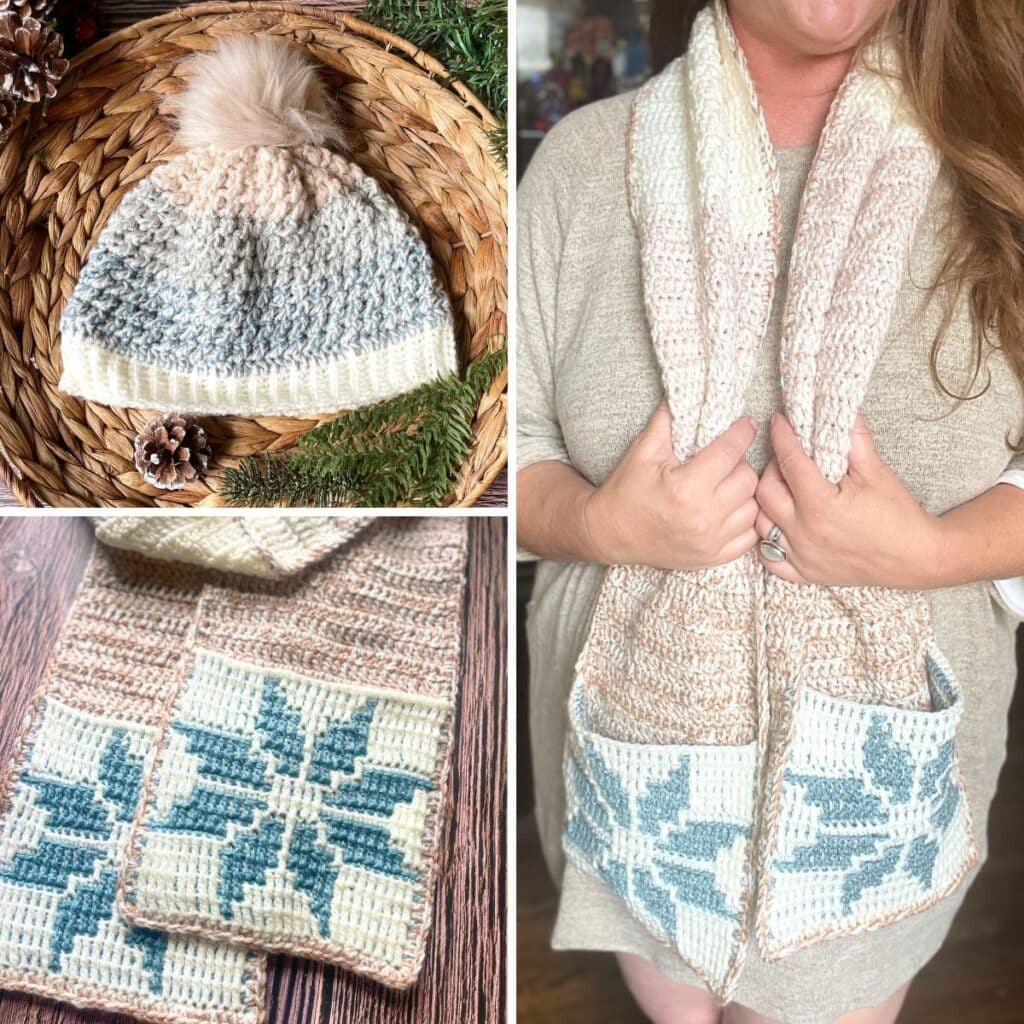
if you like a printable ad-free version, here is a great 2 in 1 PDF that includes both the beanie and scarf pattern – Winter Whispers Scarf & Beanie Set PDF
COMPANION BEANIE & VIDEO
if you want to watch the companion video I made for the scarf you can click the image below or click this link, winter whispers scarf video companion.
and check out the winter whispers beanie post over here.
Get notified of new pattern releases by becoming a Stargazer (my newsletter). Sign up here!. Grab all my patterns in the Lifetime Bundle! 139 patterns + ALL future patterns (excludes exclusive Colorwork Club patterns) – get 70% OFF NOW. Join the Colorwork Club here.
I hope you enjoy this easy pattern. Pattern support? Head over to Stardust Gold Crochet & Friends.
More Free Crochet Pattern You’ll Love


You can use ANY weight yarn with mosaic patterns. I chose to use a 3-weight yarn for the star pocket with a 4.5 mm hook and doubled up two 3 weight yarns with a 5.5 mm hook for the scarf body.
All About the Yarn…
I went with Yarnsmith’s DK (100% Acrylic) yarn for the main color (off-white) & Premier DK Colors in Strata for the complimentary color. These are both 3-weight yarns.
If you’re familiar with Overlay Mosaic Crochet, skip on down to the Recommended Yarn & Yardage Details.
The star pocket cover is done using a technique called overlay mosaic crochet. However, you can work the chart / pattern in tapestry crochet, although you may need to double up the yarn to get the proper gauge / size.
How to do Overlay Mosaic Crochet.
Overlay mosaic crochet is a specific type of mosaic crochet where you work with two contrasting colors, but only one color per row. The magic happens by using a combination of single crochet (BLOsc) and front loop only dc (FLOdc) stitches to create the design. The FLOdc stitches are worked two rows below your current row, allowing the contrasting color from previous rows to peek through, creating the mosaic effect.
This pattern uses two colors but these are helpful tutorials if you want to play with color.
Key Aspects of Overlay Mosaic Crochet:
- One color per row: You cut the yarn after each row, then add the color to the beginning of the next row.
- No turning: You work each row from the right side (or “front”) of the fabric.
- Direction of Work: Right to left (can be worked left to right as well for the lefties out there!)
- Stitch combination: The interplay of BLOsc and FLOdc stitches creates the pattern.
- Charts: Overlay mosaic crochet patterns typically rely on charts to guide the placement of stitches and color changes, however, written patterns are also helpful.
Basic Steps:
- Foundation chain: Start with a foundation chain (or chain + 1 for turning) in your main color. The number of chains will depend on the pattern.
- Border stitches: Most patterns begin and end each row with a border stitch (usually a single crochet placed diagonally into the V of the single crochet below to secure it).
- Follow the chart or written pattern: Use the chart to determine whether to work a BLOsc or a FLOdc in each stitch. Empty squares are BLOsc (regardless of what color the square is) and X’s are FLOdc regardless of what color the square is.
Tips for Success:
- Fixing mistakes: The beautiful thing about overlay mosaic crochet is it is easy to fix mistakes even from a few rows down. Simply untie the knot on the left side, rip back the first row, then do the same for the rows below until you reach the stitch you missed or made a mistake on. Fix it and finish crocheting the rows above.
- Read your chart carefully: Pay close attention to the symbols on the chart to ensure you’re working the correct stitches in the right places. Sometimes this can be confusing at first because the color of the square may not match – but trust the process.
- Block your finished piece: Blocking will help even out your stitches and showcase the mosaic design.
Abbreviations / Legend
| Square | Abbreviation | Description |
| A | With Color A, BBS in 1st stitch, ch 1 | Beginning Border Stitch |
| B | With Color B, BBS in 1st stitch, ch 1 | Beginning Border Stitch |
| Empty Square (colored or not) | BLOsc | Back Loop Only Single Crochet |
| Squares with X (colored or not) | FLOdc | Front Loop Only Double Crochet |
| + | Ch 1, EBS in the last stitch | Ending Border Stitch |
| Yo | Yarn Over | |
| Dc | Double Crochet | |
| Sc | Single Crochet | |
| Color A, B |
Stitch Guide
BBS – Beginning Border Stitch: It’s a single crochet stitch, placed between the V of the single crochet below. Insert your hook into the designated stitch or space. Yo and pull up a loop. Yarn over again and draw the yarn through both loops on the hook. (it’s a single crochet)
BLOsc – Back Loop Only Single Crochet: Insert your hook into the back loop only of the designated stitch. Wrap the yarn over your hook and pull up a loop. Yarn over again and draw the yarn through both loops on the hook.
FLOdc – Front Loop Only Double Crochet (aka drop down dc): Yo, insert your hook into the front loop only 2 rows down. Yo and pull up a loop. Yarn over and draw through two loops on the hook.
EBS – Ending Border Stitch: Insert your hook into the designated stitch or space (between the V’s of the single crochet). Wrap the yarn over your hook and pull up a loop. Yarn over again and draw the yarn through both loops on the hook. Fasten off the yarn. (it’s a single crochet)
Std – Stacked Double Crochet
Turn, insert hook in 1st stitch, yo, pull up a loop, yo, pull through both loops (1 sc created). Insert hook in left post of the V, yo, pull up a loop, yo, pull through both loops – 1 std created.
Dc – Double Crochet: Yo, insert hook in indicated stitch. Yo and pull up a loop. Yo and pull through two loops (2 times).
Sc – Single Crochet: Insert hook in indicated stitch. Yo and pull up a loop. Yo and pull through both loops on the hook.
Materials:
- 4.5 mm (USA G Hook) – pockets
- 5.5 mm (USA H-8 Hook) – body of scarf
- Scissors
- Buttons / zipper (optional)
- Darning Needle
Recommended Yarn & Yardage Details:
Recommended Yarns:
Yarnsmiths Create (DK) in white or off white Skein Weight: 3.52 oz. / 100 g Yardage: 317.24 yd. / 290 m.
Premier Colors DK in Strata (or your favorite colors – they have so many!) Skein Weight: 5 oz. / 140 g Yardage: 383 yd. / 350 m.
After completing the scarf, I had a lot of yarn leftover.
You can use any weight yarn you’d like of course, however, using a 4 weight or smaller yarn is recommended. Most people prefer to crochet mosaic crochet patterns using a DK (3-weight) yarn because using a worsted (4-weight) yarn can create a very large scarf and use a LOT of yarn.
Total Scarf Yardage/Skeins
- Color A (MC – White or Cream): 2 skeins
- Color B (CC – DK Colors in Strata): 407 yds (372 m) – 2 skeins
Starting Chains & Foundation Rows (for the STAR)
I recommend using a foundation single crochet (<< learn how here) because it stretches easier and gives a better flow to a blanket. With foundation rows, you crochet the same number of stitches as your graph.
You can choose to work a foundation row or do a chain and work a row of single crochets back through the chain.
Just remember that your first row of single crochet is the first row of your chart.
Foundation Row To Start
Foundation Crochet Row: After working your foundation row, begin working Row 2 of the chart.
- Create a FSC row of 29 to start.
Using a Chain to Start
Starting Chains: After crocheting your starting chain (29 chains + 1 = 30 chains), sc in the 2nd ch from the hook and across. Tie off. Add Color B in stitch 1 and begin working Row 2 of the chart
Notes: The chains at the beginning and end of each row are a foundation for the border to create a cleaner edging to work into and enclose the BBS & EBS stitches. These are not counted as stitches and never worked into unless indicated.
Measurements:
Snowflake Pockets: 7″ wide (18 cm) x 8″ tall (20 cm).
Total Scarf with edging: 7.5″ wide (19.05 cm) x 64.5″ tall (163.83 cm), 4 ft wide (1.22 m) x 3 ft tall (0.91 m)
Winter Whispers Pocket Scarf in Mosaic Crochet
Main Snowflake Pattern Stitch Fiddle Progress Tracker
Snowflake Pockets Pattern (Make 2):
GRAPH ON PAGE 12.
Choose your two colors, I used White for Color A and DK Colors for Color B.
← Row 1 [RS]: With Color A, BBS in 1st stitch, ch 1, BLOsc x27, ch 1, EBS in last stitch.
← Row 2 [RS]: With Color B, BBS in 1st stitch, ch 1, BLOsc x27, ch 1, EBS in last stitch.
← Row 3 [RS]: With Color A, BBS in 1st stitch, ch 1, FLOdc x8, BLOsc x1, FLOdc x9, BLOsc x1, FLOdc x8, ch 1, EBS in last stitch.
← Row 4 [RS]: With Color B, BBS in 1st stitch, ch 1, BLOsc x8, FLOdc x1, BLOsc x9, FLOdc x1, BLOsc x8, ch 1, EBS in last stitch.
← Row 5 [RS]: With Color A, BBS in 1st stitch, ch 1, FLOdc x8, BLOsc x2, FLOdc x7, BLOsc x2, FLOdc x8, ch 1, EBS in last stitch.
← Row 6 [RS]: With Color B, BBS in 1st stitch, ch 1, BLOsc x8, FLOdc x2, BLOsc x7, FLOdc x2, BLOsc x8, ch 1, EBS in last stitch.
← Row 7 [RS]: With Color A, BBS in 1st stitch, ch 1, FLOdc x8, BLOsc x4, FLOdc x3, BLOsc x4, FLOdc x8, ch 1, EBS in last stitch.
← Row 8 [RS]: With Color B, BBS in 1st stitch, ch 1, BLOsc x8, FLOdc x4, BLOsc x3, FLOdc x4, BLOsc x8, ch 1, EBS in last stitch.
← Row 9 [RS]: With Color A, BBS in 1st stitch, ch 1, FLOdc x8, BLOsc x5, FLOdc x1, BLOsc x5, FLOdc x8, ch 1, EBS in last stitch.
← Row 10 [RS]: With Color B, BBS in 1st stitch, ch 1, BLOsc x9, FLOdc x4, BLOsc x1, FLOdc x4, BLOsc x9, ch 1, EBS in last stitch.
← Row 11 [RS]: With Color A, BBS in 1st stitch, ch 1, BLOsc x8, [FLOdc x1, BLOsc x4] 2 times, FLOdc x1, BLOsc x8, ch 1, EBS in last stitch.
← Row 12 [RS]: With Color B, BBS in 1st stitch, ch 1, BLOsc x2, FLOdc x6, BLOsc x3, FLOdc x2, BLOsc x1, FLOdc x2, BLOsc x3, FLOdc x6, BLOsc x2, ch 1, EBS in last stitch.
← Row 13 [RS]: With Color A, BBS in 1st stitch, ch 1, FLOdc x2, BLOsc x8, [FLOdc x1, BLOsc x2] 2 times, FLOdc x1, BLOsc x8, FLOdc x2, ch 1, EBS in last stitch.
← Row 14 [RS]: With Color B, BBS in 1st stitch, ch 1, BLOsc x4, FLOdc x6, BLOsc x7, FLOdc x6, BLOsc x4, ch 1, EBS in last stitch.
← Row 15 [RS]: With Color A, BBS in 1st stitch, ch 1, FLOdc x4, BLOsc x7, FLOdc x5, BLOsc x7, FLOdc x4, ch 1, EBS in last stitch.
← Row 16 [RS]: With Color B, BBS in 1st stitch, ch 1, BLOsc x27, ch 1, EBS in last stitch.
← Row 17 [RS]: With Color A, BBS in 1st stitch, ch 1, FLOdc x4, BLOsc x7, FLOdc x5, BLOsc x7, FLOdc x4, ch 1, EBS in last stitch.
← Row 18 [RS]: With Color B, BBS in 1st stitch, ch 1, BLOsc x4, FLOdc x6, BLOsc x7, FLOdc x6, BLOsc x4, ch 1, EBS in last stitch.
← Row 19 [RS]: With Color A, BBS in 1st stitch, ch 1, FLOdc x2, BLOsc x8, [FLOdc x1, BLOsc x2] 2 times, FLOdc x1, BLOsc x8, FLOdc x2, ch 1, EBS in last stitch.
← Row 20 [RS]: With Color B, BBS in 1st stitch, ch 1, BLOsc x2, FLOdc x6, BLOsc x3, FLOdc x2, BLOsc x1, FLOdc x2, BLOsc x3, FLOdc x6, BLOsc x2, ch 1, EBS in last stitch.
← Row 21 [RS]: With Color A, BBS in 1st stitch, ch 1, BLOsc x8, [FLOdc x1, BLOsc x4] 2 times, FLOdc x1, BLOsc x8, ch 1, EBS in last stitch.
← Row 22 [RS]: With Color B, BBS in 1st stitch, ch 1, BLOsc x9, FLOdc x4, BLOsc x1, FLOdc x4, BLOsc x9, ch 1, EBS in last stitch.
← Row 23 [RS]: With Color A, BBS in 1st stitch, ch 1, FLOdc x8, BLOsc x5, FLOdc x1, BLOsc x5, FLOdc x8, ch 1, EBS in last stitch.
← Row 24 [RS]: With Color B, BBS in 1st stitch, ch 1, BLOsc x8, FLOdc x4, BLOsc x3, FLOdc x4, BLOsc x8, ch 1, EBS in last stitch.
← Row 25 [RS]: With Color A, BBS in 1st stitch, ch 1, FLOdc x8, BLOsc x4, FLOdc x3, BLOsc x4, FLOdc x8, ch 1, EBS in last stitch.
← Row 26 [RS]: With Color B, BBS in 1st stitch, ch 1, BLOsc x8, FLOdc x2, BLOsc x7, FLOdc x2, BLOsc x8, ch 1, EBS in last stitch.
← Row 27 [RS]: With Color A, BBS in 1st stitch, ch 1, FLOdc x8, BLOsc x2, FLOdc x7, BLOsc x2, FLOdc x8, ch 1, EBS in last stitch.
← Row 28 [RS]: With Color B, BBS in 1st stitch, ch 1, BLOsc x8, FLOdc x1, BLOsc x9, FLOdc x1, BLOsc x8, ch 1, EBS in last stitch.
← Row 29 [RS]: With Color A, BBS in 1st stitch, ch 1, FLOdc x8, BLOsc x1, FLOdc x9, BLOsc x1, FLOdc x8, ch 1, EBS in last stitch.
Total: BBS x 29, BLOsc x 469, FLOdc x 314, EBS x 29.
Cut, tie off and weave in tails.
Scarf Body Pattern:
Using one strand of Color A and one strand of Color B held together, and a 5.5 mm hook >> begin working the scarf body.
Row 1: Ch 28, dc in 3rd chain from hook and across – 26 dc.
Row 2: Turn (do not ch 1), std in 1st stitch, dc in each stitch across – 26 dc.
Repeat Row 2 until the scarf measures 55” – 65” tall (or however tall you’d like. My scarf measures 64” tall, with border edging 65” tall, which is perfect for doing a wrap as seen below.
Here are some basic measurements for scarfs and you can adjust to your liking.
| Scarf Size | Length (Ichs) | Length (cm) |
| Small | 45 – 60 | 114 – 152 |
| Medium | 60 – 75 | 152 – 190 |
| Large | 75 – 90+ | 190 – 230+ |
Attaching the Pockets & Border:
I created a companion video for the assembly portion of the scarf. >>> Winter Whispers Mosaic Scarf Video Tutorial.
Once you reach the desired height, cut, tie off and weave in all tails.
Grab one strand of each Color A & Color B (held together) and your 5.5 mm hook
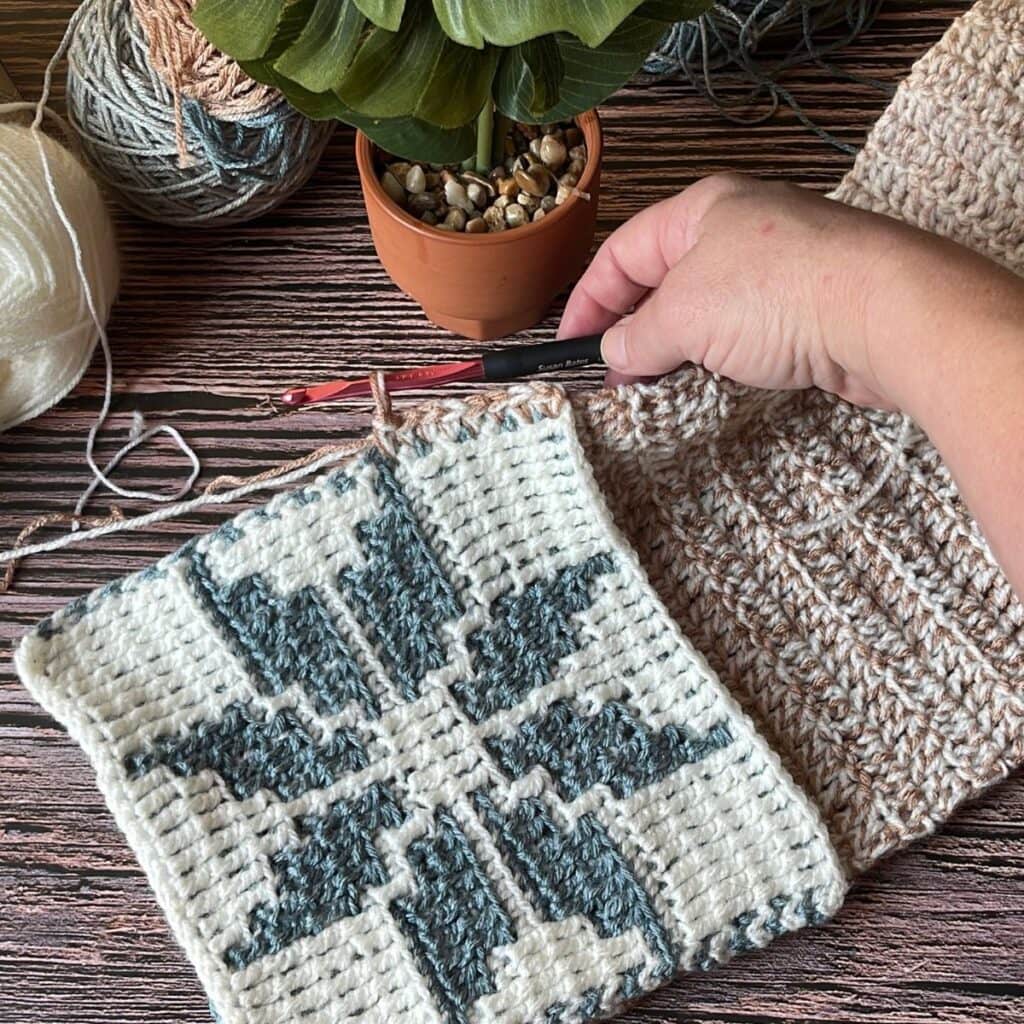
Grab one Mosaic Star pocket and lay right side up (fig. 1 below) Insert hook through the corner of the pocket and into the body of the scarf.
(Fig 1.)
Border Row 1: Insert hook into corner of star pocket & body of scarf. Attach yarn, pull through and ch 1. Sc in the same as join. Sc (evenly spaced) into each row to corner. Sc 3 in the corner. Sc in each stitch along the bottom. Sc 3 in the corner. Sc (evenly spaced) into each row to corner.
I ended up with 26 stitches along side 1, 27 stitches along the bottom (side 2) and 26 along side 3. Don’t worry if you don’t get the same counts, just work them as evenly as possible.
Tip: I worked my stitches in the ch 1 space after the EBS’s.
Continue working a single crochet in each row up side 3 until you reach the other pocket. Place the pocket right side up as we did before and attach it in the same manner as mentioned above (Fig 2.)
(Fig 2.)

Optionals:
If you want something a little more discreet, you can add a zipper to the pocket.
I decided to add small buttons and a loop to mine.
Add tassels to jazz it up a little or leave it as is. If I decide to add tassels to it, I will update the pattern and notify everyone of the new additions. 🙂
Congrats! You are finished!
Share your finished scarf with me!
#WinterWhispersScarf
