

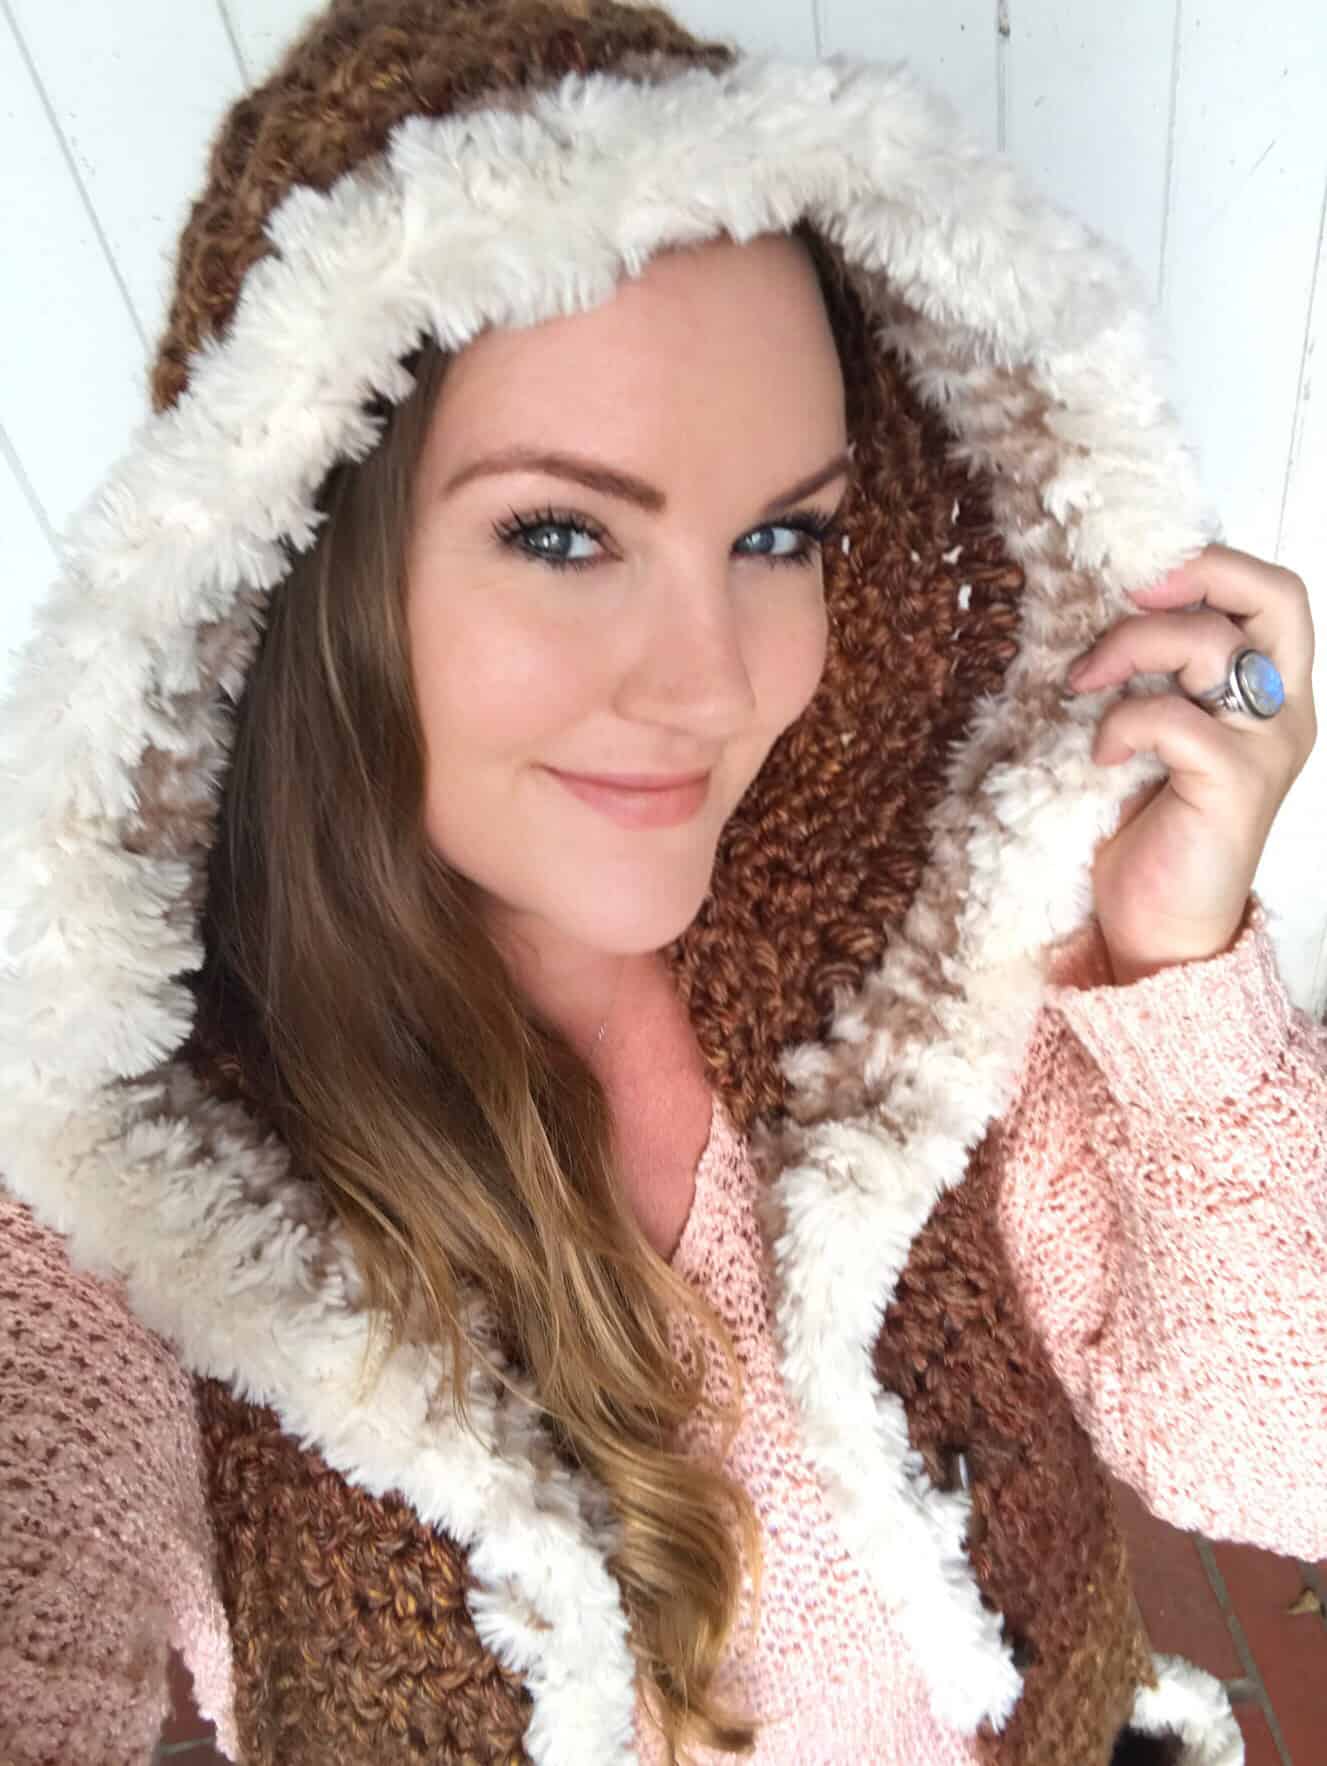
Hello Makers!  Ooooh the cozies of the Kunik Scoodie are endless! The kunik Scoodie makes me feel like I’m ready for the runway AND the snow lodge. It’s such an Easy Crochet Hooded Scarf pattern.
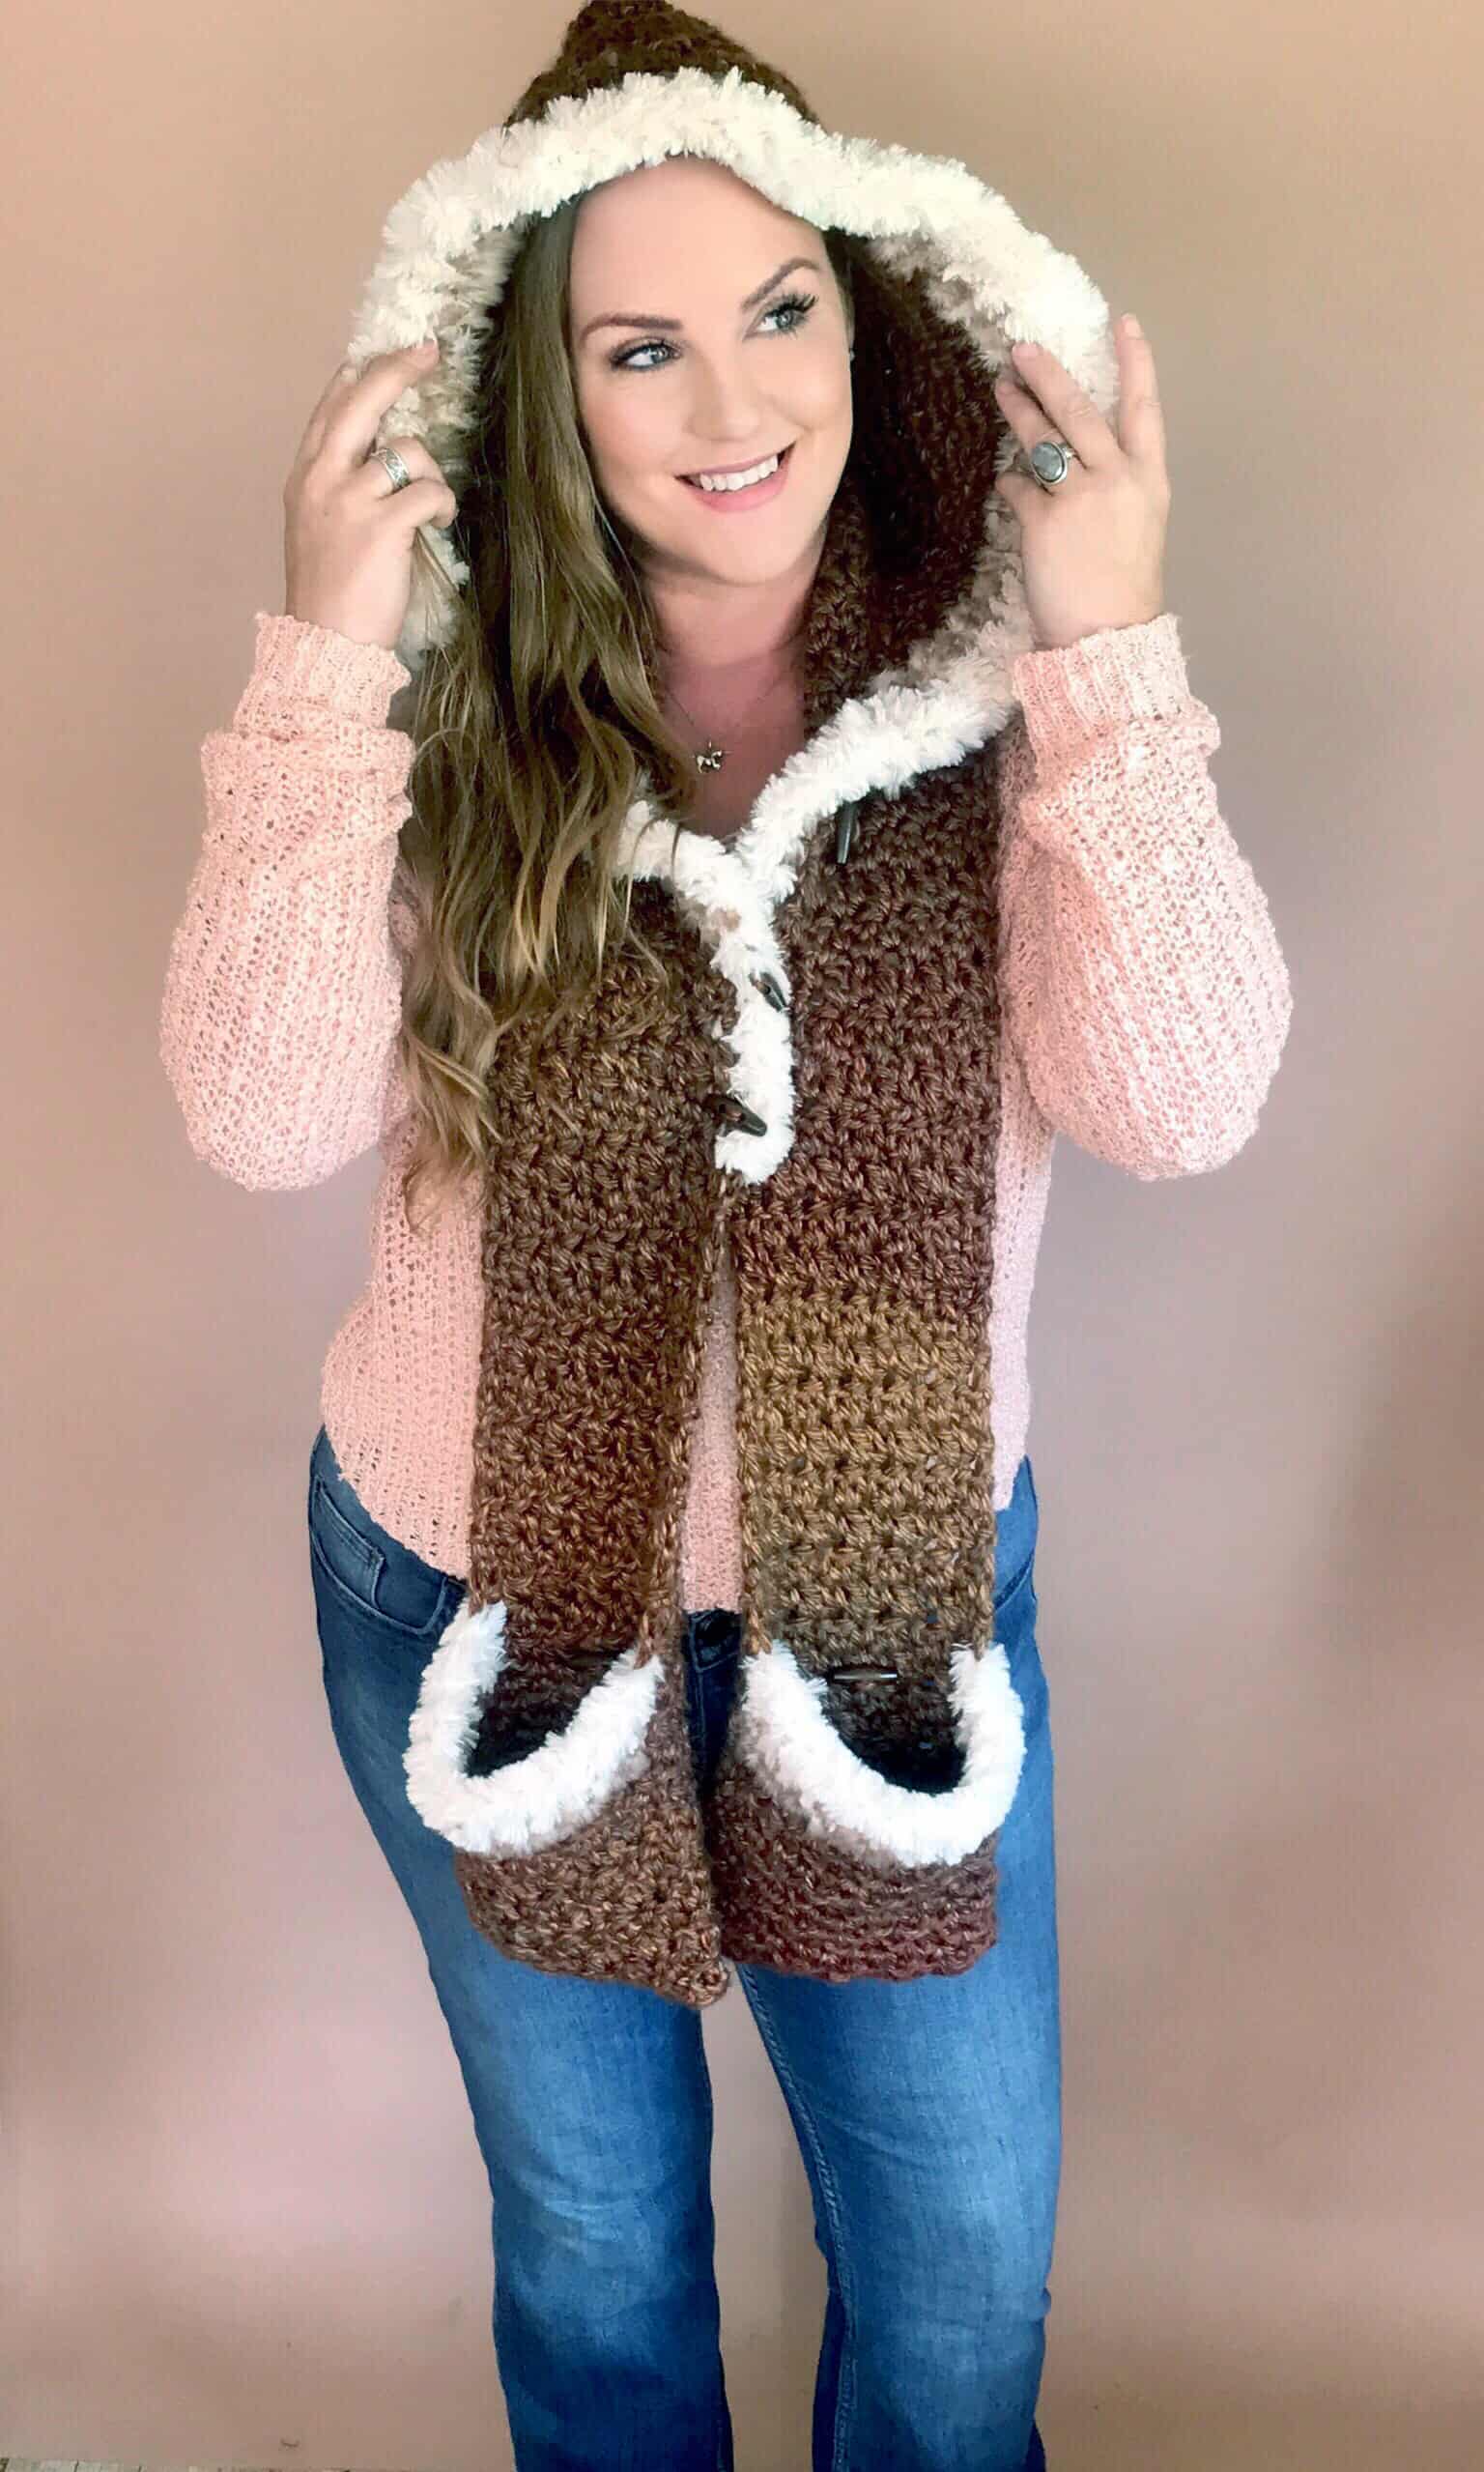
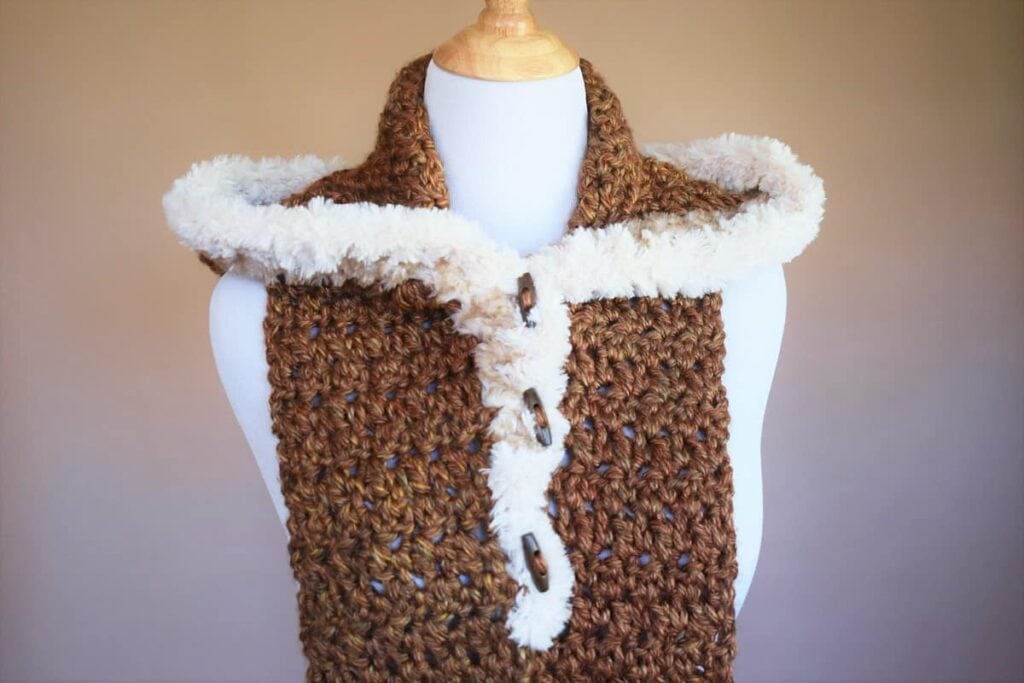
It dresses up and down easily. You can pair it with jeans and a sweater or dress it up with a sleek outfit for a night out. It is versatile, and functional, with pockets deep enough to carry your phone, wallet, and other goodies! Kunik means Eskimo Kisses!
Crochet hooded pocket scarves have gained immense popularity, and it’s no wonder why.
These versatile accessories combine fashion and functionality in a unique way. Let’s explore why these scarves are a winter must-have.
Autumn Harvest Blog Hoppers!
Scroll on down to find the DOWNLOAD NOW graphic to get your free pattern!
Style and Warmth in One
Fashion-Forward: Hooded pocket scarves add a trendy touch to any winter outfit. With a hood that frames your face elegantly, you can stay warm without sacrificing style.
The scarf’s design allows you to layer up while maintaining a chic appearance.
Cozy Comfort: The fur lining in the Kunik Scoodie adds a luxurious touch. It not only keeps you incredibly warm but also provides a soft, comforting feel against your skin.
You’ll look and feel fabulous, even on the chilliest days.
Functionality Redefined
Hands-Free Convenience: The pockets in the Kunik Scoodie is a game-changer. No need to fumble for gloves or struggle with a handbag.
Slip your hands into the conveniently placed pockets to keep them toasty and free for other activities.
Hooded Protection: The attached hood serves as a practical shield against wind, rain, and snow.
It keeps your head and neck snugly covered, preventing the cold from sneaking in. Say goodbye to those pesky drafts.
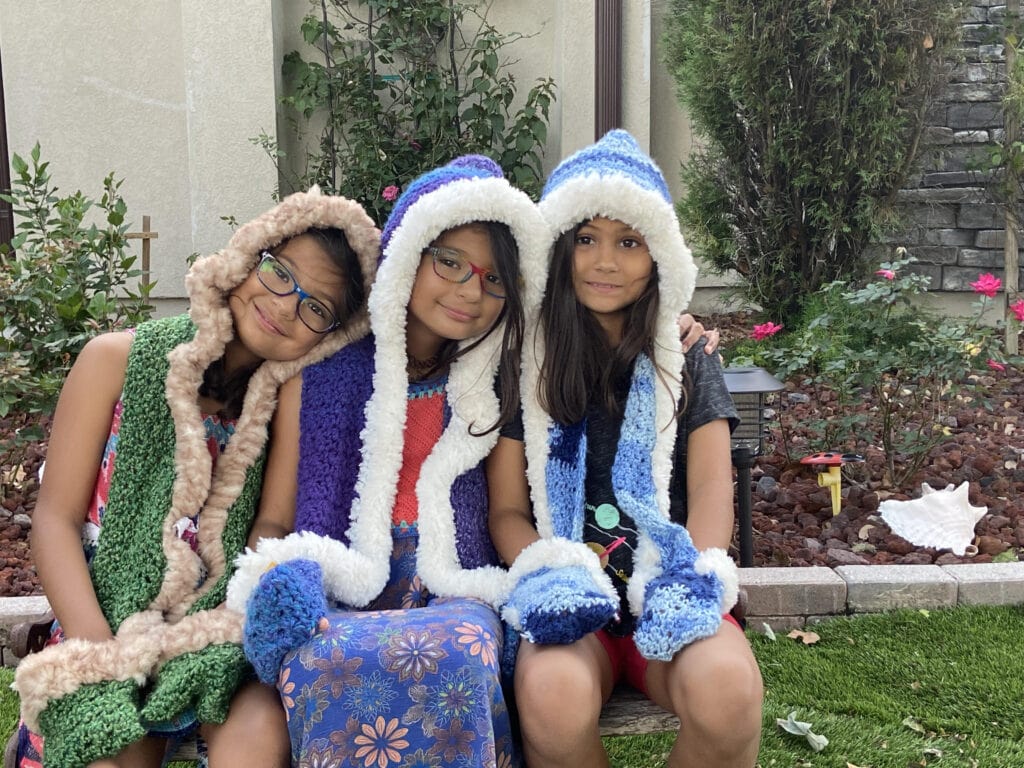
Customization: This scarf is incredibly versatile. You can choose the yarn color and texture that best suits your personal style.
Whether you opt for a bold, vibrant shade or a classic neutral, your scarf becomes a unique reflection of your taste. (See testers photos below)
Craft Your Own
The best part? You can create your own hooded pocket scarf! With a few simple materials and a crochet hook, you can embark on a crafting journey that ends with a beautiful, functional accessory.
Personalize it further by selecting the perfect faux fur lining to match your vision.
All About Fall Blog Hop
If you landed here as a part of the All About Fall Blog Hop, head on down and find the buttons!
Why this Easy Crochet Hooded Scarf pattern is great!
- Simple Crochet Stitches
- Easy to Follow Instructions
- Full Video Tutorial
- Great Beginner Crochet Project
I’m very excited to be releasing this hooded scarf just in time for the 

Full Video Tutorial At Bottom of Post
If you have any questions about this pattern, please join my pattern support group Stardust Gold Crochet & Friends. 
Table of contents
- Autumn Harvest Blog Hoppers!
- All About Fall Blog Hop
- Why this Easy Crochet Hooded Scarf pattern is great!
- Full Video Tutorial At Bottom of Post
- A little bit about the yarn…
- Kunik Scoodie Easy Crochet Hooded Scarf Pattern
- Skill Level
- Materials
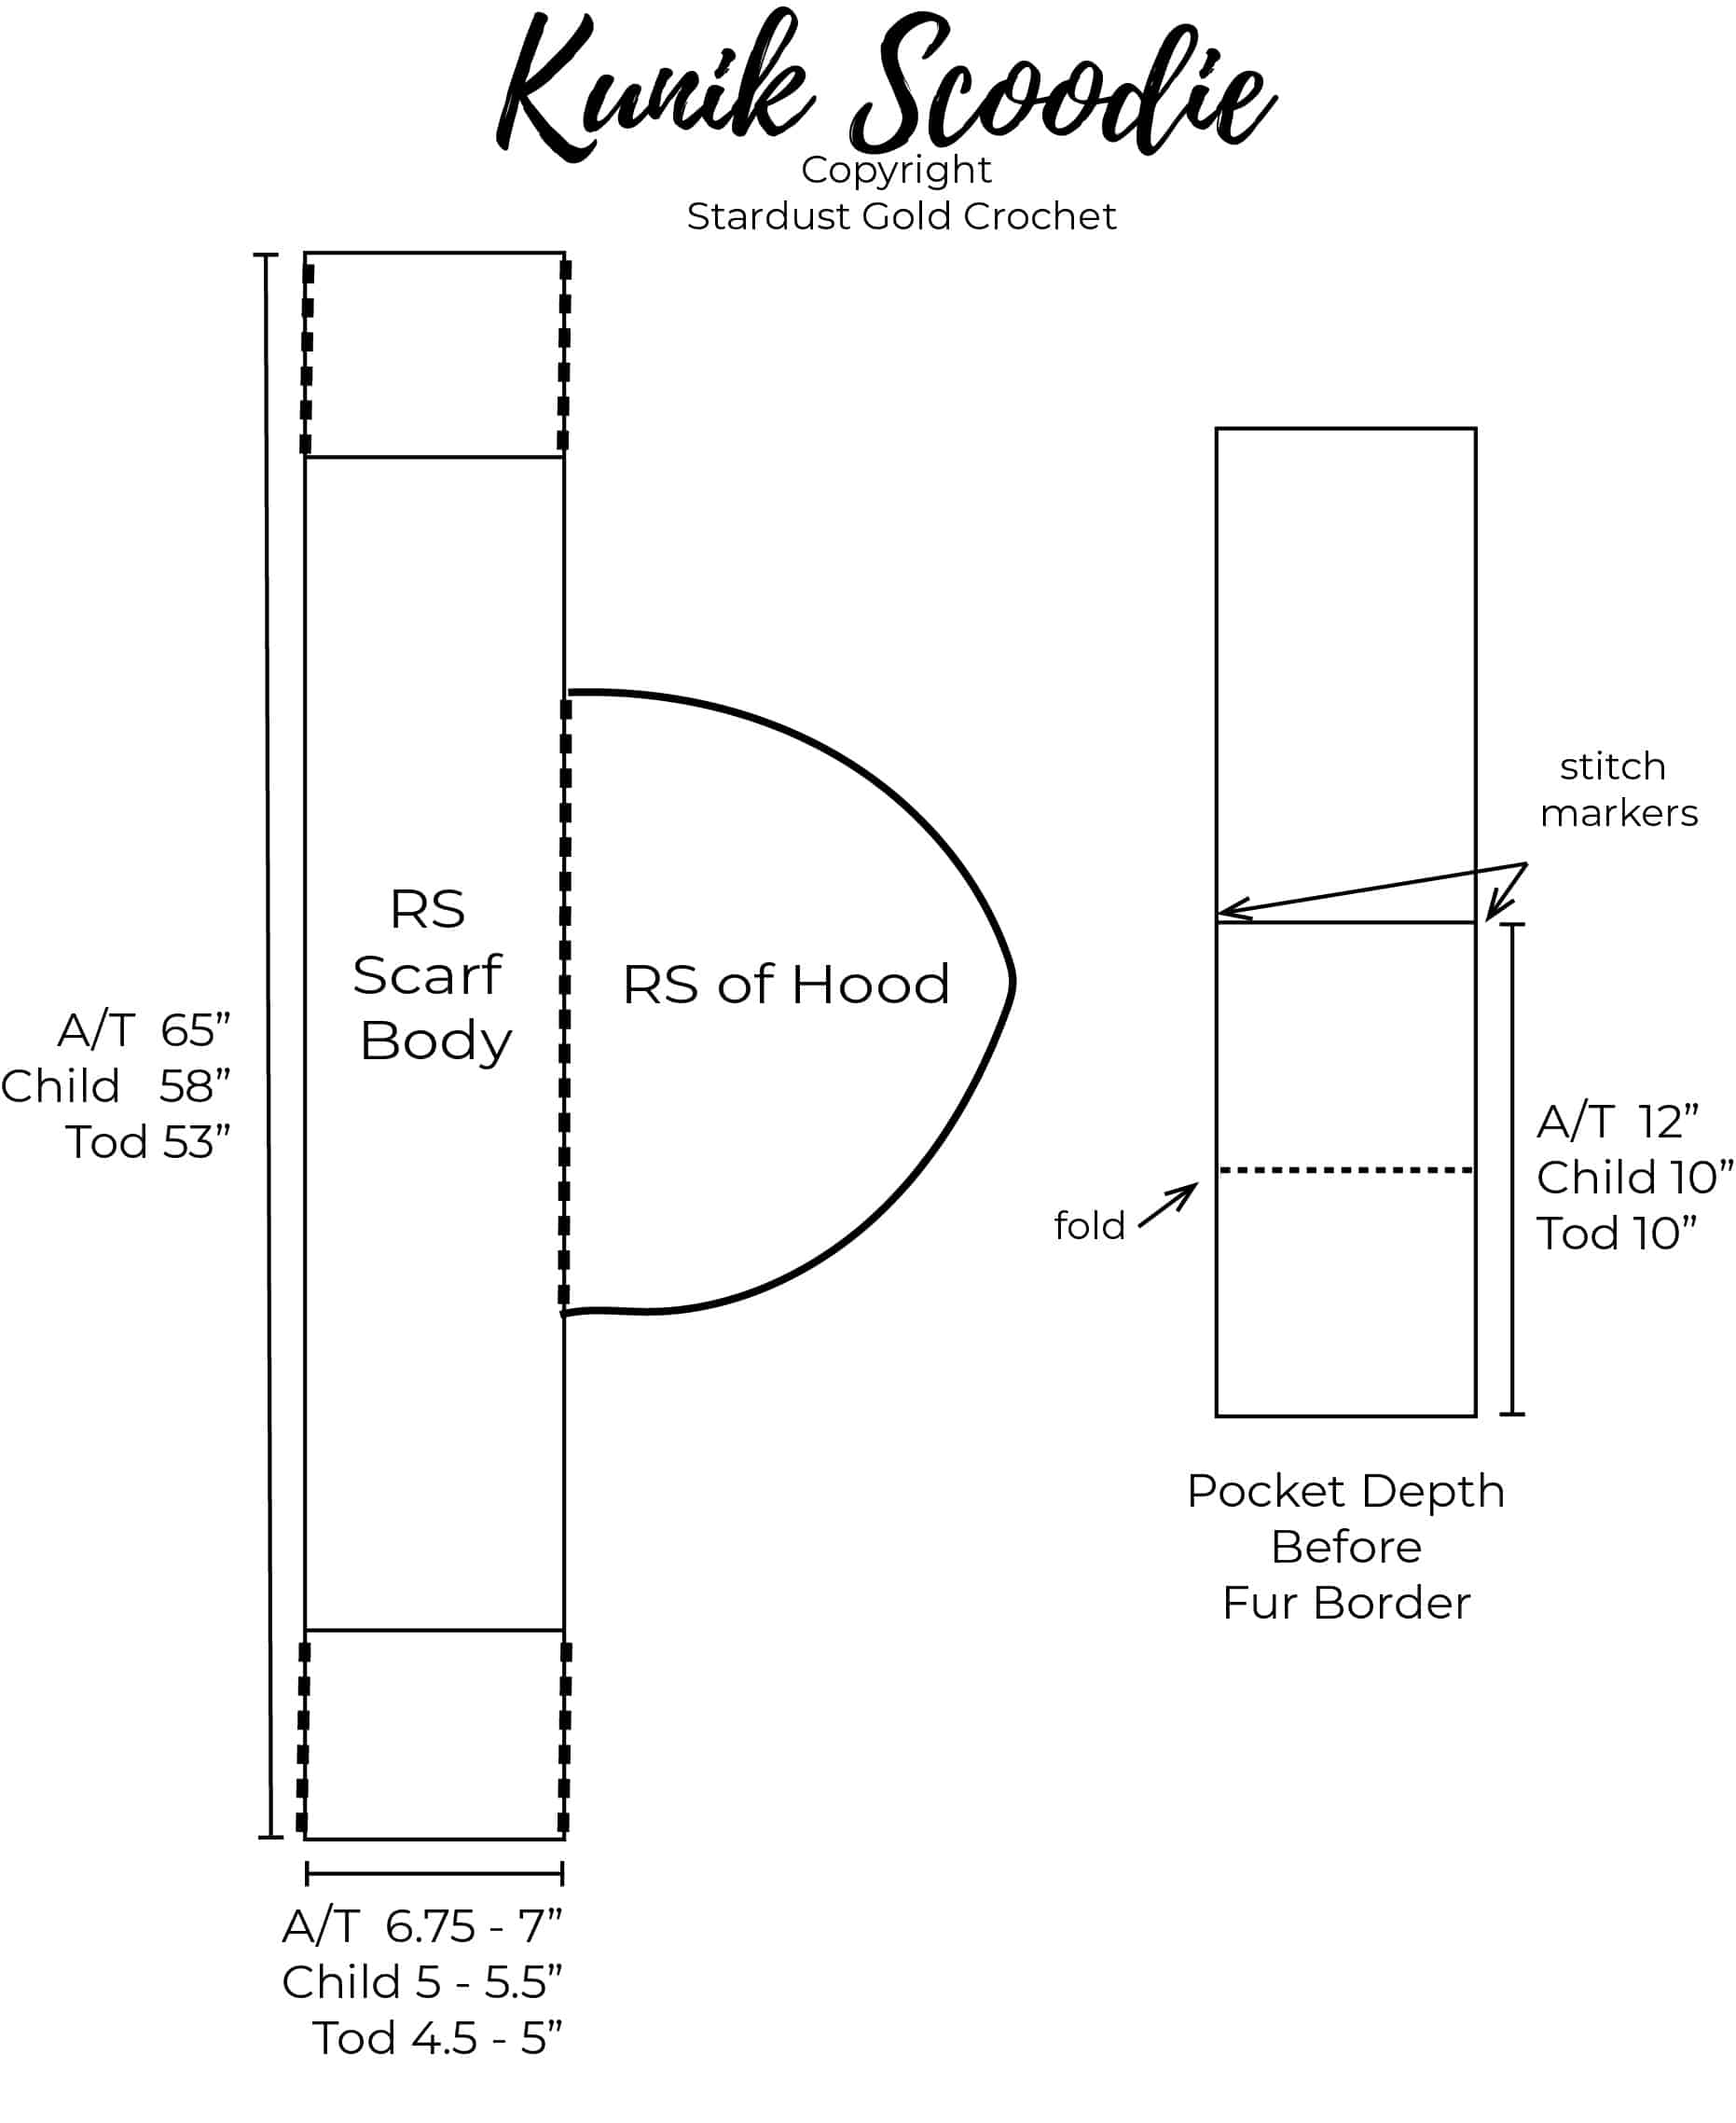
- Measurements
- Stitch Guide
- Abbreviations
- Adjusting the Size:
- Pattern Notes – Please Read
- Easy Crochet Hooded Scarf Pattern
- Pocket Assembly:
- Hood:
- Decrease rows:
- Hood Assembly:
- Hood to Scarf Assembly:
- Creating the collar:
- Joining collar to hood border:
- Toggle Button Placement:
- Kunik Scoodie Easy Crochet Hooded Scarf – Full Video Tutorial
- Wrapping it Up!
- Autumn Harvest Blog Hop 2024


I added a few toggle buttons to give it an extra bit of functionality so you can close up the hood to keep your neck warm, and close the pockets up to keep your stuff from falling out too! 
A little bit about the yarn…
Kunik Scoodie – Easy Crochet Hooded Pocket Scarf
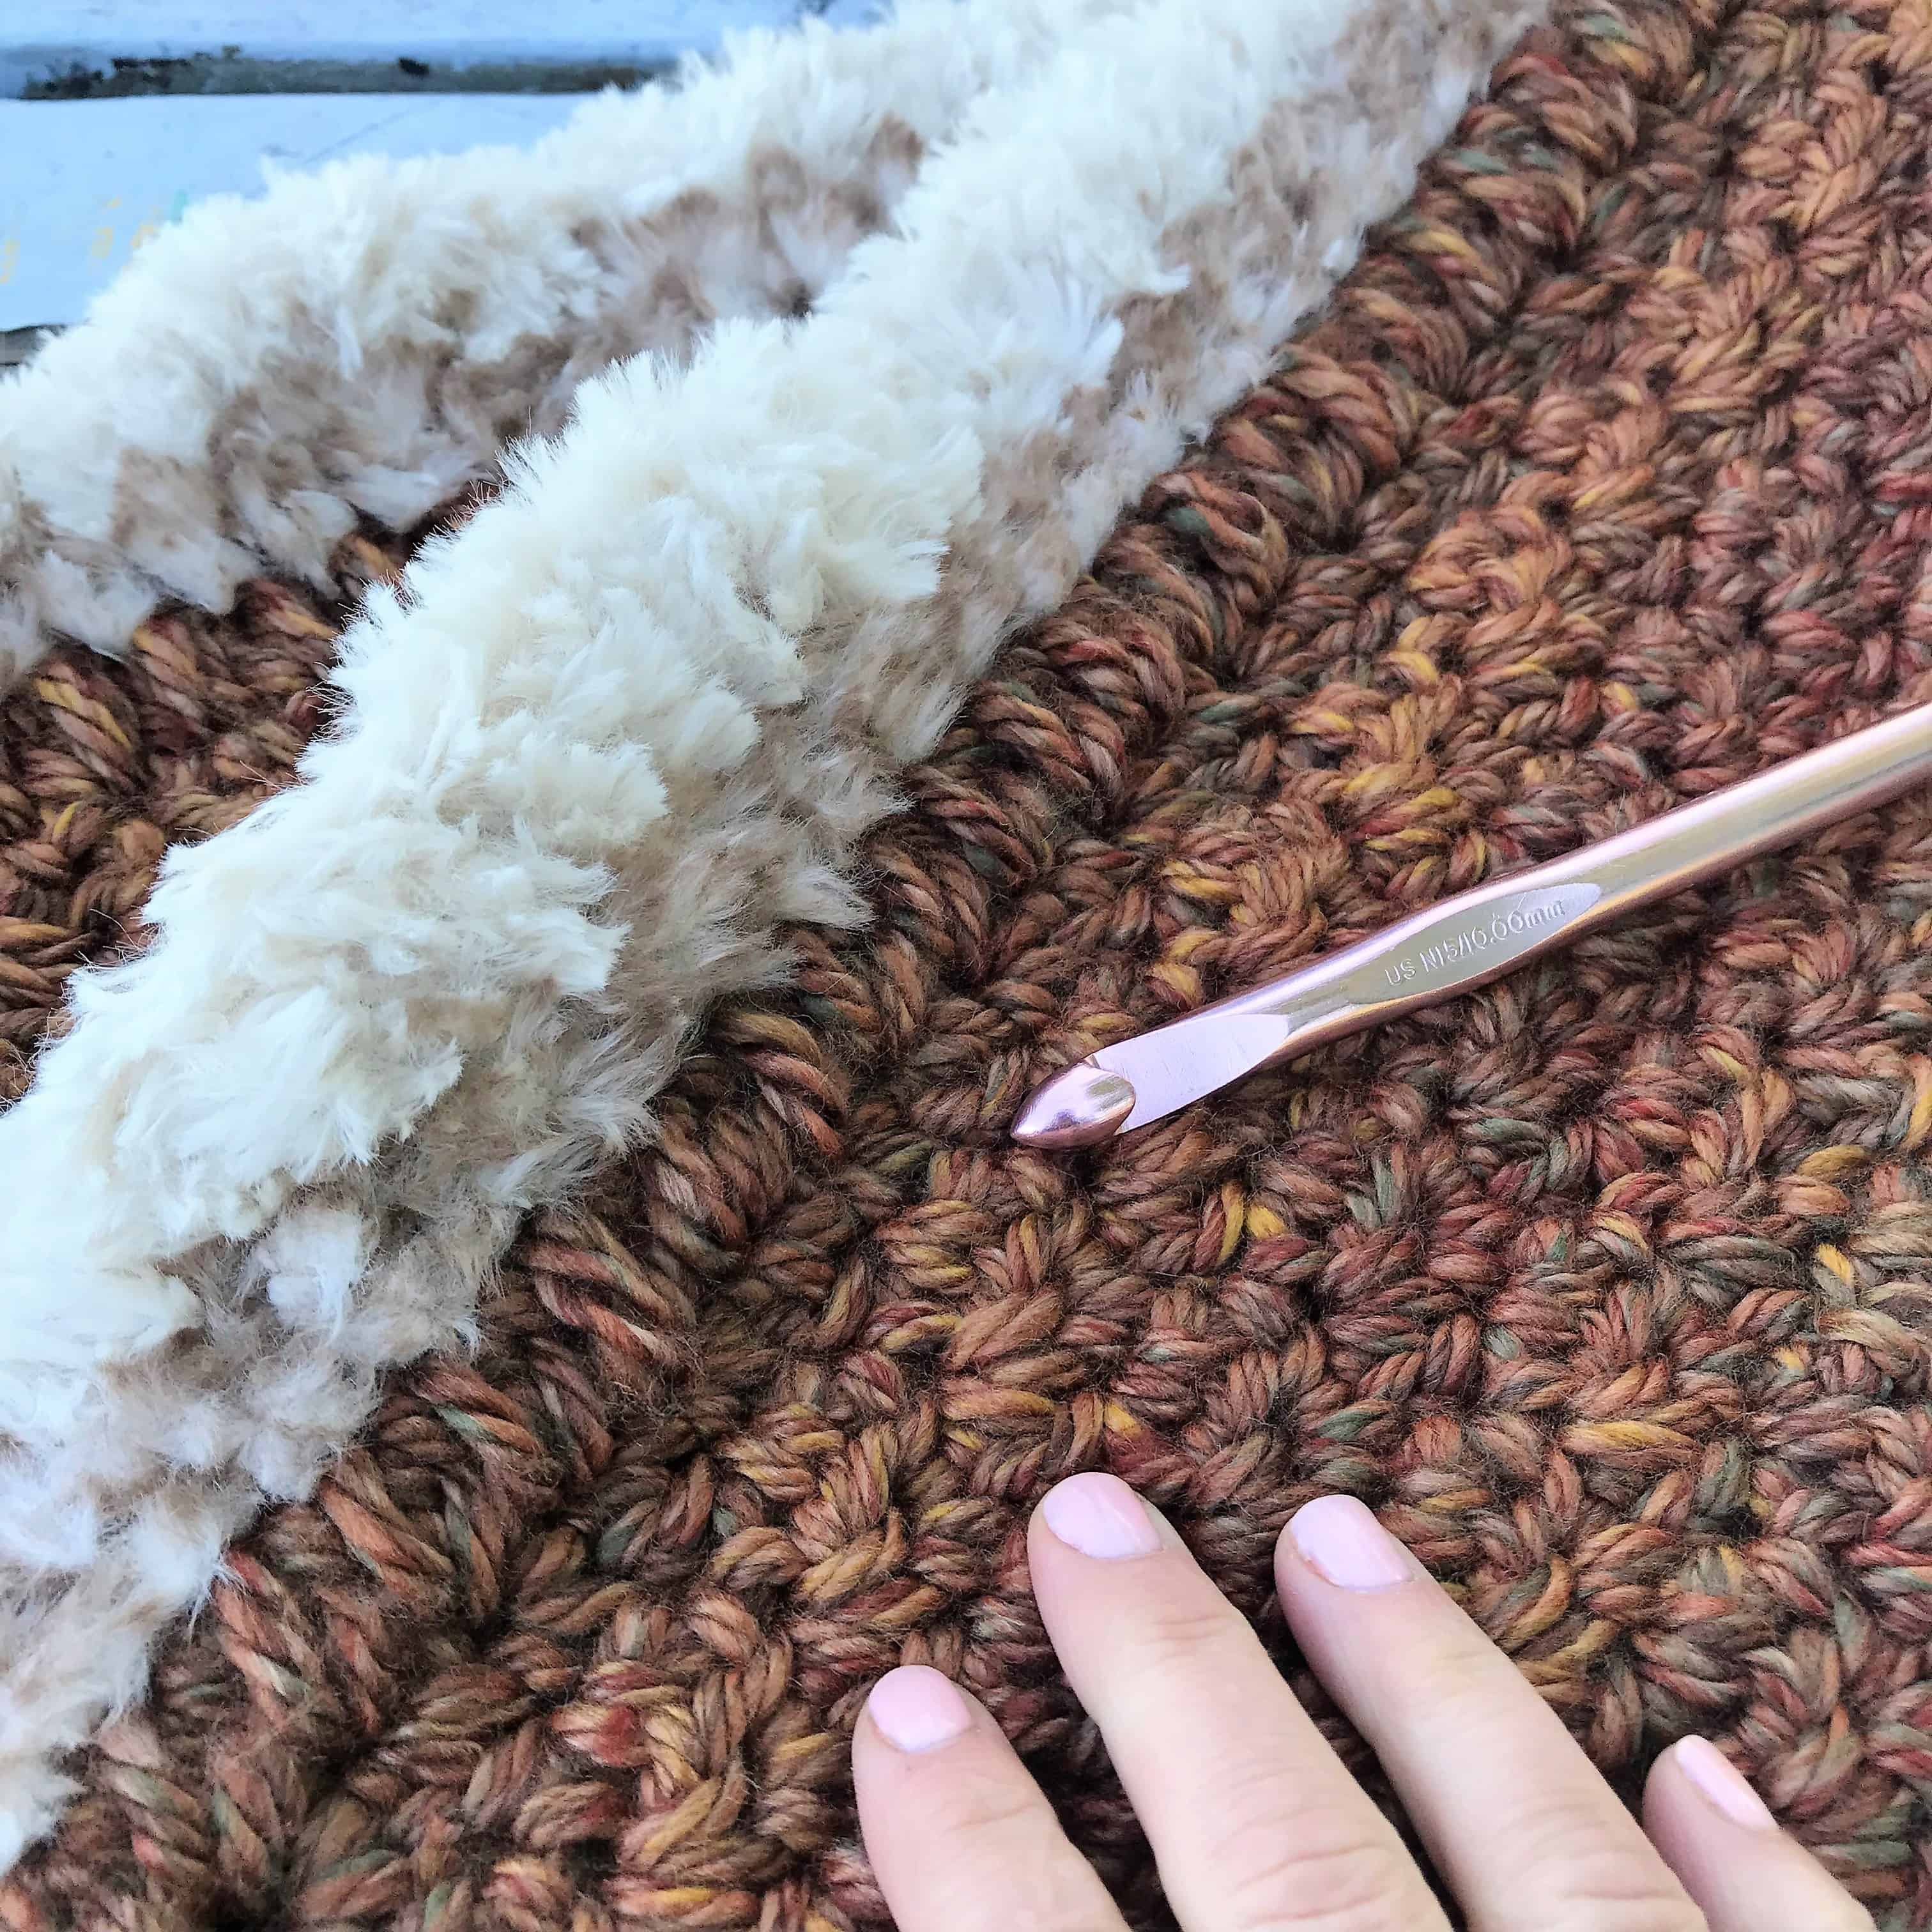
I used two different yarns to create
Go For Faux has to be one of my favorite yarns because it has such beautiful
So this yarn is perfect to get that look without hurting 
 .
.
A little note about how this pattern is written…
The
There are 4 sizes available, the Adult Teen sizes are one in the same. My tester for the teen stressed that she would like the adult size, so I combined the two. There are also versions for a child size and toddler.
Here are some of the versions from my testers! Thanks you guys so much!


You can also find it on Ravelry & Etsy
PDF is available on Ravelry and Kunik Scoodie PDF Pattern
or scroll down for the FREE pattern


Ready? Let’s make it!
Need pattern support? Join my private Facebook group Stardust Gold Crochet & Friends! We talk about crochet, you’re welcome to post your creations and help each other learn new crochet techniques!
Kunik Scoodie Easy Crochet Hooded Scarf Pattern
Skill Level
Easy to Intermediate
Gauge:
This pattern is based measurements.
Materials
Suggested Yarn: Main Color (MC) – Lion Brand Hometown USA, El Paso Autumn, which looks like they discontinued  , but they do have a lot of wonderful colors. You can always find a similar yarn weight and run with that.
Accent Colors (A1 & A2) – Lion Brand Go For Faux. A1: Baked Alaska A2: Pomeranian
- Hook Size: 10 mm (USA K)
- Suggested Yarn Details:
- Hometown USA: 100% Acrylic, 64yds (59m), 4oz (113g) per 1 skein.
- Go For Faux: 100% Polyester, 65yds (60m) 3.5oz, (100g) per 1 skein.
- Yardage Needed:(Adult, Teen)(Child, Toddler)
- Hometown USA: 6, 4 skeins or 384, 256 yards approximately.
- Go For Faux: 1 skein of each color for all sizes.
- Scissors
- Measuring Tape
- Yarn Needle
- 1.5″ – 3.81 cm, wooden toggle buttons – these can be found on Etsy.
Measurements
| Size | Width | Height |
| Adult | 6.75 – 7” | 65” |
| Teen | 6.5 – 7” | 65” |
| Child | 5” | 58” |
| Toddler | 4.5” | 53” |
Stitch Guide
sc – single crochet
insert hook in indicated st, yo, draw up a loop, yo draw through both loops on hook.
dc – double crochet
yo, insert hook in indicated st, yo, draw up a loop, *yo, draw through 2 loops* – repeat from * to * until you have one loop left on the hook.
hdc – double crochet
yo, insert hook in indicated st, yo, draw up a loop, yo, pull through all three loops on hook.
Special Stitches:
puff – puff stitch
yo, insert hook in indicated st, pull up a loop. *insert hook in same stitch, pull up a loop* 2 more times. yo, pull through all 7 loops on hook. (1 puff stitch created)
hdc cluster – half double crochet cluster
yo, insert hook in next st, [yo, pull up a loop] 2 times, yo, pull through all loops on hook.
sc2tog – single crochet 2 together (a decrease stitch)
insert hook in indicated st, pull up a loop. insert hook in next st, pull up a loop. yo, pull through all three loops on hook.
Abbreviations
| sc | single crochet |
| dc | double crochet |
| hdc | half double crochet |
| hdc-cl | half double crochet cluster |
| puff | puff stitch |
| RS | right side |
| WS | wrong side |
| sl st | slip stitch |
| ch | chain |
| *…* | repeat instructions between asterisk however many times indicated. |
Adjusting the Size:
To customize the sizing for this pattern is very easy – to adjust the width, add or subtract chains in multiples of 2. To increase or decrease the lenght of the scarf, decrease or increase the number of rows. Pockets can be adjusted as well, and more detail about customizing is in the video tutorial at the end of the blog.
Pattern Notes – Please Read
- Chains do not count as stitches or in stitch count unless otherwise noted.
- 1st stitch of each row is made in same st as
chain (s). Pattern is based on measurements mostly, although the provided stitch counts should be accurate ifgauge is met. Scar f and hood are created separately and sewn together.- Buttons are sewn on and to fasten, draw through space on scarf (the stitches are wide enough – no need for buttonholes)
- Changes for sizes are listed as follows: Adult/Teen (Child, Toddler).
Easy Crochet Hooded Scarf Pattern
Scarf:
Ch 13 (11, 9)
Row 1: Sc 1 in 2nd ch from hook. *dc 1 in next ch**. sc 1 in next ch”. Repeat from * to * to end. Stop repeat at ** – 12 (10, 8) sts.
Row 2: Ch 1, turn, *sc 1, dc 1* across – 12 (10, 8) sts.
Row 3 – X: Repeat row two until scarf measures Adult/Teen: 75.5” [191cm], Child: 65.5” [166cm], Toddler: 60.5” [153cm])
Cut, tie off, weave in tails.
Forming the Pockets:
Grab 4 stitch markers. Lay scarf flat. Measure 12” (30cm) [10” (25cm), 10” (25cm)] in from each end and place a stitch marker on both sides of scarf. (when folded up, pocket should measure 6” (15cm) [5.5” (12cm), 5” (12cm)] (of course, you can customize how deep your pockets will be).
Now we are going to extend the pockets to create a fur border, using the faux fur…
*Using Pomeranian (A2), attach yarn at rightmost stitch of tip of scarf, then:
Row 1: Ch 1, sc 1 in same as ch 1, sc 1 in ea st across, end last st with new color Baked Alaska (A1) – 12 (10, 8) sc. (this will be your wrong side (WS), mark with stitch marker)
Row 2: Ch 2, turn, loosely work 1 hdc in each st across, leaving a long tail – 12 (10, 8) hdc.
Cut all yarns, leaving a 6” tail for sewing*
Follow down to other side of scarf. (wrong side still facing you) and repeat from * to *
Pocket Assembly:
Turn scarf over (RS facing you), fold up pockets, lining up the top of the MC section with the markers (the fur portion will extend past the markers).
Repeat this section on both ends of scarf.
Using a separate length of MC, whip stitch up to the fur, then using the A1 & A2 tails, whip stitch fur section. Turn pockets so right side is facing out.
Tie off, weave in all tails.
Hood:
note: mark WS with stitch marker
with MC, Ch 52 (44, 40)
Row 1 (WS): Starting in 3rd ch from hook, *hdc cluster (yo, insert hook in next st, [yo, pull up a loop]) 2 times. Yo, pull through all loops* – repeat from *…* to end of row – 50 (42, 38)
Row 2 (RS): Ch 1, turn. *sc 1, dc 1* repeat from *…* to end of row – 50 (42, 38)
Repeat row 2, until it measures 6.5” [16cm] ( 5” [12cm], 4.25” [10.8cm]) from row 1 to last completed row.
note: the number of rows may vary depending on your tension, when you reach the measuremets above, continue working with your MC and complete the following decrease rows.
Decrease rows:
Ch 1, turn, then…
Row 1: *Sc 1, dc 1* – repeat *…* 11 (9, 8) times, then sc 1 in next st, sc2tog (2 times), dc 1 in next st, repeat *…* 11 (9, 8) times – 48 (40, 36) sts
Row 2: Ch 1, turn, *sc 1, dc 1* repeat *…* to end of row – 48 (40, 36) sts.
Row 3: Ch 1, turn, *sc 1, dc 1* repeat *…* 11 (9, 8) times, sc2tog (2 times), *sc 1, dc 1* repeat 11 (9, 8) times – 46 (38, 34) sts.
Tie off, leave long tail for sewing hood.
Hood Assembly:
Bring WS’s together, whip stitch the back of the hood from bottom to top.
Fur Border for Hood:
with WS of hood facing you, attach A2 in rightmost st (where starting ch is).
Row 1: Ch 1, hdc 1 in same st, hdc 1 in each st across, change to A1 at end of last st, turn – 50 (42, 38) sts.
Row 2: with A1, ch 2, puff 1 in ea st across, tie off, leave a long tail for weaving – 50 (42, 38) sts.
Hood to Scarf Assembly:
Place the scarf on a flat surface with the pocket side (RS) down. Place hood flat, centred with front RS facing you.
Center the hood: to check center, measure from edge of pocket to edge of hood. Make sure measurement is same on both sides. Adjust as needed. Using MC, begin sewing MC section of hood to scarf, leaving the fur section alone.
Creating the collar:
We are going to extend the fur border onto the main body of the scarf, then sew the extending border to the hood border. Begin by laying scarf flat, with inside of hood facing you. Starting with the right side and using A2, attach yarn in 1st visible stitch on body of scarf, just below fur hood border, where hood attaches to scarf, then…
Row 1: Ch 1,
Row 2 (is worked on top of Row 1): Using A1, join in top of first hdc created from Row 1 above, then…
Ch 1, puff 1 in same as join, puff 1 in ea of next 2 stitches, hdc 1 in next st, sc 1 in each of next 3 sts, (working into MC now), sc 1 in ea of next sts until you measure 9” (22.8cm), 7” (17.78cm), 6” (15cm) from starting point to end.
Repeat on other side.
Joining collar to hood border:
Weave in tails on bottom end of collar, then use A1 & A2 tails to join collar to hood, matching up the colors, and closing the gaps.
Weave in all tails.
Toggle Button Placement:
Pockets:
with RS facing you, place toggle horizontally inside pocket – make sure it is centered so it will be in the center of the fur. Using MC, sew button to scarf. Repeat on other pocket.
Collar:
with RS of scarf facing you, on right side of scarf, place bottom toggle vertically, about 1/2” above the end of the bottom of the collar. Place 2nd & 3rd toggles 2” (20cm) apart above one another.
Congratulations! You’re Finished!
More Free Crochet Patterns…
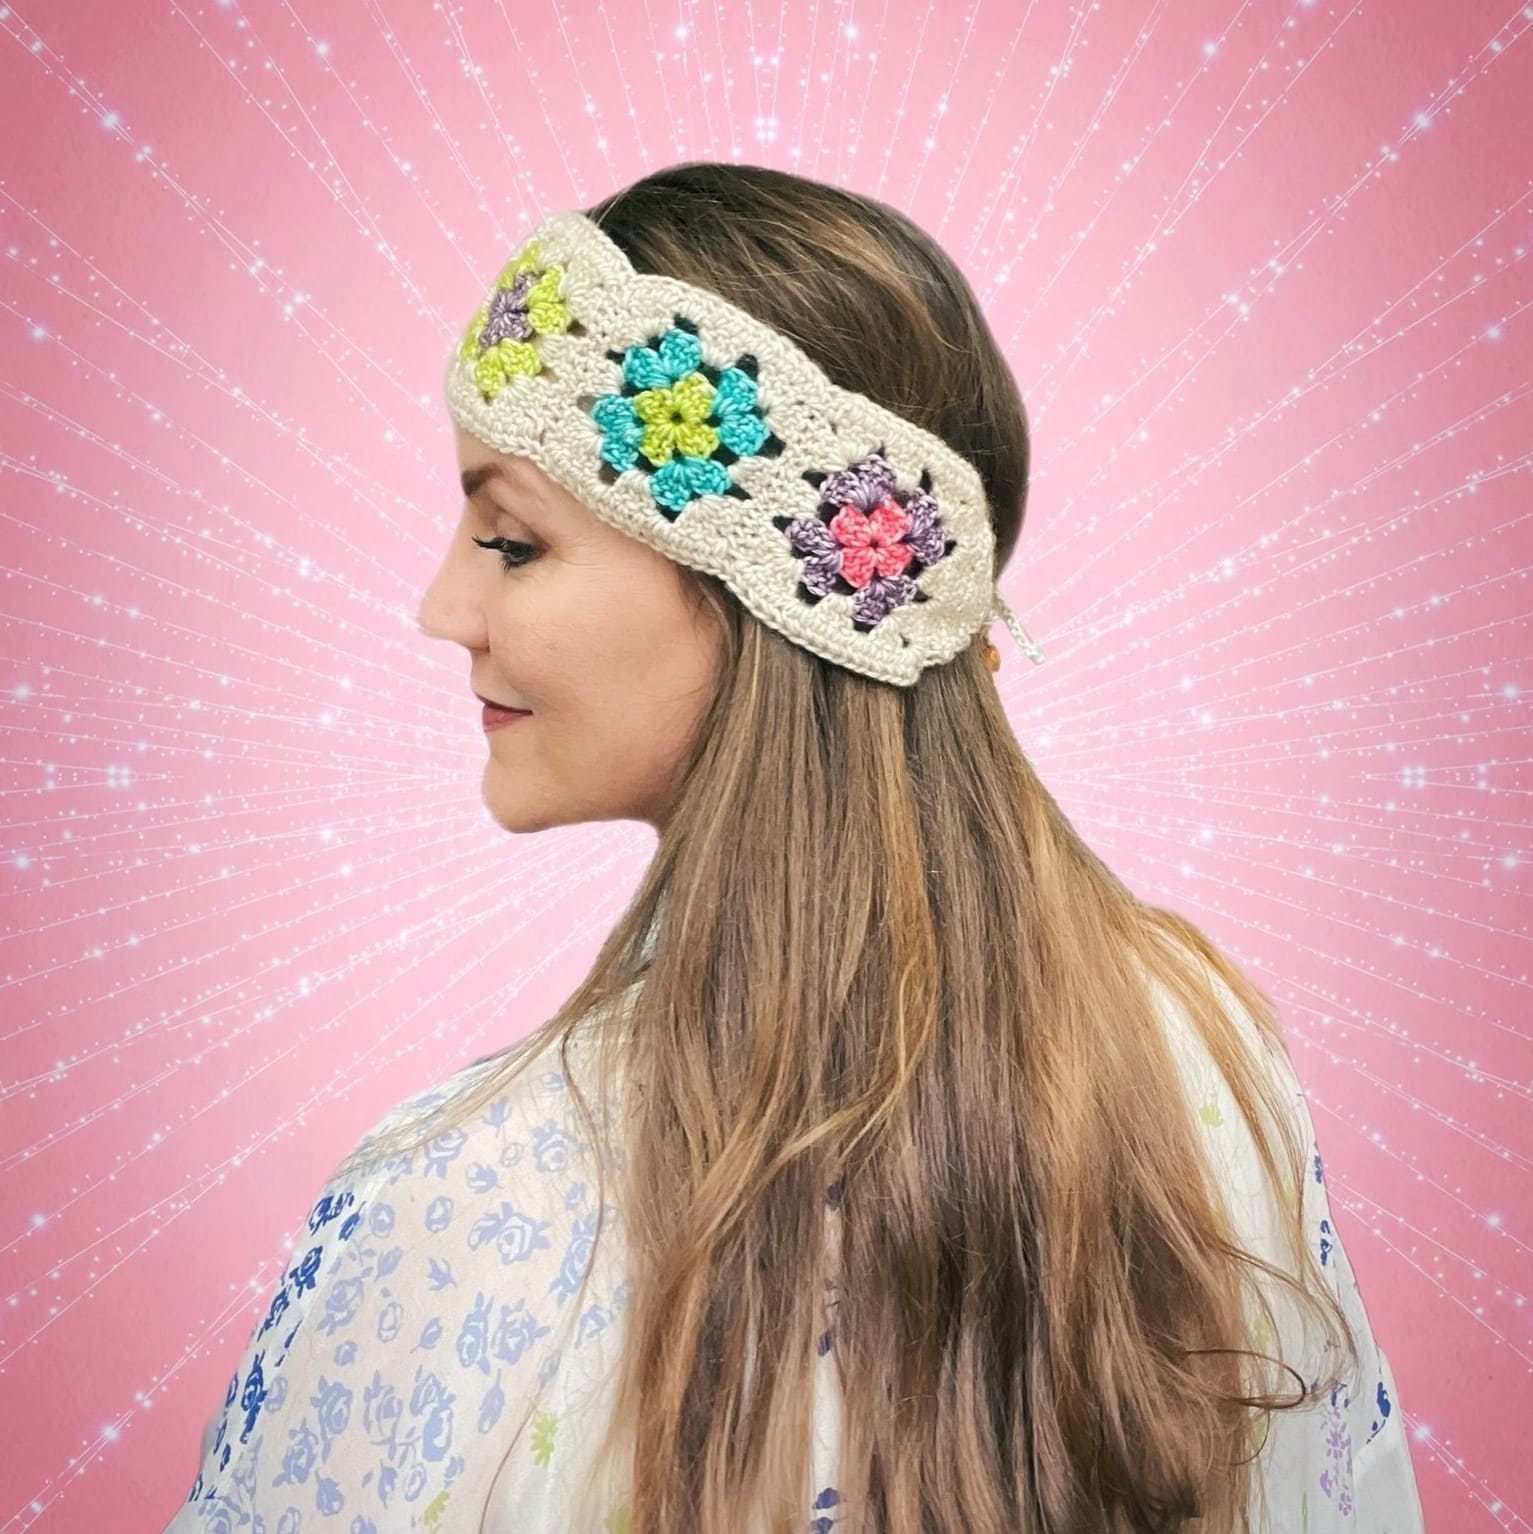
If you love making crochet headbands, I have quite a few other cute and fast crochet beanie patterns here >>>
Kunik Scoodie Easy Crochet Hooded Scarf – Full Video Tutorial
I’d love to see your work! Use hashtags on FB & IG
#stardustgoldcrochet #kunikscoodie
Wrapping it Up!
Easy crochet hooded pocket scarves are the perfect blend of fashion, warmth, and convenience.
They make a fantastic addition to your winter wardrobe and a thoughtful handmade gift for loved ones.
Whether you’re braving the cold or adding a stylish layer to your ensemble, these scarves are a true winter essential.
Autumn Harvest Blog Hop 2024
Thanks for being here! Click here >>> Kunik Scoodie – OR – Click the image below to get the free download.

Thanks for being here friends! I couldn’t do it without you!


Made 3 for Christmas gifts. Love them. Thank you for the pattern!
Cloudflare Ray ID: 8d5c07597ab55e74 Said I was blocked when clicking on download button. I never had any problems before
Beautiful pattern, looks so warm and inviting.
Cute!! Just a heads up, under the button placement you have 2″ (20cm) which should be 5cm 🙂
Thank you!
This is beautiful!! I can’t wait to try this!
Thank you! I really love it and I am looking forward to the winter to wear this I’ll be wearing it all winter long, for sure!
Awesome! Thanks so much Michelle!