
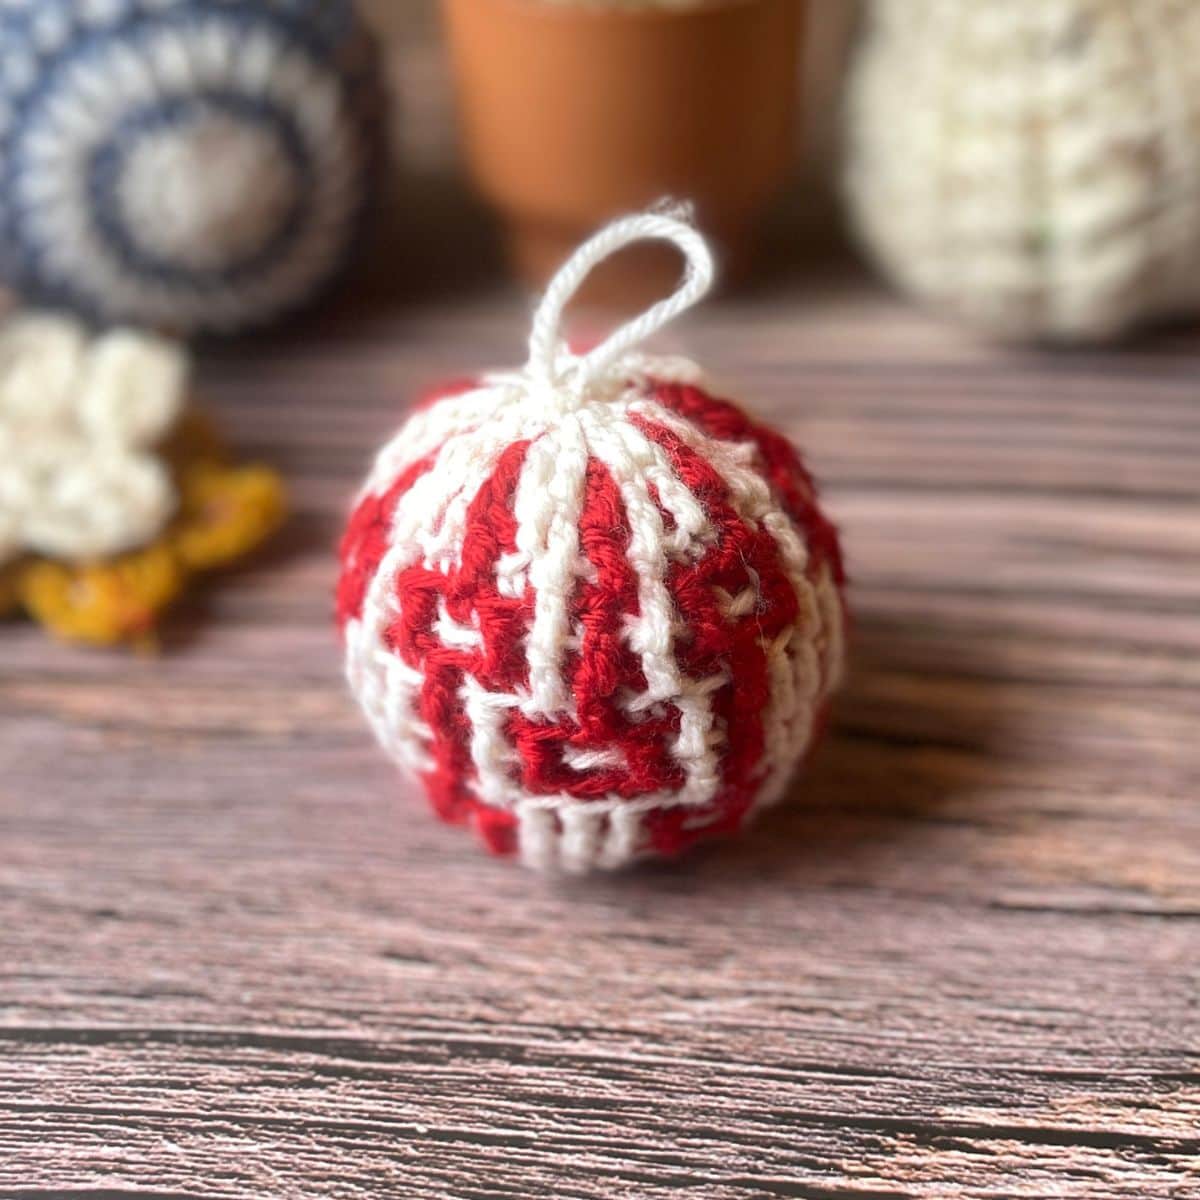
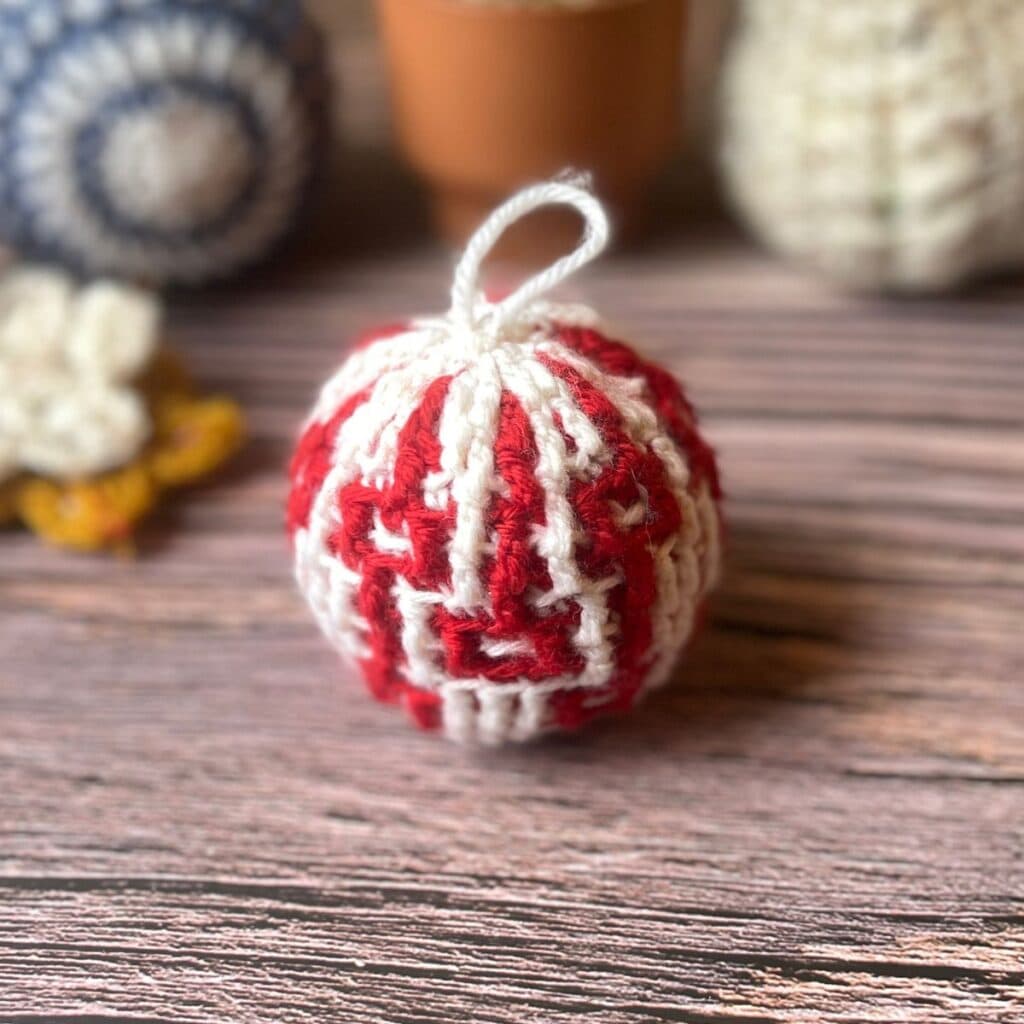
Step back in time with a touch of Scandinavian charm! ✨ The Vintage Nordic Mosaic Crochet Ornament ❄️ combines the timeless beauty of Nordic design with the magic of mosaic crochet, and it’s the perfect way to add handmade elegance to your holiday decor. 🎄
If you’ve been wanting to learn mosaic crochet 💫, this is a great project to start with!
You’ll pick up simple techniques, easy color changes, and how to read mosaic charts — all while creating something truly stunning and giftable. ❤️
🧶 What you’ll love about this pattern:
- Beautiful vintage-inspired texture and colorwork 🪄
- Great for beginners wanting to try mosaic crochet
- Works up quickly — perfect for last-minute handmade ornaments!
- Makes a thoughtful gift or a keepsake for your own tree 🎁
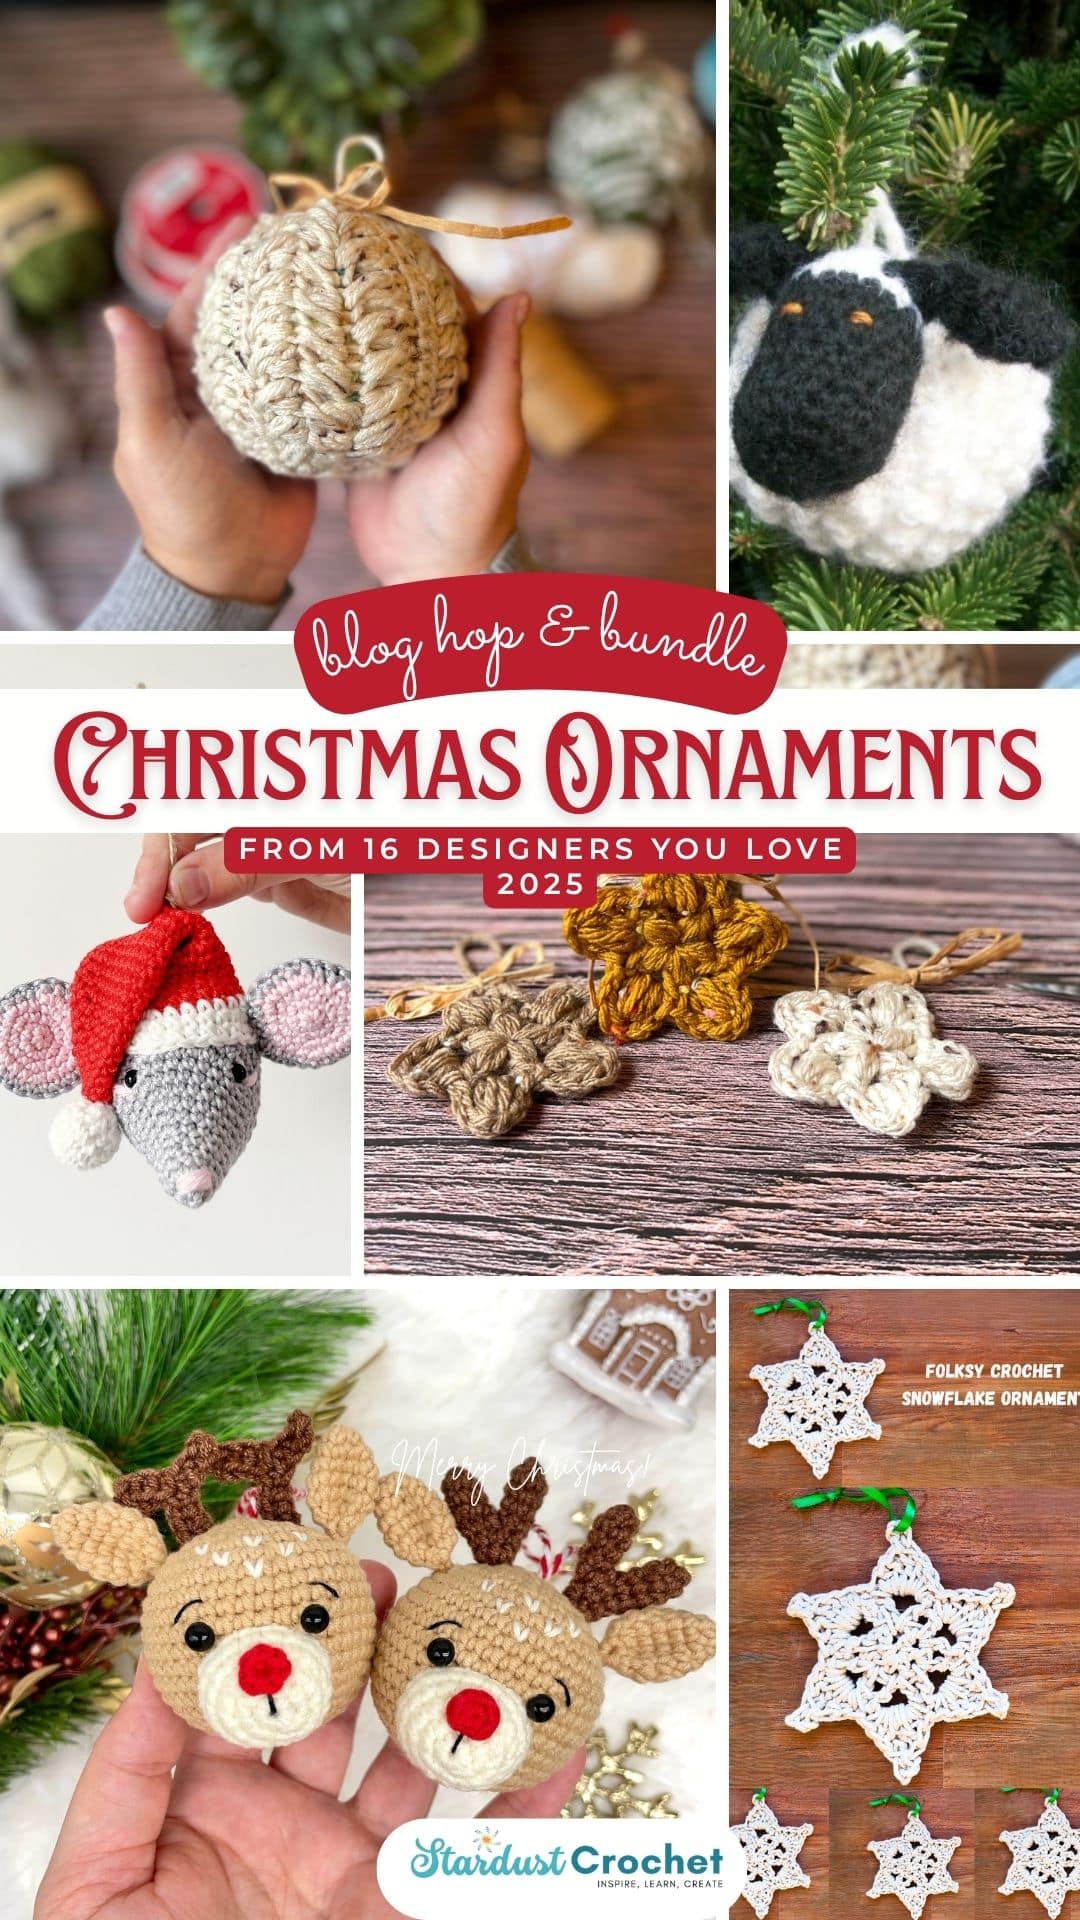
📘 The PDF pattern is available inside the Ornament Bundle, packed with 24 gorgeous designs from talented crochet designers.
If you’re a Lifetime Bundle Member, you’ll find it waiting for you in your Products Section — ready to download and start stitching! 🌟
So grab your yarn, cozy up with some cocoa ☕, and let’s make something beautifully nostalgic together. 💖
👉 Get the Ornament Bundle below and start your next mosaic adventure today!
Grab the Bundle – PRE-sale $10.99 (3 Days Only!)
Get it today for $10.99 – after the 3rd it goes up to $12.99!
- 📘 Get all 24 patterns in one amazing PDF file!
- 📄 184 pages (it’s a big one! 😍)
- 🧵 Beautiful instructions, photos, and how-to guides
- 🎥 Video links & more
- 📚 Get all 24 patterns in a clickable PDF with a full table of contents too! 🪄💫
BONUS: GET THE LIFETIME BUNDLE FOR just $15, at check out!
Click the image below or head over to the Christmas Ornaments Keepsakes ebook here.


Don’t miss an update!
I will send you an email reminder every day (please don’t report me for spam…pretty please) In the email, you will find the link to this page. You can also bookmark this page and set a reminder to come back every day for the links!
Every day you’ll get a link to a special FREE CROCHET PATTERN on the blog! Some designers (including myself) may offer a free pattern PDF along with it!
Bookmark this page. How do I do that? Here is an article on how to bookmark pages. The BEST way to never miss an update is to sign up for the Stargazers Newsletter below:
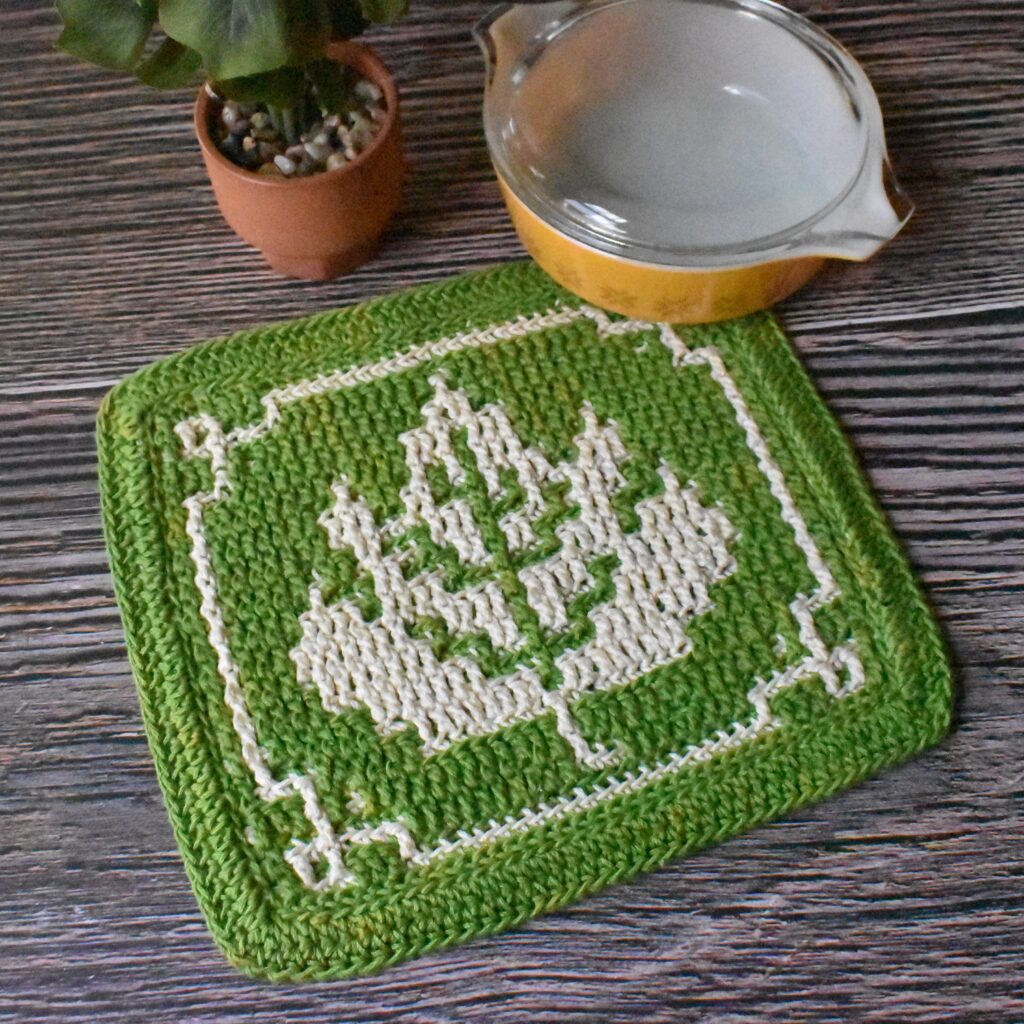
Vintage Nordic Mosaic Crochet Ornament
Pattern
Get ready to make this adorable mosaic crochet ornament. Perfect project to start your mosaic crochet journey. If you are new to mosaic, there are links throughout to help you learn.
I used two simple and stretchy 3-weight yarns – you can use scraps too, it’s a simple pattern. Use a 4 weight for a larger ornament.
Materials & Notions
Suggested Yarn: I used 3-weight yarn (Swish in white & red)
Estimated Yardage:
Color A: Approximately <1 skein
Color B Approximately <1 skein
- Hook Size: 3.25 mm (US D-3) or 4 mm (US G-6)
- Scissors
- Darning Needle
- Raffia (optional)
- Polyfill or yarn scraps
Sizes / Finished Measurements:
3” X 3” (7 cm x 7 cm)
Abbreviations
- bs – border stitch
- dc = front loop only double crochet
- sc = back loop only single crochet
- ch (s) – chain (s)
- st (s) – stitch(es)
- yo – yarn over
- fsc – foundation single crochet
[…] – Repeat inside brackets as many times as indicated.
(…) – Repeat inside brackets as many times as indicated.
More Mosaic Patterns

Stitch guide:
Sc = Back Loop Only Single Crochet: Insert your hook into the back loop only of the designated stitch. Wrap the yarn over your hook and pull up a loop. Yarn over again and draw the yarn through both loops on the hook.
Dc = Front Loop Only Double Crochet (aka drop down dc): Yo, insert your hook into the front loop only 2 rows down. Yo and pull up a loop. Yarn over and draw through two loops on the hook.
LEARN MOSAIC CROCHET
What is Overlay Mosaic Crochet?: Short Tutorial
Overlay mosaic crochet is a specific type of mosaic crochet where you work with two contrasting colors, but only one color per row. The magic happens by using a combination of single crochet (BLOsc) and front loop only dc (FLOdc) stitches to create the design. The FLOdc stitches are worked two rows below your current row, allowing the contrasting color from previous rows to peek through, creating the mosaic effect.
Key Aspects of Overlay Mosaic Crochet:
- One color per row: You cut the yarn after each row, then add the color to the beginning of the next row.
- No turning: You work each row from the right side (or “front”) of the fabric.
- Direction of Work: Right to left (can be worked left to right as well for the lefties out there!)
- Stitch combination: The interplay of BLOsc and FLOdc stitches creates the pattern.
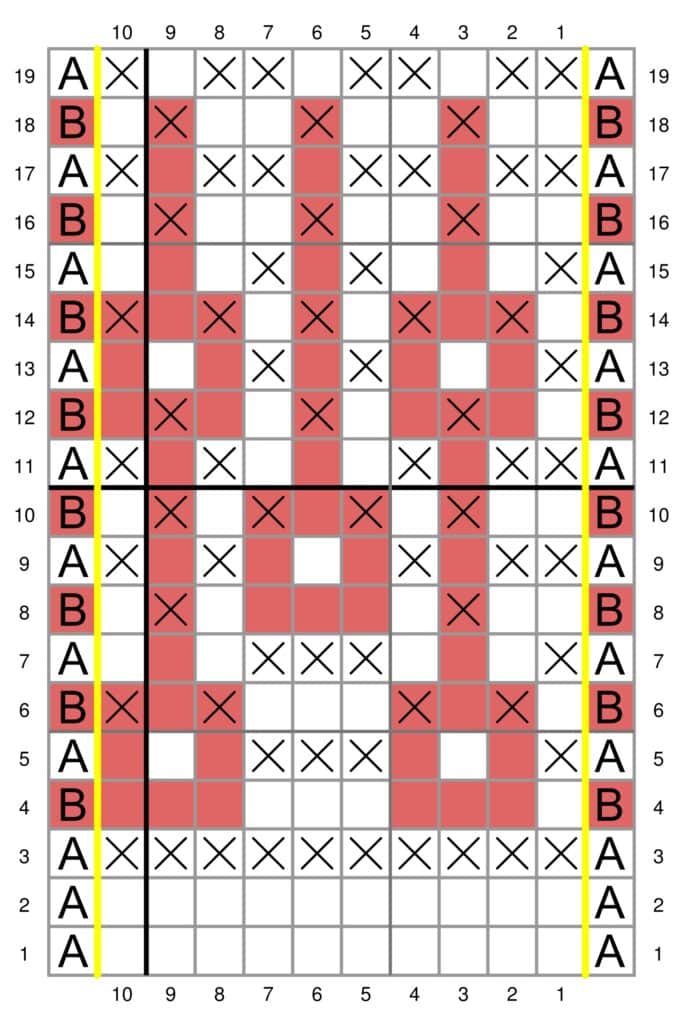
- Charts: Overlay mosaic crochet patterns typically rely on charts to guide the placement of stitches and color changes, however, written patterns are also helpful.
Basic Steps for Mosaic Crochet:
- Foundation chain: Start with a foundation chain (or chain + 1 for turning) in your main color. The number of chains will depend on the pattern.
- Border stitches: Most patterns begin and end each row with a border stitch (usually a single crochet placed diagonally into the V of the single crochet below to secure it).
- Follow the chart or written pattern: Use the chart to determine whether to work a BLOsc or a FLOdc in each stitch. Empty squares are BLOsc (regardless of what color the square is) and X’s are FLOdc regardless of what color the square is.
Tips for Success:
- Fixing mistakes: The beautiful thing about overlay mosaic crochet is it is easy to fix mistakes even from a few rows down. Simply untie the knot on the left side, rip back the first row, then do the same for the rows below until you reach the stitch you missed or made a mistake on. Fix it and finish crocheting the rows above.
- Read your chart carefully: Pay close attention to the symbols on the chart to ensure you’re working the correct stitches in the right places. Sometimes this can be confusing at first because the color of the square may not match – but trust the process.
- Block your finished piece: Blocking will help even out your stitches and showcase the mosaic design.
PATTERN: VINTAGE NORDIC CHRISTMAS ORNAMENT (MOSAIC CROCHET)
Notes:
- Pattern is worked in the round.
- Join in 1st stitch, ch 1.
- Mark 1st stitch of each round.
- The first stitch is always in the same stitch as the join
- Leave a long beginning tail and ending tails to cinch.
- Bring up colors as needed, drop when not using. You’re working on the right side so you will not see the color changes from the outside
Round 1:
Starting Chain: Create a chain of 30 + 1, sc in 2nd ch from hook and across – join ends (make sure there are no twists)- COUNTS AS ROUND 1 – skip to round 2 below.
Foundation Chain: Foundation single crochet 30 – join into the 1st stitch.
← Round 2 [RS]: Color A, 30sc.
← Round 3 [RS]: Color A, 30dc.
← Round 4 [RS]: Color B, 30sc.
← Round 5 [RS]: Color A, (1dc, 3sc, 3dc, 3sc) Repeat 3 times.
← Round 6 [RS]: Color B, ([1sc, 1dc] 2 times, 3sc, 1dc, 1sc, 1dc) Repeat 3 times.
← Round 7 [RS]: Color A, (1dc, 3sc, 3dc, 3sc) Repeat 3 times.
← Round 8 [RS]: Color B, (2sc, 1dc, 5sc, 1dc, 1sc) Repeat 3 times.
← Round 9 [RS]: Color A, (2dc, 1sc, 1dc, 3sc, 1dc, 1sc, 1dc) Repeat 3 times.
← Round 10 [RS]: Color B, (2sc, [1dc, 1sc] 4 times) Repeat 3 times.
← Round 11 [RS]: Color A, (2dc, 1sc, 1dc, 3sc, 1dc, 1sc, 1dc) Repeat 3 times.
← Round 12 [RS]: Color B, ([2sc, 1dc] 3 times, 1sc) Repeat 3 times.
← Round 13 [RS]: Color A, (1dc, 3sc, 1dc, 1sc, 1dc, 3sc) Repeat 3 times.
← Round 14 [RS]: Color B, ([1sc, 1dc] 5 times) Repeat 3 times.
← Round 15 [RS]: Color A, (1dc, 3sc, 1dc, 1sc, 1dc, 3sc) Repeat 3 times.
← Round 16 [RS]: Color B, ([2sc, 1dc] 3 times, 1sc) Repeat 3 times.
← Round 17 [RS]: Color A, ([2dc, 1sc] 3 times, 1dc) Repeat 3 times.
← Round 18 [RS]: Color B, ([2sc, 1dc] 3 times, 1sc) Repeat 3 times.
← Round 19 [RS]: Color A, ([2dc, 1sc] 3 times, 1dc) Repeat 3 times.
Leave a long tail to cinch the ends.
Assembly
- Step 1: Attach a needle to one tail and weave a running stitch through the top of the last round. Pull tight, then close the hole by weaving the yarn side to side.
- Step 2: Add stuffing as desired. Repeat Step 1 on the opposite end.
- Step 3: Shape by steaming or lightly spritzing with water, then form into an orb. Add raffia or a bow to finish.
Chart
If you are working from the chart only – create a foundation single row of 30 and join. Or create a chain of 30 + 1, single crochet in the second chain from hook and across (counts are Round 1 in the image below) join in 1st chain. REPEAT SECTION BETWEEN THE YELLOW LINES – 3 TIMES.
Congrats! You are finished!
Check out these other cute ornaments on the blog in November 2025.

Legal Stuff
This pattern and its images are the property of Stardust Gold Crochet ©2025. It is for personal use only. Please do not copy/paste, distribute, or alter and claim as your own. No permissions to mass produce or create a replica based on this pattern or design. You can sell finished items at markets with credit to the designer.
I’d love to see your finished patterns! If you make this pattern, please email a picture to [email protected] and I will include it in a gallery on my website. You may post pictures on social media and tag @stardustgoldcrochet and use the hashtag.
#StardustGoldCrochet
You can also post pictures on my Facebook Page, or in the Stardust Gold Crochet & Friends Pattern Support Group – OR – the Crochet-a-long-with-US Community.
Let me know if you run into a problem. I respond quickly and will help any way I can to clarify any confusion or challenging stitches.
Connect with Me!
Crochet Christmas Ornaments – Keepsakes Collection
Check out all the Christmas ornament patterns available free on the blog. Get them all in one bundle here >>> Christmas Ornaments Bundle.
Please leave any comments below, and thanks for visiting!


*any FREE pdf download participants agree to my privacy policy.
I am a member of the Lifetime Crochet Bundle and can not find this Nordic Mosaic Crochet Ornament – Vintage Style – pattern in the Products section. Can you help me please?