


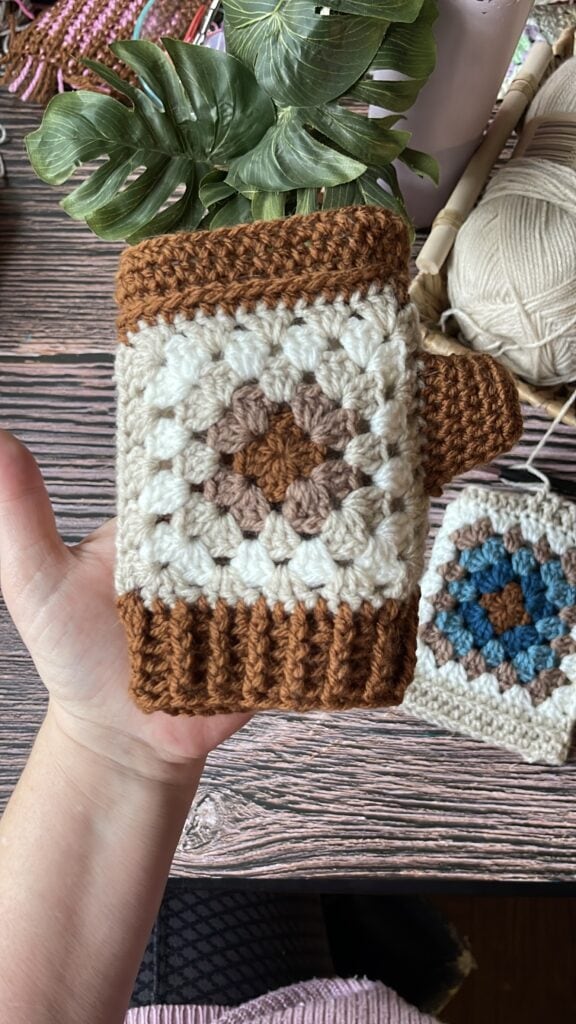
Brrr! 🥶 It’s heading into spring, but still a little chilly! These super easy granny square mittens can help with open fingers & thumbs for easy phone use! Perfect for beginners and advanced crocheters, these crochet mittens are an excellent way to use up your scrap yarn and create a stylish, handmade accessory.
This free crochet pattern will guide you step-by-step through creating these adorable granny square gloves, making them a fantastic weekend project. Get ready to bundle up in handmade happiness! 🧶🧤✨”
Colorwork Crochet Club is Here!
I started a fun crochet club in January and we have 27 members – we’d LOVE more crocheters to join – read all about it here >>> Join the Colorwork Club here.
Let’s Make some Cute Easy Granny Square Mittens!
I absolutely ❤️ love this 🥰 easy method of NO TAILS granny squares. This method makes creating granny square projects so much more fun. 😊 Scroll down for the free pattern, tutorials, and graphs. Much LOVE and Happy Crocheting!
Get the PDF Pattern Here
If you prefer an ad-free version to print out, please head over to the Infinite Yarniverse.
Get the DownloadWatch the tutorial here: Granny Square Mittens Video Tutorial


These adorable granny square mittens are a perfect cozy project for beginners, requiring only a few simple squares and basic stitches like single crochet, double crochet & half double crochet. Making them a relaxing and fun way to learn or practice your crochet skills. You’ll have warm, handmade mittens in no time, and they’re easily customizable with your favorite colors!
Get notified of new pattern releases by becoming a Stargazer (my newsletter) Sign up here!. Grab all my patterns in the Lifetime Bundle! 93 patterns + ALL future patterns – get 30% off now CODE: LIFETIME30.
I hope you enjoy this easy pattern. Pattern support? Head over to Stardust Gold Crochet & Friends.
Difficulty
![]()


You can use ANY weight yarn with graphgan patterns. I chose to use a 5-weight yarn because I wanted to make it with plushie yarn and a little larger. But this graph & pattern can be created using 4-weight, or even 3-weight (although it may be smaller)
All About the Yarn…
I went with Yarnsmiths CREATE DK yarn for my Granny Square Mittens because it’s a lightweight yarn that has over 50 beautiful colors. They have worsted weight, but I went with 3 (DK) weight for these for better stitch definition and fit.
Yarn Substitutions:
I recommend using any 3 weight with similar gauge, but because these gloves are completely customizable, you can use a worsted weight or even a chunky yarn. The top border and bottom borders are so easy to modify to accommodate changes.
PATTERN:
Materials & Notions
Watch the Full Video Here.
Suggested Yarn: Yarnsmiths CREATE DK weight or equivalent 3 weight yarn – 100% Acrylic, 290 m (approx 317 yds), 100 g (3.5 oz) in the following colors:
(color name – color number)
Blue & Cream Mittens:
- Rust (3074)
- Petrol (3234)
- Steel Blue (3251)
- Latte (3069)
- White (3040) or Off White (3045)
- Linen (3061)
Brown & Cream Mittens:
- Rust (3074)
- Latte (3069)
- Linen (3061)
- White (3040) or Off White (3045)
Yardage Needed:
Minimal amounts needed for each color. Approximately 55 or less for each glove in total. My finished glove weighs 0.67 oz and 0.85 oz for the brown glove with fingers
- Hook Size: For smaller glove: 4.0 mm (USA G) or 5 mm (USA H) for larger
- Scissors
- Darning Needle
- Flexible Measuring Tape
Gauge:
I recommend measuring your hand side to side and adjust accordingly by using different hook sizes.
Small Glove (using 4 mm hook) = 5 rounds of granny square = 4” (10 cm)
Larger Glove (using 5 mm hook) = 5 rounds of granny square = 4.5” (11.43 cm)
Sizes / Finished Measurements:
Estimated Dimensions:
Blue & Cream Mittens: (5 mm hook): Top to bottom = 6.5”, Side to Side = 4.5”
Brown & Cream Mittens: Top to bottom = 6”, Side to side = 4”
Abbreviations
- Ch (s) – Chain (s)
- St (s) – Stitch(s)
- Sl st – Slip stitch
- Yo – Yarn over
- Sc – Single crochet
- Dc – Double crochet
- Hdc – Half double crochet
- StD- Stacked double crochet
- Sc2tog – Single crochet 2 together
- * – Repeat from * as many times indicated.
Stitch guide:
Sc – Single Crochet – Insert hook in indicated stitch, yo, pull up a loop, yo and pull through both loops.
Hdc – Half Double Crochet – Yo, insert hook in indicated stitch, draw up a loop. Yo, draw through all 3 loops on the hook.
Dc – Double Crochet – Yo, insert hook in indicated stitch, yo, draw up a loop, (yo, draw through two loops) x 2.
StD – Stacked Double Crochet – Create a single crochet in indicated stitch. Insert hook into the left vertical bar of the single crochet, yo, draw up a loop. Yo, draw through both loops on hook (1 stacked double created) – sub for this: Use a chain 3 instead and work stitch into the same as your chain.
Sc2tog – (Single 2 Together – a sc crochet decrease) – *Insert hook in next stitch, yo, draw up a loop, repeat from * 1 more time, yo, draw through all 3 loops on hook (1 sc dec made)
Third Loop – The third loop of a hdc is located behind the back loop.
Notes:
- Create 4 granny squares.
- Recommend measuring your hand first and adjust the hook accordingly to get the right fit.
- I used a ch 1 between each dc3cluster.
- Share your work on social media using the hashtag: #GrannyStitchMittens #Stardustgoldcrochet
Color Pallette
You can choose any colors you’d like of course. Here is the color palette using the Create by Yarnsmiths Yarn along with the abbreviations used in the pattern.
Two Styles of Gloves
Blue & Cream Mittens:
- Row 1 – Rust (3074)
- Row 2 – Petrol (3234)
- Row 3 – Steel Blue (3251)
- Row 4 – Latte (3069)
- Row 5 – White (3040) or Off White (3045)
- Linen (3061) (Ribbing & Top)
Brown & Cream Mittens:
- Row 1 + (Ribbing & Top) – Rust (3074)
- Row 2 – Latte (3069)
- Row 3 & 5 – Linen (3061)
- Row 4 – White (3040) or Off White (3045)

Granny Square Tutorial:
If you don’t know how to create a granny square yet, head over to this tutorial: No Tails Granny Square Tutorial – below is the written version.
Round 1: Create a magic circle or chain 2 and work your stitches into the 1st chain.
StD or Ch 3 (counts as first dc), dc 2, ch 1, dc 3, *dc 3, ch 1, repeat from * 2 more times, ch 1, join in 1st StD (or top of ch-3), sl st in the next 2 dc and into the ch-1 space, ch 1, cut & tie off. (12 dc, 4 ch-1)
Round 2: Add your next color in the same ch-1 space. StD or Ch 3 (counts as first dc), dc 2, ch 1, dc 3 into the same ch-1 space (corner made). *(dc 3, ch 1, dc 3) into the next ch-1 space (corner); repeat from * two more times, ch 1, join in 1st StD (or top of ch-3), sl st in the next 2 dc and into the ch-1 space, ch 1, cut & tie off. (24 dc, 4 ch-1)
Round 3: Add your next color in the same ch-1. StD or Ch 3 (counts as first dc), dc 2, ch 1, dc 3 into the same ch-1 space (corner made). *dc 3 into the next ch-1 space, (dc 3, ch 1, dc 3) into the next ch-1 space (corner); repeat from * two more times, dc 3 into the next ch-1 space, join in 1st StD (or top of ch-3), sl st in the next 2 dc and into the ch-1 space, ch 1, cut & tie off. (36 dc, 4 ch-1)
Round 4: Add your next color in the same ch-1. StD or Ch 3 (counts as first dc), dc 2, ch 1, dc 3 into the same ch-1 space (corner made). *(dc 3 into the next ch-1 space) repeat until you reach the next corner, (dc 3, ch 1, dc 3) into the next ch-1 space (corner); repeat from * two more times, (dc 3 into the next ch-1 space) repeat until you reach the start, join in 1st StD (or top of ch-3), sl st in the next 2 dc and into the ch-1 space, ch 1, cut & tie off. (48 dc, 4 ch-1)
Round 5: Repeat Round 4 and for all subsequent rounds you’d like to add. (60 dc, ch-1)
Note: the stitch counts for the top and bottom of the glove will be different from the written pattern if you crochet more than five rows.
Finish: Fasten off and weave in your ends.
Creating the Top Border:
Grab two of your granny squares and position them with the WS’s facing each other. Attach your border color in the top right ch-1 corner space (top left for lefties).

Row 1: Ch 1, hdc in the same as ch-1 space. Working on front granny square only; Hdc in next 15 dc. Bring up the back piece, match the corner and hdc through both pieces in the ch-1 space. Hdc in next 15 dc. Join in 1st hdc with sl st. (32 sts)
Row 2: Ch 1, hdc (third loop) in the same stitch, hdc in next 31 sts, join in 1st hdc. (32 sts)
Row 3: Ch 1, hdc in same stitch, hdc in next 31 sts, join in 1st hdc. (32 sts)
(optional decrease row)
I found this helpful to draw-in the top.
Row 4: Ch 1,sc in each stitch around, sc2tog every 8 – 9 stitches. Join in 1st sc, tie off and weave in all tails.
Creating the Bottom Cuff (2 ways)
There are two ways to create the cuff, both are fairly easy.
First, we are going to create a decrease row.
Row 1: Join yarn in corner ch-1 like we did creating the Top Border. Ch 1, sc in the same corner ch-1 space, *sc in next 2 stitches, sc2tog, (sc in next 3 stitches, sc2tog) x 2**.
Bring corners together, work through the ch-1 space on both pieces, sc in that ch-1 space. Repeat from * to **, sc in last stitch, join in 1st sc with sl st. (26 sts)
(don’t cut yarn)
Simple ribbings:
There are two ribbings you can create. The first is a simple single crochet back loop only – back and forth. The second is a back loop and front loop only double crochet stitch.
Single Crochet Ribbing:

Row 1: Ch 7, sc in 2nd ch from the hook and in each chain down (6 sc), sl st in base, *ch 1, turn, sc (BLO) in next 6 sc. Ch 1, turn, sc (BLO) in each stitch down to base. Sl st in next stitch on base. Repeat from * until you reach the beginning. Join by slip stitching up through the beginning stitches, tie off and weave in all tails.
Front & Back Post Ribbing:
StD or Ch 3 (counts as dc), dc in each stitch around. Join in with a sl st into the first stitch (or top of ch 3) of the round. Ch 2, *FPdc around next st, BPdc around next, repeat from * around. Join in 1st FPdc. Repeat from ** as many times you’d like until the cuff is as long as you’d like.
Sewing the Sides:
I used the mattress stitch to join my sides. Highly recommend checking out the video for this step.
The placement will depend on your hand size but here is where I placed my markers:

Thumbs (optional):
Insert hook into the stitch in the inseam between the thumb and index finger. Ch 1, hdc around. Join, and repeat as many times needed for your desired thumb height. Cut, tie off and weave in all tails.
Congrats! You are finished!
Thanks for Crocheting Along with Me
Collaboration Designer Crochet Blankets You May Like


Thanks for being here! Show me your Granny stitch Mittens!!
I hope you enjoyed this pattern and thank you so much for being here!


Hello and thank you. The video is private, can you share it please ?Thanks
These look lovely! Are they part of the Lifetime Crochet Pattern Bundle?