This is so exciting! I absolutely love 


Go easy on me y’all…I have changed my writing style since this was released, so you may notice some variations or things that don’t quite make sense or are not entirely consistent compared to my recent patterns. I have gone through a fine tooth comb to try to update to my current writing style, but it isn’t perfect
Also, translating this 18 page PDF to blog post style was grueling! But I’m so happy to have it out there for everyone.
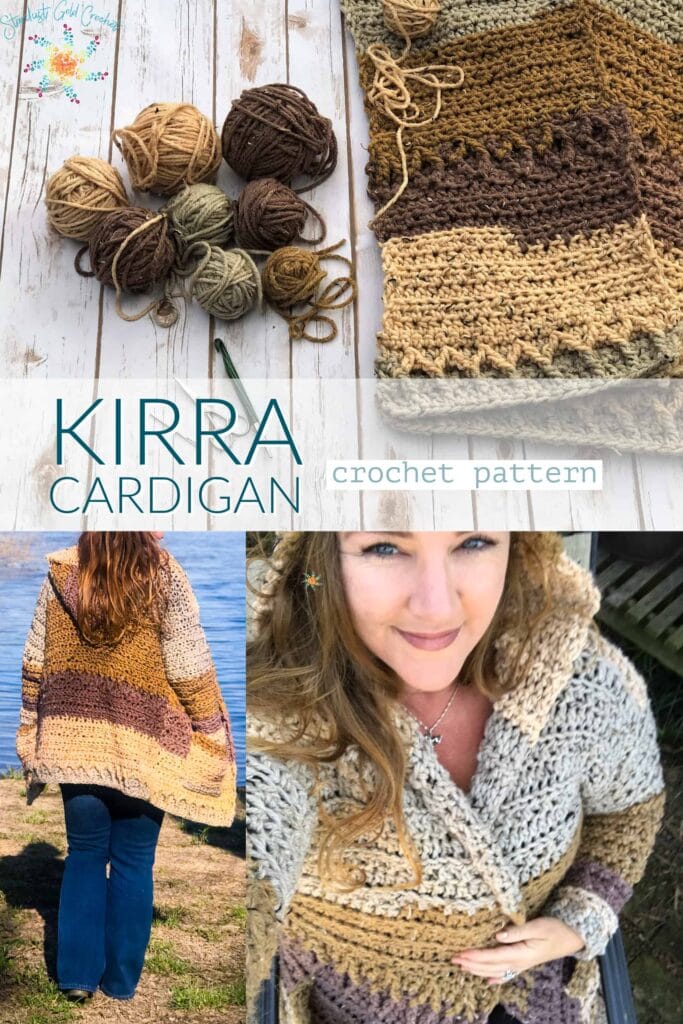
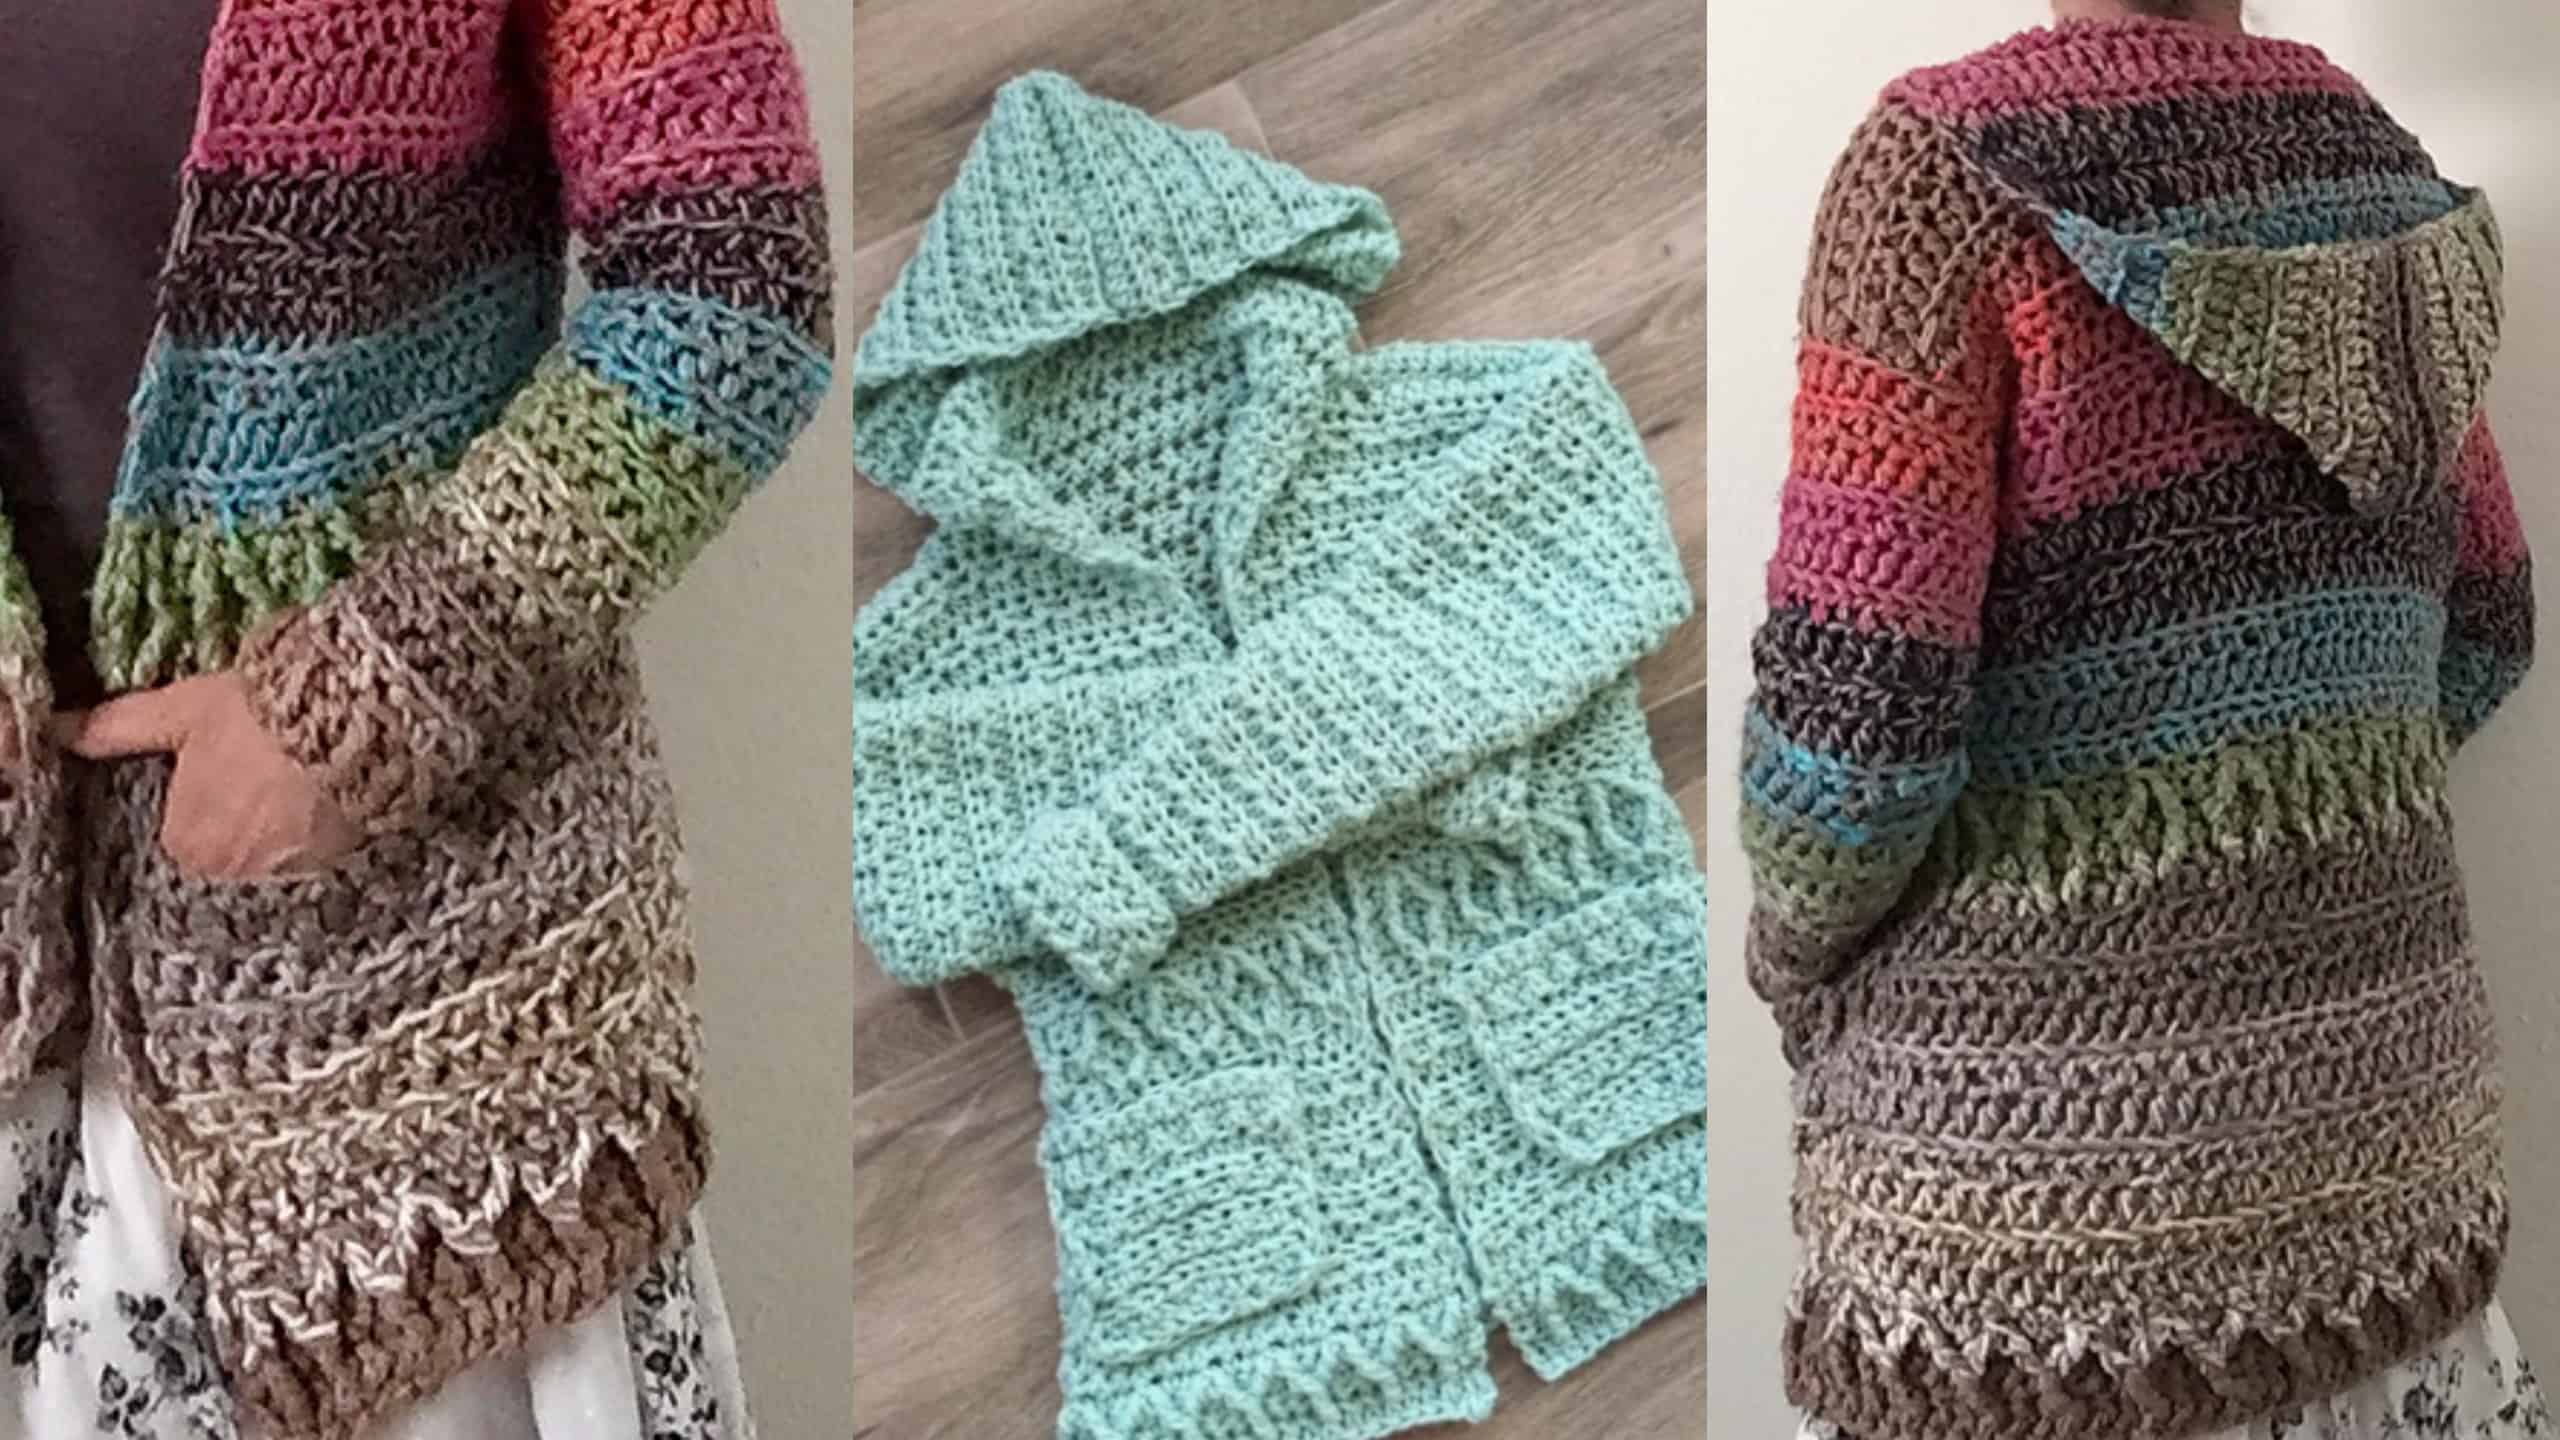
The Kirra Cardi (Kirra Cardigan) uses a bulky weight yarn that is unfortunately discontinued right now…however, read more about suggested yarn subs and other cool techniques you can use to make this cute crochet cardigan below.
If you prefer a PDF pattern, you can grab that here: Kirra Cardigan – Hooded Cardigan or click the button below.
Kirra Cardigan – Hooded Cardigan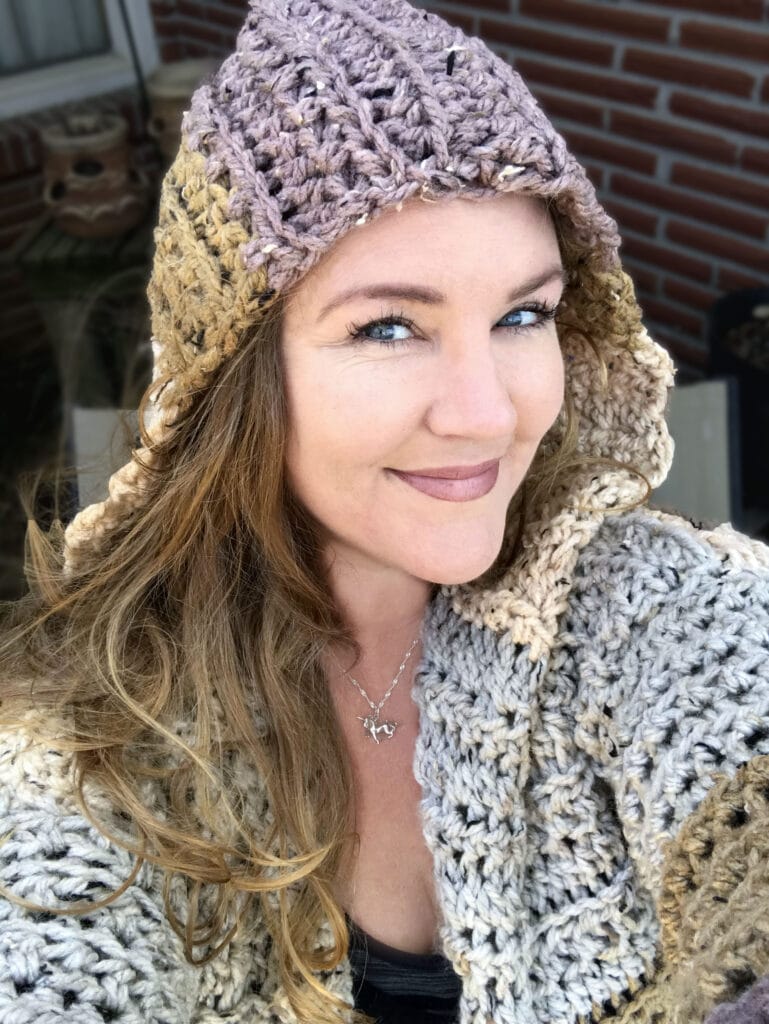
Beginner Crochet Cardigan Pattern, You will Learn…
- How to Crochet a Cardigan.
- Front Post Treble Crochet (FPtr)
- Front Post Double Crochet (FPdc)
- Front Post Treble 2 Together (FPtr2tog)
- Foundation Single Crochet (fsc)
- Foundation Half Double Crochet (fhdc)
- Half Double Crochet
- Assembling a Cardigan
It’s designed to sit by the campfire, on the porch, or crocheting on a chilly night. It is somewhat holey, so it isn’t great for super cold weather, but perfect for a fall night by a fire. Some of the testers so many compliments on it, they made two!
I’m so happy to share this one with you guys, and I really hope you enjoy creating. Also, despite it being tested over and over, there still may be some mistakes, so if you find one, please do me a solid and leave a comment so everyone can see, and we can fix it together. 
The inspiration…
The Kirra Cardigan aka Kirra Cardi inspiration came from my beautiful niece Kirra, she has blonde hair, and is absolutely beautiful. When she held this yarn next to her, it all just came out! I wanted to create something like 1975 say hello to 2018, and it’s teen approved! This is a great beginner crochet cardigan pattern to learn how to crochet and assemble a cardigan.
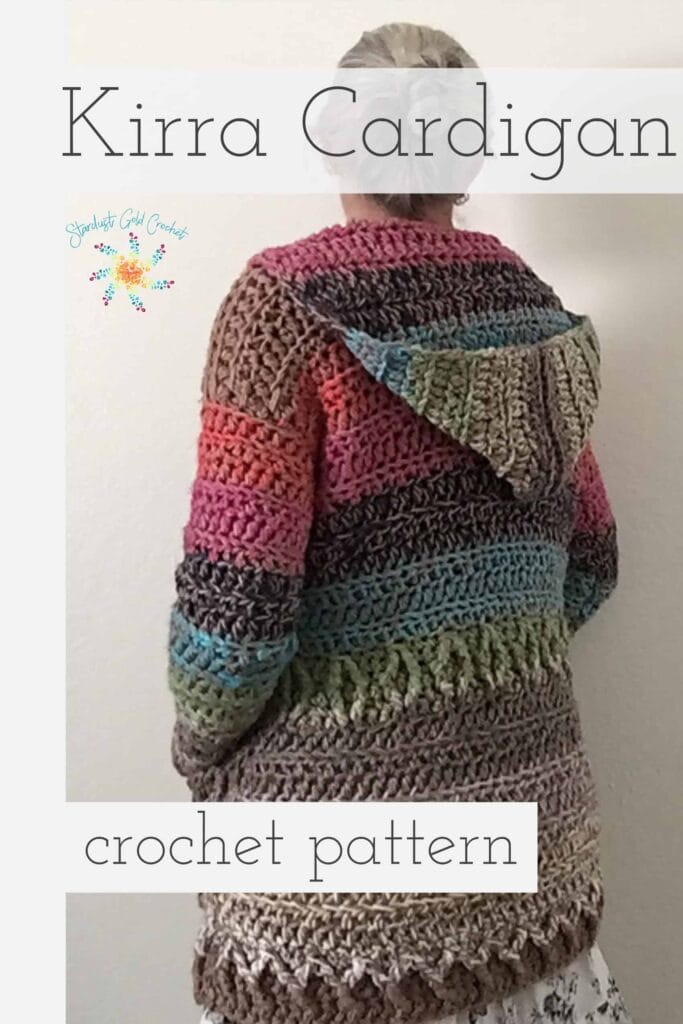
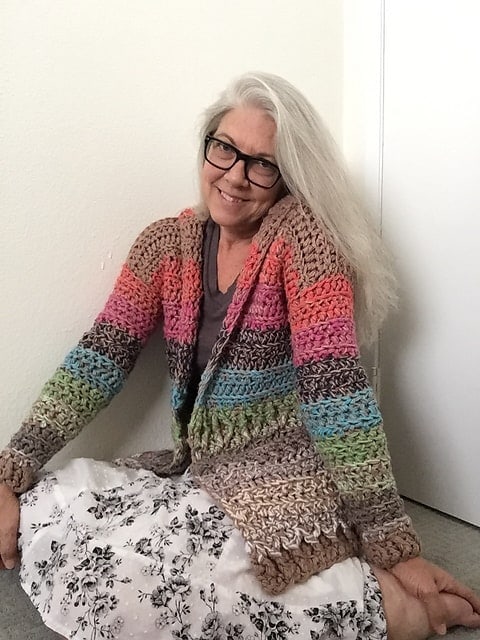
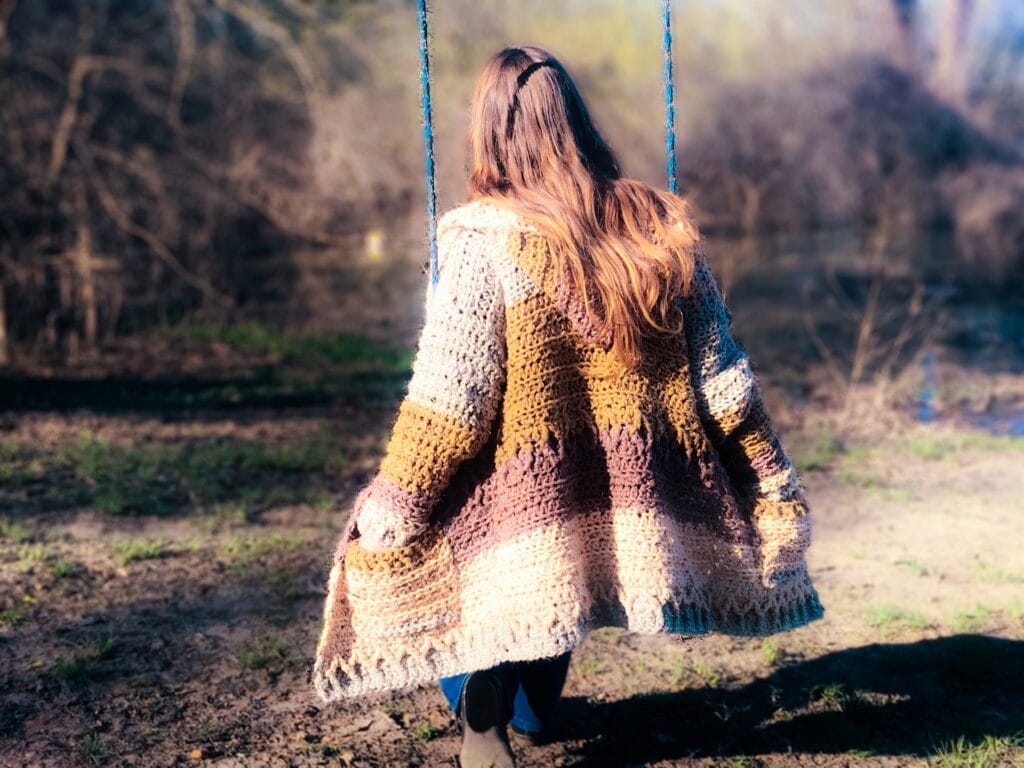
Here are a few samples from my testers pictured in size small:
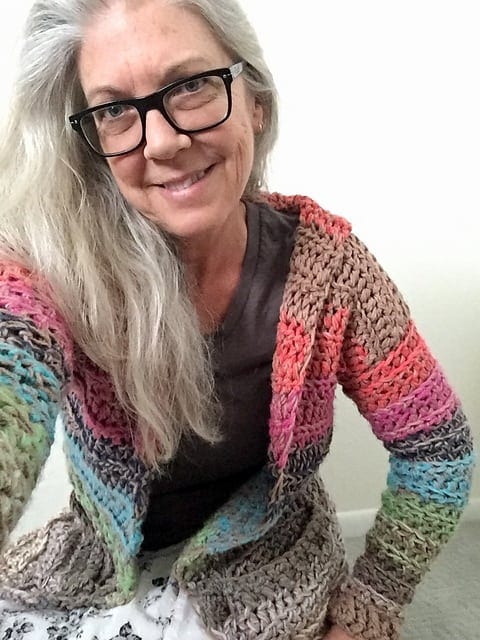
She joined two yarns together to get the same effect of using a super bulky yarn and it looks fabulous!
Kirra Cardigan Video Tutorial:
Are you a visual learner like me? The video tutorial covers the first 22 rows or so and hopefully it can help you work through the more difficult aspects of the pattern.
I hope you enjoy creating this cardigan, and learn something new in the process. If you need help or learn visually, the Kirra Cardigan Video Tutorial (YouTube Link) can help you. Jump to the bottom of the page to see the full video – please go easy on my y’all – this was one of my first tutorials and the lighting was terrible. Also, my nails….yikes! My nails looked bad. I love y’all anyway.
Pattern Support:
I’m always here to help if you get stuck! Please don’t hesitate to comment here or visit my Facebook group Stardust Gold Crochet & Friends with any questions.
I want to help you learn new techniques and spread the joy of crochet – it’s called *joy* for a reason – crochet is a way to relax. I understand it can be frustrating learning new things, but that’s why I’m here – to help you learn and inspire you to create.
I would absolutely 
Hashtags
#stardustGoldCrochet #kirraCardigan
so I can see them 

It’s All About the Yarn…
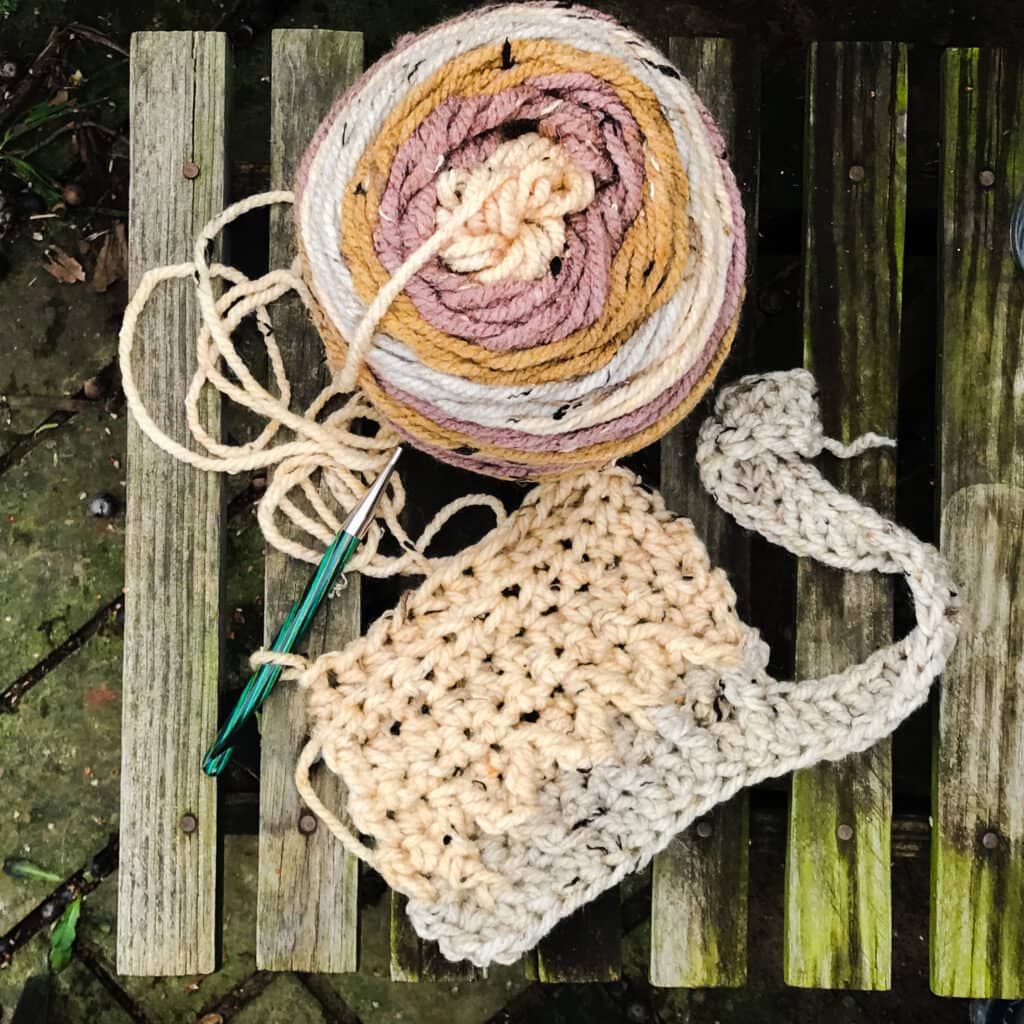
The original pattern was created using Caron Sprinkle Cakes – these are unfortunately discontinued now. However, Yarn Sub has some great yarn subs. Another great method to create an original crochet cardigan is to double up on a worsted weight yarn in two colors (see my testers version below).
Color changes:
Despite sprinkle cakes being discontinued, I recommend following the color changes listed in the pattern, unless you want to create it in a solid color. Either way works, and both look beautiful. I’m going to drop a hint here and say I’d LOVE to see this worked up in a solid tweed 
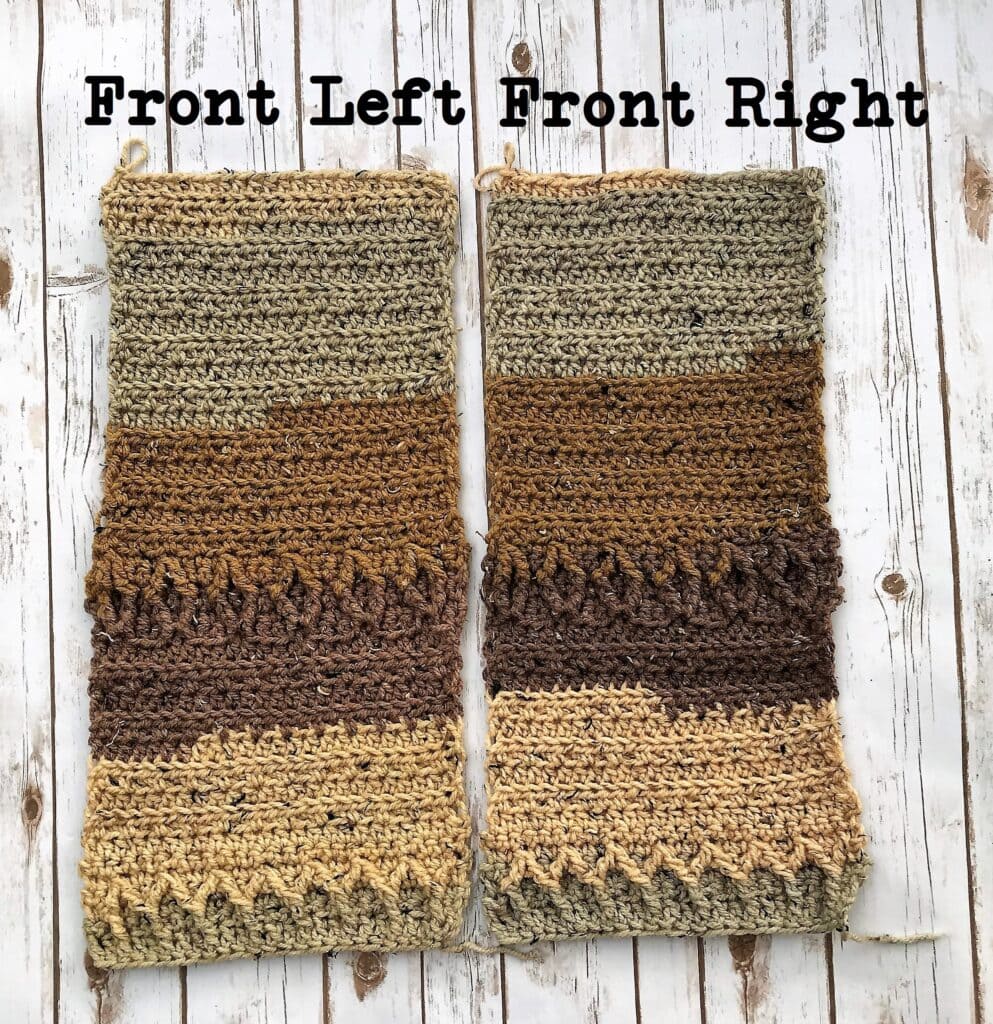
I started the front panel and let the colors flow, then found a cake with similar pattern and crocheted the second panel.
If you are creating your cardigan and want to make consistent color changes, see the image below to get an idea of how many rows per color will match. You can see my color changes are not perfect on the front panels because I let it flow.
The back panel section will show you how I purposefully changed colors to match these front panels.
+ Skill Level
Ambitious Beginner to Intermediate because it involves sewing together a garment.
+ Gauge
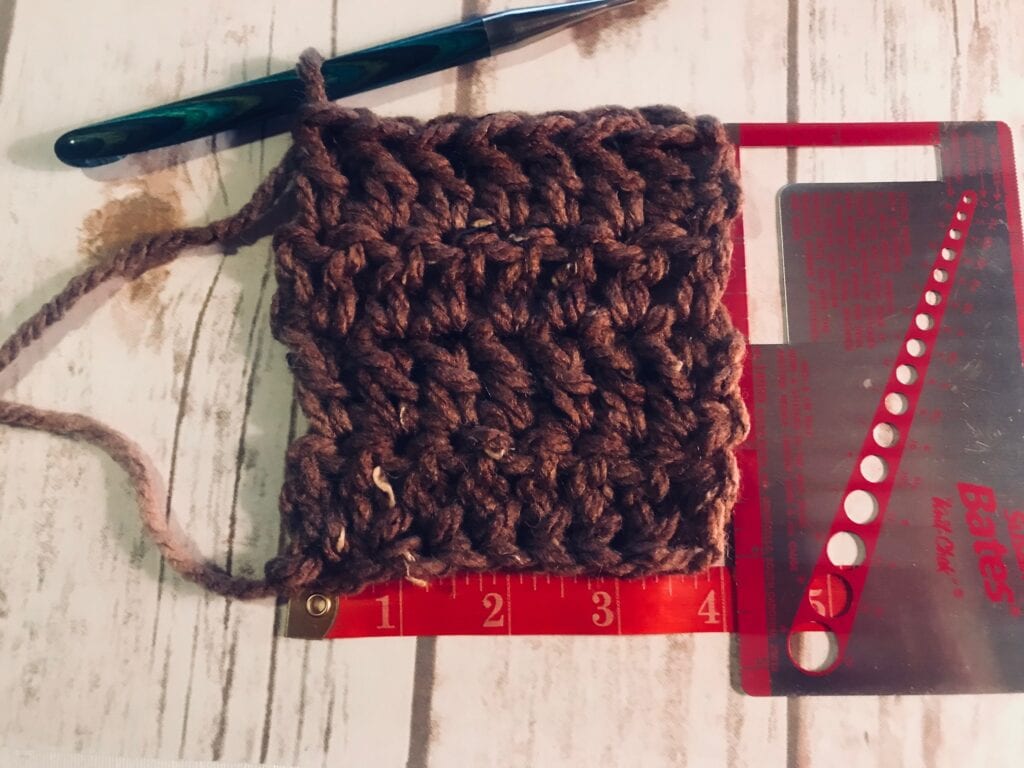
7 sts x 4 rows = 4” x 4” (10 x 10 cm)
Directions for gauge: fdc 7, (first chain does not count as a stitch) ch 2, turn. dc in same space as chain and across entire row, ch 2, turn – repeat until you reach 4 rows.
+ Materials
Suggested Yarn
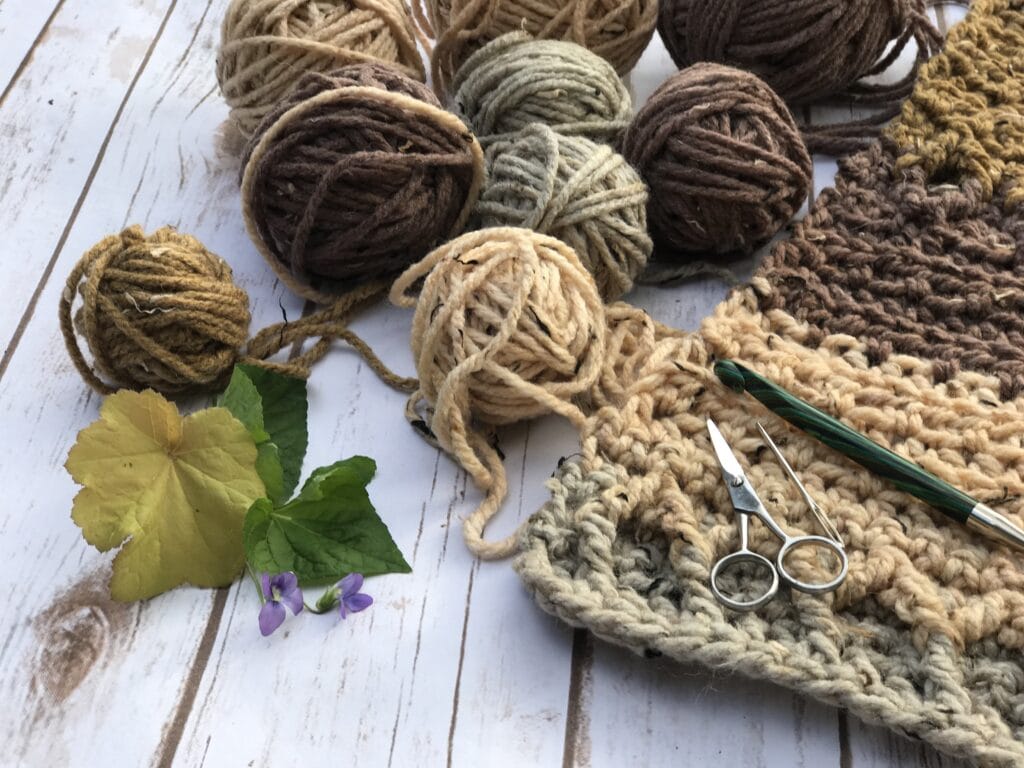
- Yarn: Any 6 weight (Super Bulky) – Kirra Cardigan in photos with brown cardigan uses Caron Sprinkle Cakes in Pecan Fudge (see above for yarn subs).
- Yardage: 1100-1200 yards – I used 6 cakes total, with plenty left over although my testers used one color yarn and they only used around 800 yards (please see notes for how I created the color changes).
- Hook Size: 10 mm (N/P-15)
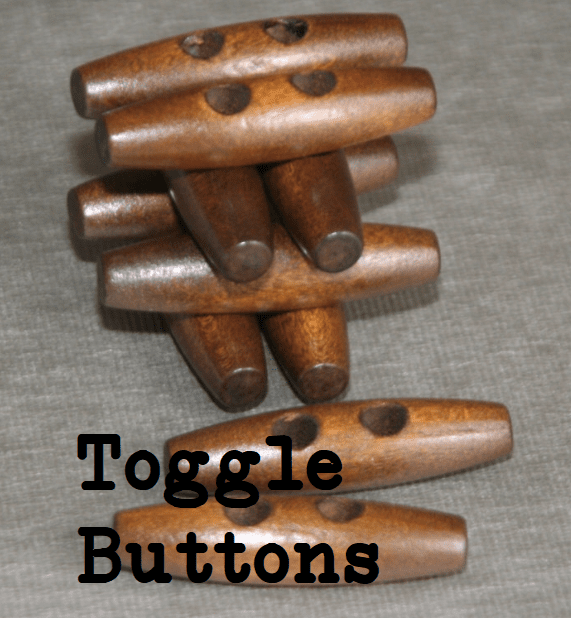
- Accessories: Wooden Toggle Buttons (Etsy affiliate) 2” (5-10cm) you will need 4 – 6 of them.
- Scissors
- Darning Needle
+ Yarn Details
Fiber: 77% Acrylic, 20% Wool, 3% Other Fiber Super Bulky (#6); Each Skein: 8.5 oz. / 240 g 204 yd. / 186 m
+ Sizes
Kirra Cardi is available in 3 written sizes, Large, Medium, & Small.
+ Measurements
Approximate: Back panel width: L = 24” (58.5 cm) M = 22” (56 cm) S = 20” (50 cm).
+ Abbreviations
| beg | beginning |
| ea | each |
| sc | single crochet |
| hdc | half double crochet |
| fdc | foundation double crochet |
| fsc | foundation single crochet |
| fpdc | front post double crochet |
| fptr | front post treble crochet |
| fptr2tog | front post treble 2 together |
| st | stitches |
| BLO | back loop only |
| FLO | front loop only |
| ch | chain |
| lp(s) | loop(s) |
| sl st | slip stitch |
| sk st | skip stitch |
| *…* | repeat instructions between *…* indicated times |
+ Stitch Guide
This stitch guide writes out the actions on creating the stitches, but please watch the video to help you if you need a visual reference.
sc – single crochet – insert hook in indicated st, yo, draw through both lps on hook
fdc – foundation double crochet – create a slip knot, ch 3, yo insert hook in first ch, *yo, pull up a loop, ch 1, yo, pull through 2 loops until one loop is left on hook* – repeat between*, except insert hook in ch 1.
fsc – foundation single crochet – create a slip knot, ch 2, insert hook in first ch, ch 1, yo, draw through both loops on hook. repeat except insert hook in chain.
fhdc – foundation half double crochet – create a slip knot, ch 3, insert hook in first ch, ch 1, yo, draw through all loops on hook. repeat except insert hook in ch 1.
hdc – half double crochet – yo, insert hook in indicated st, yo, draw through all three loops on hook.
FPdc – front post double crochet – yo once, insert hook in indicated st (from front to back and out the front again). yo and draw through two loops until only one loop on hook remains on hook.
FPtr – front post treble crochet – yo 2 times, insert hook around indicated st (from front to back and out the front again). yo and draw through two loops until only one loop on hook remains on hook.
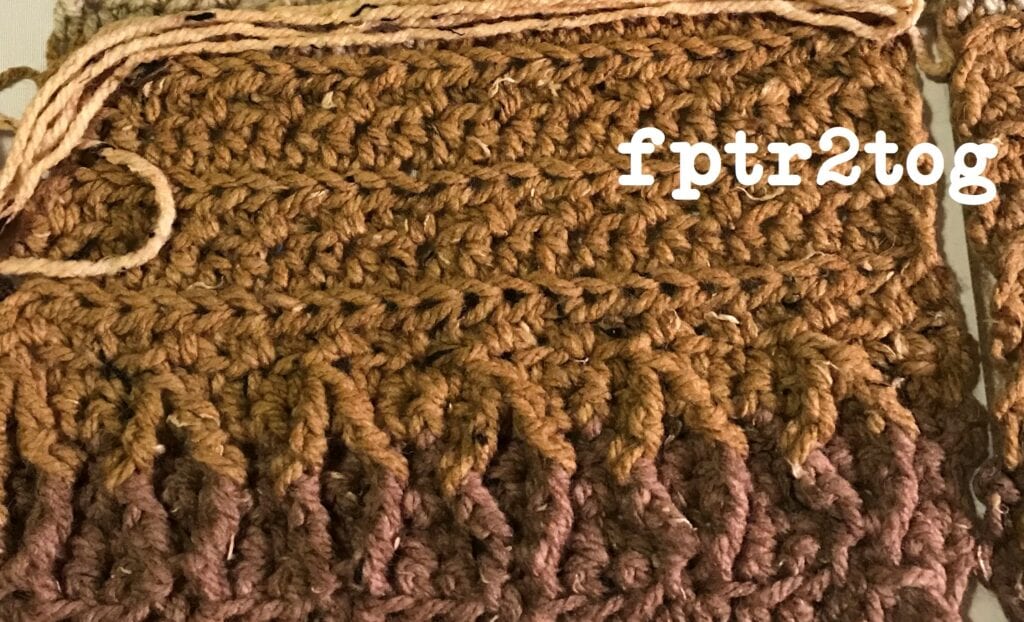
FPtr2tog – front post treble crochet 2 together – *yo 2 times, insert hook around post of indicated stitch (from front to back and out the front again), yo, draw up a loop. yo, draw through 2 loops* (2 loops left on hook), repeat from * to * (3 loops left on hook) yo and draw through all loops on hook to complete the stitch. this counts as one stitch.
+ Pattern Notes
- I write my patterns for readability and make them beginner friendly. The words in bold are stitches and actions 😊.
- Stitch counts are at end of each row in parentheses (L) (M, S).
- Repeats for ea size are also noted in parentheses (L) (M, S).
- Remember to count your stitches 😉.
+ Instructions
To start…
Get your yarn ready and let’s go! I’ve written the pattern so you can accurately copy the cardigan in the photos, however, if you choose to work with solid yarn, no color changes, that is fine too. I worked the pieces in this order:
- Right front panel
- Left front panel
- Back panel
- Hood
- Arms
- Pockets
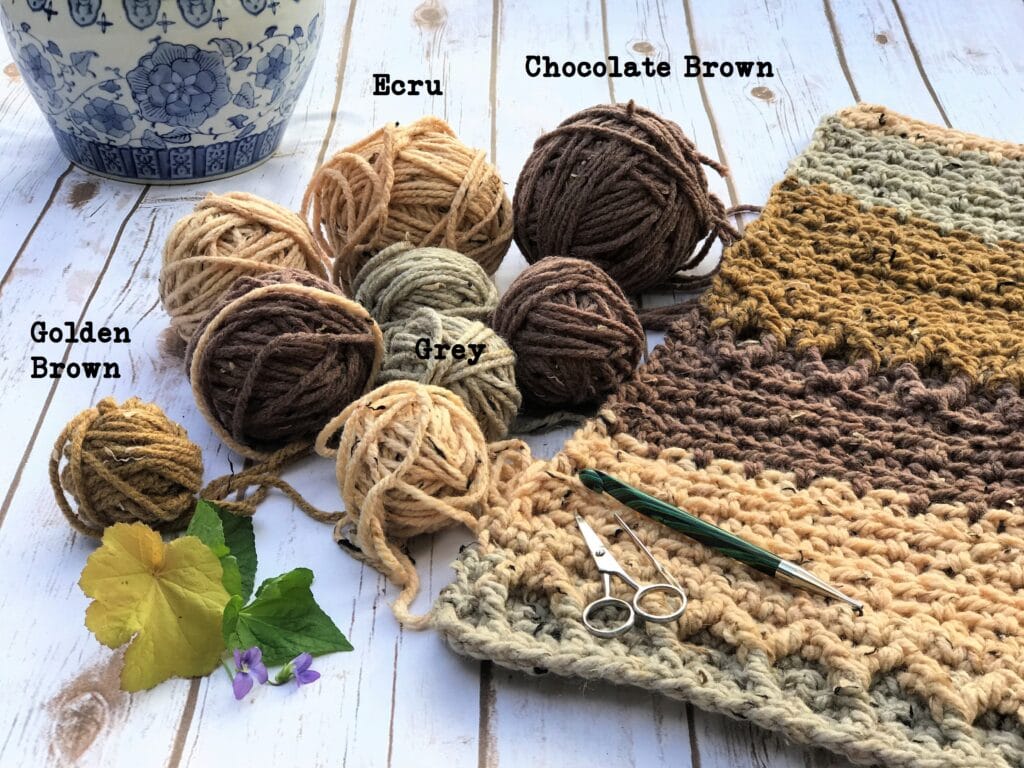
I started with two cakes that matched in color; meaning both started with Grey in the center. I worked the front panels continuously, letting the colors change with the yarn, using one cake per panel, starting from the center of the cake. When the first front panel was complete, I deconstructed the left overs from that ball and set them aside. I then used a new cake to start the next front panel.
I deconstructed the remaining cakes separated by color (I used about 6 cakes total – two for the front panels, and deconstructed the rest – there is enough left over to make a hat). The back panel, pocket, and arms are worked with intentional color changes (all color changes are noted in the pattern).
+ Pattern
Note: Unless otherwise noted in the pattern, please remember to use these guidelines:
- 1st st of row is made in the same space the as turning chain (unless otherwise indicated).
- Turning chains (and the first foundation chain of row 1) are not counted as a stitches and therefore not included in the stitch count.
- Companion Video for this design is available here: Kirra Cardigan video tutorial
+ Front Panels (Make 2)

Notes: Right and Left front panels are created the same way. Stitch count is at end of row listed as (L), (M, S). Repeats are noted in same order as stitch count (L), (M, S).
Row 1: Fdc 24 (22, 20). ch 1, turn.
Row 2: *Sc (BLO), sc (FLO)*, repeat from *…* to end of row, ch 1, turn. (24) (22, 20).
Row 3: Sc in first stitch, *FPtr around fdc of row 1 directly below next stitch, skip stitch on current row, sc in next 2 sts* – *repeat* (7) (7, 7) times.
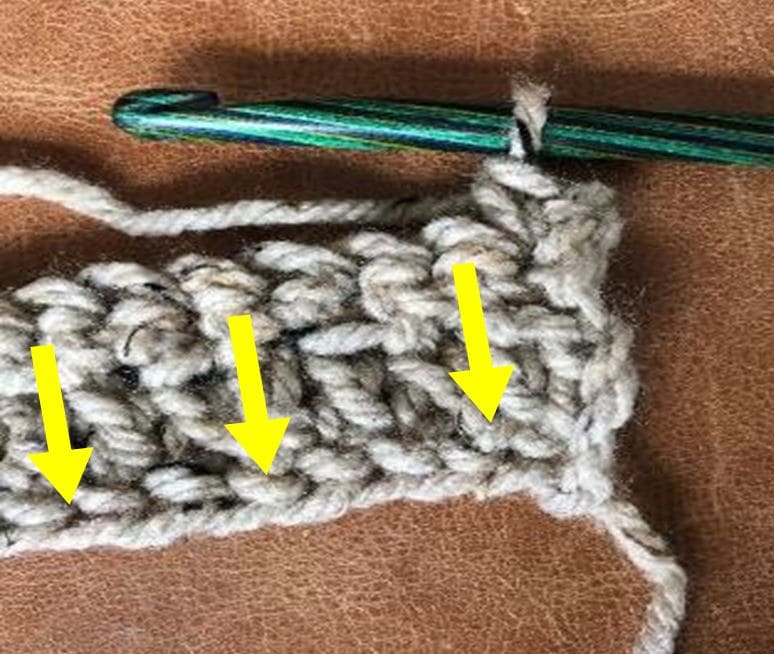
Finishing Row 3 – via size: Large: FPtr around fdc of row 1 directly below next st, skip 1 stitch, sc in last stitch of row, ch 1, turn. (24) Medium: The repeat ends the row with 2 sc, so just complete 7 total repeats and the row is complete, ch 1, turn. (22) Small: Work the repeat in row 3, 6 times, you should have 1 stitch left on row, FPtr around fdc from row 1, don’t skip a stitch, sc in last st of row, ch 1, turn. (21)
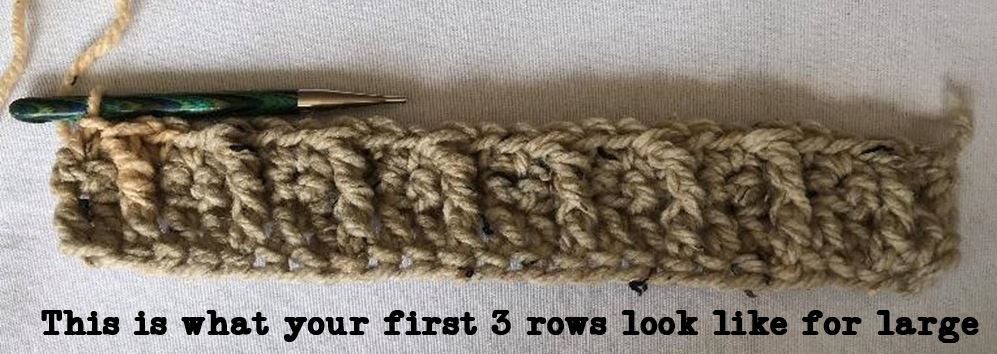
Row 4: Large & Medium: Sc in each stitch across, ch 1, turn. (24, 22) Small: Skip 1st stitch, sc in each stitch across, ch 1, turn. (20)
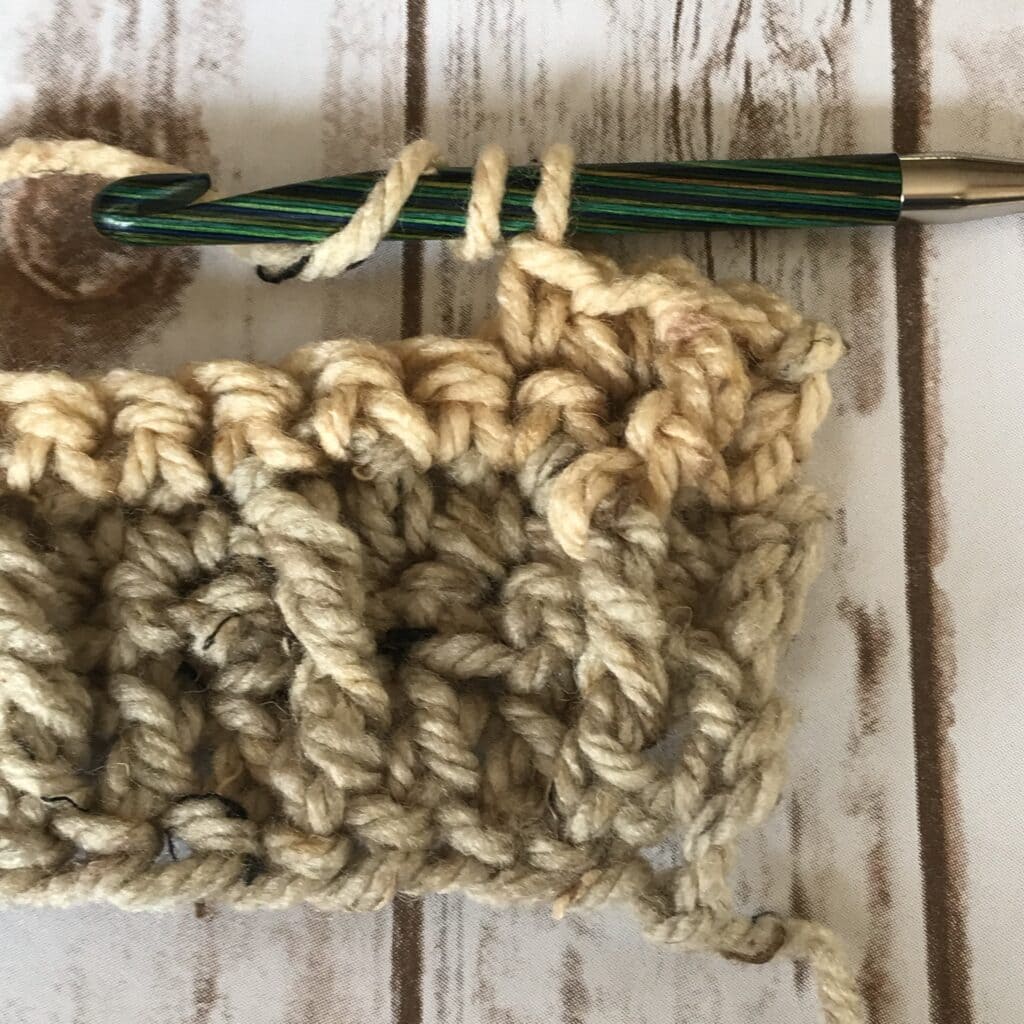
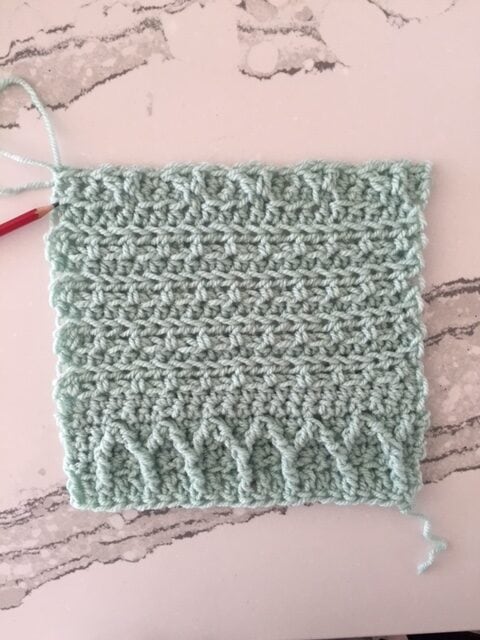
Row 5: FPtr around first FPtr from row 3, skip 1 stitch on current row, *sc in next 2 stitches, FPtr2tog around same FPtr from row 3 you just went around and complete 2nd half of fptr2tog around next FPtr from row 3 (see photo below), skip 1 stitch behind the FPtr2tog*, repeat from *…* (6) (5, 5) more times.
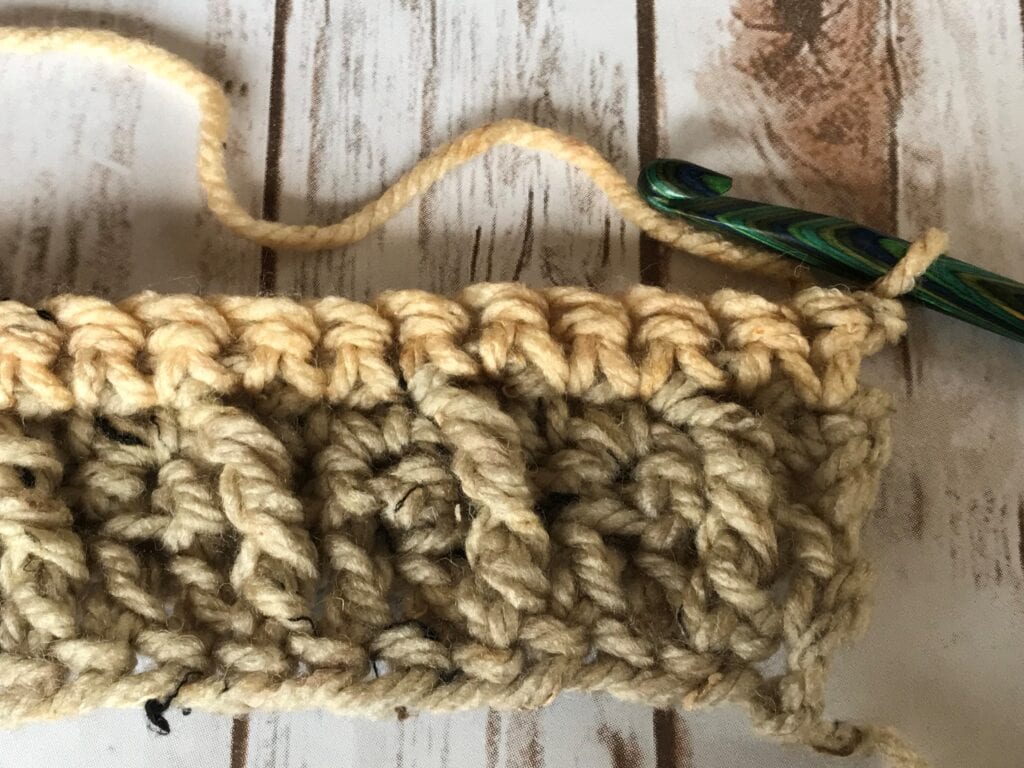
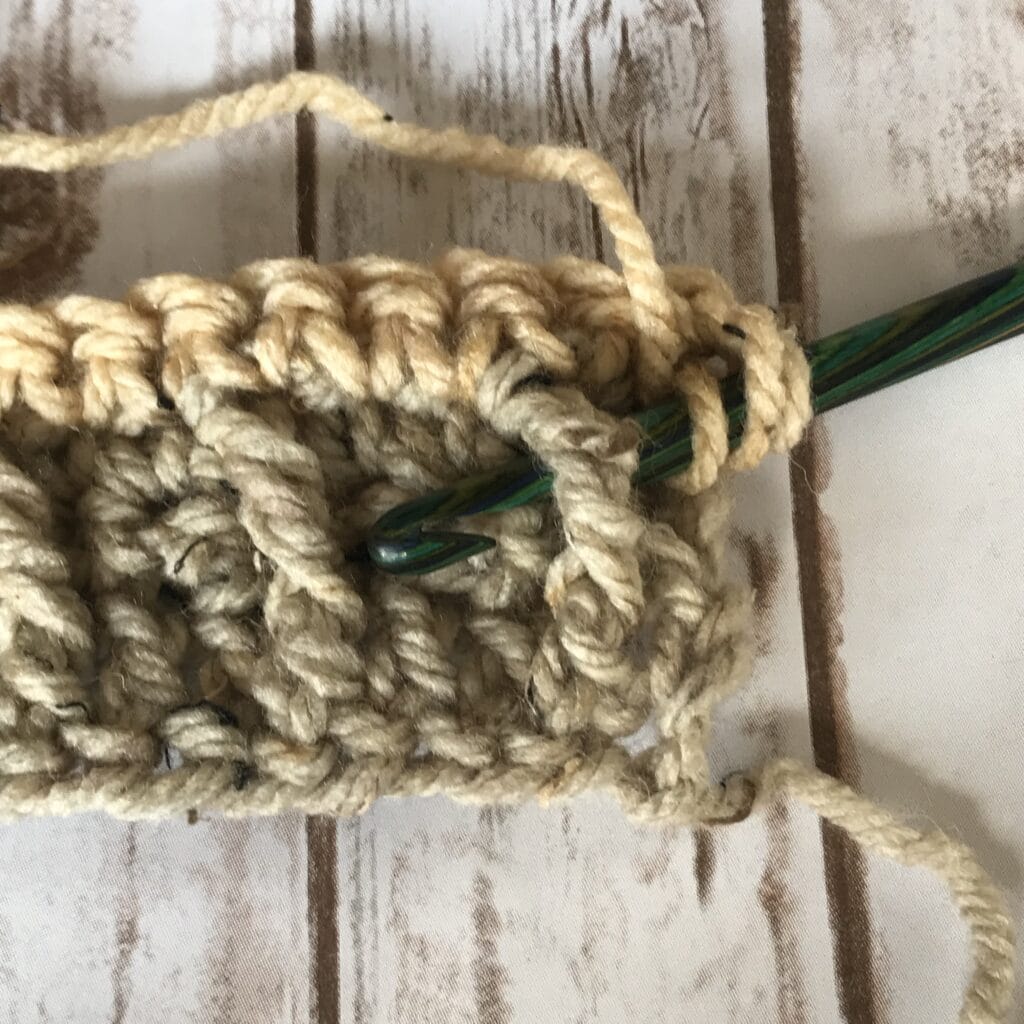
To finish row 5: Large: Sc in last 2 stitches, ch 1, turn. (24) Medium: Skip stitch behind the FPtr2tog you just completed, sc in next stitch, FPtr 1 around same post below on row 3, skip stitch on current row, sc in last stitch, ch 1, turn. (22) Small: Sc in last stitch of row, ch 1, turn. (20)
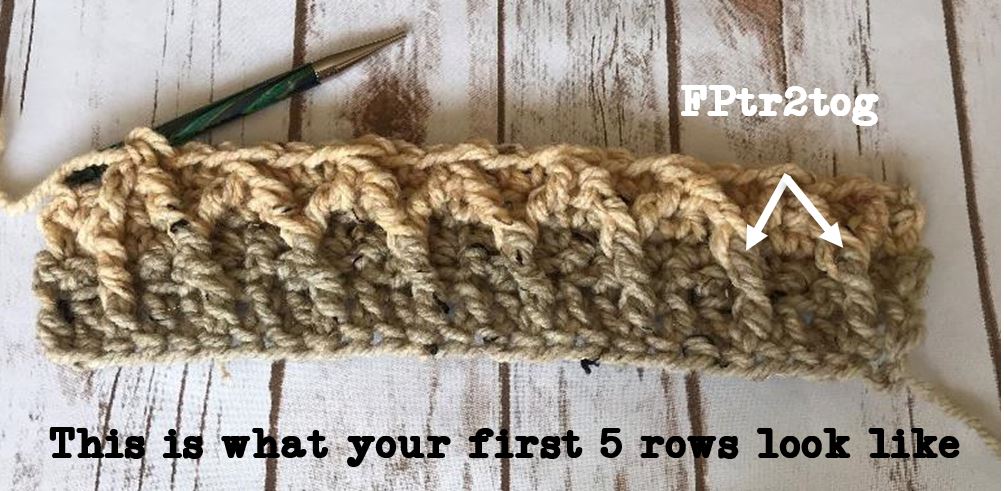
Row 6: Sc in each stitch across, ch 1, turn. (24) (22, 20)
Row 7: Hdc 1 in each stitch across, ch 1, turn. (24) (22, 20)
Row 8: *Hdc 1, hdc 1 (FLO) in next stitch*, repeat from * ….* to end of row. ch 1, turn. (24) (22, 20)
Row 9: Hdc 1 (BLO) in each stitch across entire row, ch 1, turn. (24) (22, 20)
Note:
- Rows 10 – 15 stitch count is the same throughout (24) (22, 20).
- Chain 1 and turn at end of ea of these rows.
Row 10 – 15: Alternate repeat – row 8 and row 9 (i.e. row 10 repeats row 8, row 11 repeats row 9 and so on ending with a repeat of row 9 on row 15)
Row 16: Sc (FLO) in each stitch across entire row. ch 1, turn. (24) (22, 20)
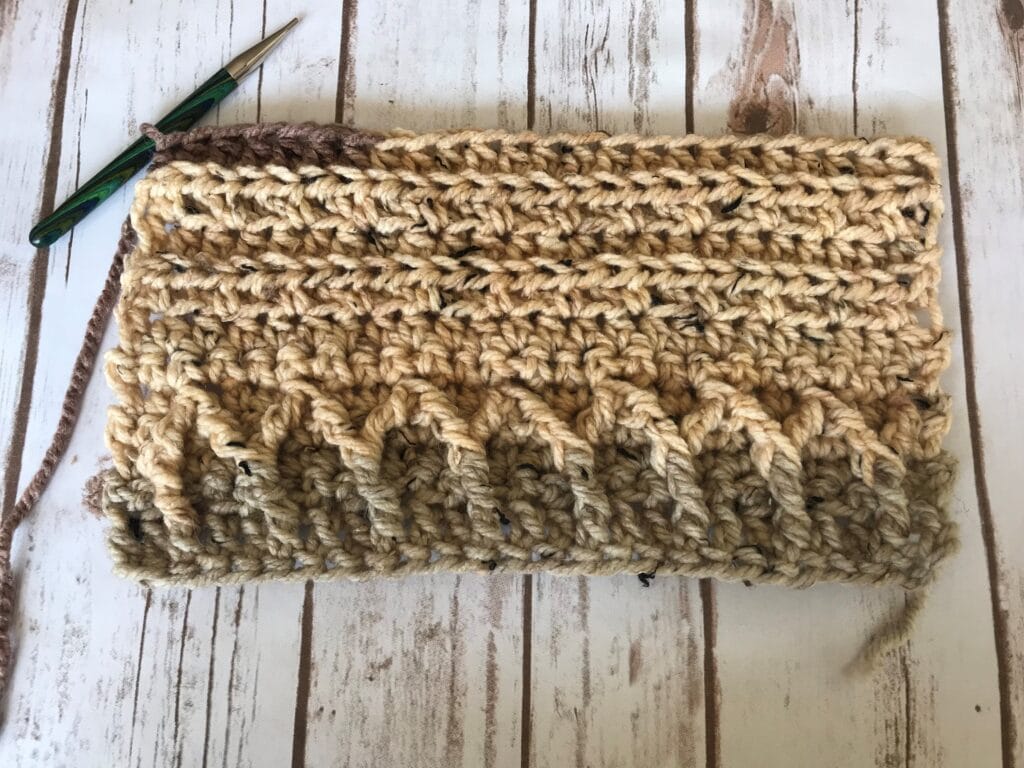
Note:
The following rows create the diamond overlay pattern. For the large & Small the stitch count will increase by 1 on rows 17, 19 & 21. We correct it by skipping 1st st of row 18 & 20.
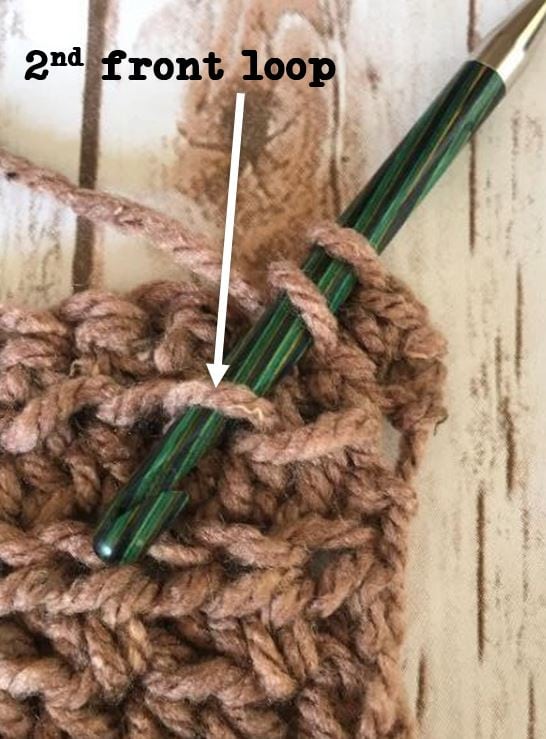
Row 17: Sc 1, dc in 2nd front loop of row 16, skip stitch on current row, sc in next st, dc in same front loop as previous dc, skip stitch, sc in next stitch, *skip 3 front loops on row 16, dc in 4th front loop, skip stitch on current row, sc in next st, dc in same front loop on row 16 as previous dc, skip stitch, sc in next, repeat from *…* (4) (4, 4) more times…row 17 instructions continue below
To finish row 17: Large: However, when you reach the end of the row, do not skip stitch behind dc, sc into very last stitch of the row, ch 1, turn. (25) Medium: Sc in last stitch of row, ch 1, turn. (22) Small: However, when you reach the end of the row, do not skip stitch behind dc, just sc into very last stitch of row, ch 1, turn. (21)
Row 18: Large & Small: Skip 1st stitch, sc in each stitch across, ch 1, turn. (24, 20) Medium: Sc in each stitch across, ch 1, turn. (22)
Row 19: FPdc around first dc from row 17, skip stitch, sc in next 2 stitches, FPdc around next dc from row 17, *skip 2 stitches on current row, FPdc around dc from row 17, sc in next 2 stitches, FPdc around next dc from R17*, repeat from *…* (3) (3, 3) more times.
To finish row 19: Large: Skip stitch, sc in next stitch, FPdc around next dc from R17, skip stitch, sc in next stitch. ch 1, turn. (25) Medium: Skip 1 stitch, sc in last stitch of row, ch 1, turn. (22) Small: Sc in last st of row, ch 1, turn. (21)
Row 20: Large & Small: Skip 1st stitch, sc in each stitch across, ch 1, turn. (24, 20) Medium: Sc in each stitch of row, ch 1, turn. (22)
Row 21: Large & Small: Skip 1st stitch, sc in each stitch across, ch 1, turn. (24, 20) Medium: Sc in each stitch across, ch 1, turn. (22)
To Finish Row 21: Large: Sc in last stitch, ch 1, turn. (25) Medium: Sc in last 2 stitchess, ch1, turn. (22) Small: for small size, when you reach the end, don’t skip last stitch of the repeat, sc in last stitch, ch1, turn. (21)
Row 22: Large & Small: Skip 1st stitch, *hdc 1 in next st, hdc 1 (FLO) in next stitch* – repeat from *…* (12, 10) times, ch1, turn. (24, 20) Medium: *Hdc 1, hdc 1 (FLO) in next stitch*, repeat from *…* (11) times, ch1, turn. (22)
Row 23: Hdc 1 (BLO) in each stitch across, (24) (22, 20)
Row 24: *Hdc 1 in next stitch, hdc 1 (FLO) in next stitch*, repeat from * across, ch1, turn. (24) (22, 20)
Row 25: Hdc 1 in each stitch across, ch1, turn. (24) (22, 20)
Notes:
- Rows 26 – 37 are a two row repeat of rows 24 & 25.
- Chain 1, and turn at end of each row.
- Stitch counts throughout are (24) (22, 20)
Row 26 – 37: Alternating repeat of row 24 & 25 (i.e. row 26, rep row 24, row 27, rep row 25) Row 37 is a rep of row 25.
+ Back Panel
The back panel of the beginner crochet cardigan pattern is worked in a similar fashion to the front panels, with intentional color changes.
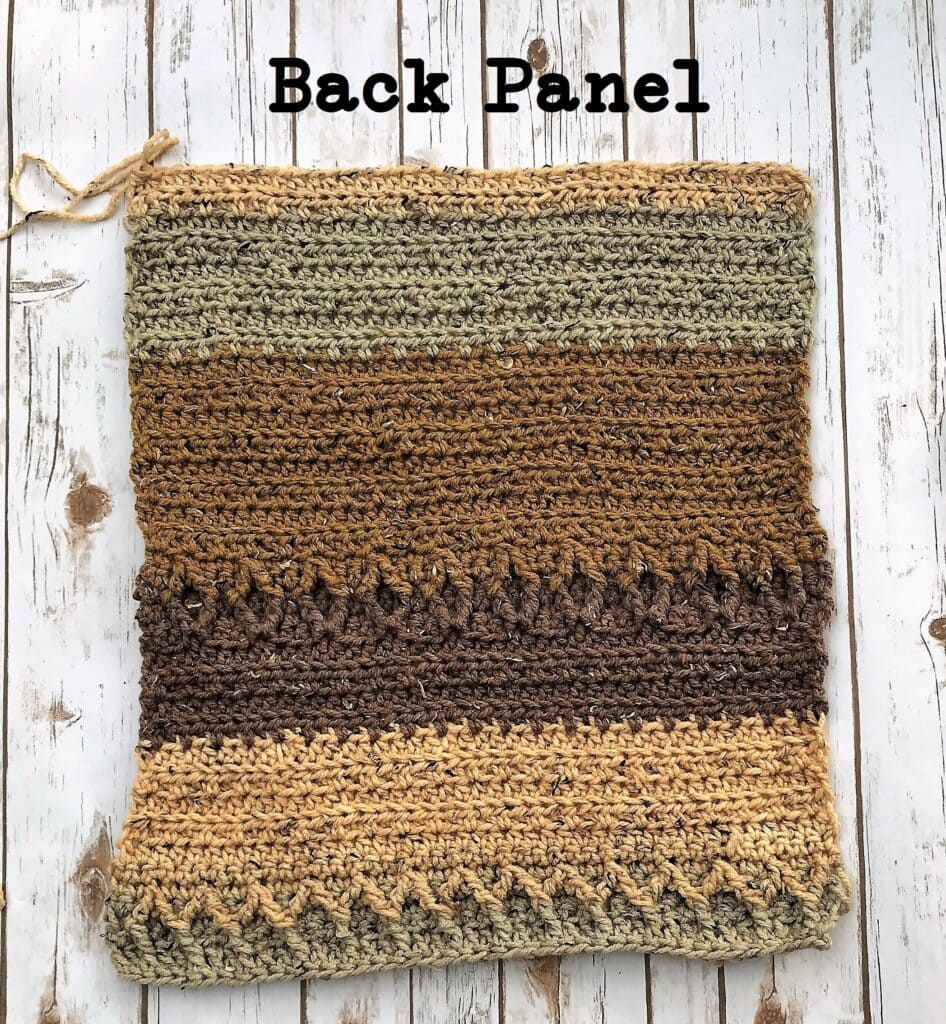

Note: The back panel is worked using the deconstructed cakes, with intentional color changes.
Rows 1 – 4 in Grey.
Row 1: Fdc 42 (40, 38), ch1, turn.
Row 2: *sc 1 (BLO), sc (FLO) in next stitch*, repeat from *…* across, ch1, turn. (42) (40, 38)
Row 3: Sc in 1st stitch, *FPtr around dc of row 1 directly below next st, skip stitch, sc in next 2 stitches*, repeat from *…* 13 (13, 12) times.
To Finish Row 3: Large: FPtr around fdc of R1 directly below next stitch, skip stitch behind FPtr, sc in last st, ch1, turn. (42). Medium: The 13 repeats go to end of row, so nothing more is needed, ch1, turn. (40) Small: FPtr around last fdc of row 1, do not skip a stitch, sc in last stitch of row. (39)
Row 4: Large & Medium: Sc in each st across, change to Ecru at end of row, ch1, turn. (42, 40) Small: Skip 1st stitch, sc in each stitch across, change to Ecru at end row, ch 1, turn. (38)
Rows 5 – 12 in Ecru.
Row 5: FPtr around first FPtr from row 3, skip stitch, *sc in next 2 stitches, FPtr2tog around same FPtr from row 3 you just went around – complete 2nd part of FPtr2tog around next FPtr from row 3, skip stitch behind FPtr2tog*, repeat from *…* 12 (12, 12) times.
To Finish Row 5: Large: Sc in last 2 stitches, ch1, turn. (42) Medium: Skip stitch behind FPtr2tog, sc in last two stitches. ch1, turn. (40) Small: Repeat 12 times, d on not skip stitch behind last stitch FPtr2tog, sc in last st of row. (38)
Row 6: Sc in each stitch across, ch1, turn. (42) (40, 38).
Row 7: Hdc 1 in ea stitch across, ch1, turn. (42) (40, 38)
Row 8: *Hdc 1, hdc 1 (FLO) in next stitch*, *repeat* to end of row, ch1, turn. (42) (40, 38)
Row 9: Hdc 1 (BLO) in each stitch across, ch1, turn. (42) (40, 38)
Row 10: Rep R8. (42) (40, 38)
Row 11: Rep R9. (42) (40, 38)
Row 12: Rep R8. (42) (40, 38)
Rows 13 – 19 in Chocolate Brown.
Row 13: Rep R9. (42) (40, 38)
Row 14: Rep R8. (42) (40, 38)
Row 15: Rep R9. (42) (40, 38)
Row 16: sc (FLO) in ea st across entire row, (42) (40, 38)
Note: The following rows create the diamond overlay pattern.
Row 17: Sc in 1st stitch, dc in 2nd front loop of R16, skip stitch, sc in next st, dc in same front loop as previous dc, skip stitch, sc in next st. *skip 3 front loops on R16, dc in 4th front loop, skip stitch, sc in next st, dc in same front loop as previous dc, skip stitch, sc in next st*, repeat from *…* (9) (8, 8) more times.
To Finish Row 17: Large: Sc in last st of row, ch1, turn. (42). Medium: Skip 3 front loops on R16, dc in 4th front loop, skip stitch on current row, sc in next st, dc in same front loop as previous dc, sc in last st of row, ch1, turn. (41) Small: Sc in last 2 stitches. ch1, turn. (39)
Row 18: Large: Sc in each stitch across, ch1, turn. (42) Medium & Small: Skip first stitch, sc in each stitch of row, ch 1, turn. (40, 38)
Row 19: FPdc around 1st dc from R17, skip stitch, sc in next 2 stitches, FPdc around next dc from R17. *FPdc around next dc from R17, skip 2 stitches, sc in next 2 stitches, FPdc around next dc from R17*, repeat *…* to end.
To Finish Row 19: Large: When you reach end of row, sc in last st. Change to Golden Brown at end of this row, ch1, turn. (42). Medium: After repeat, you should have 1 st left. sc in last st. Change to Golden Brown at end of this row, ch1, turn. (41) Small: skip stitch behind last FPdc, sc in last 2 stitches. Change to Golden Brown at end of this row, ch1, turn. (38)
Rows 20 – 29 in Golden Brown.
Row 20: . Large: Sc in ea st across row, ch1, turn. (42) Medium: Skip 1st stitch, sc in ea st across row, ch1, turn (40). Small: Sc in ea stitch of row, ch 1, turn. (38)
Row 21: *Sc in next 3 stitches, FPtr2tog around 1st and 2nd FPdc’s from R19, skip 1 stitch*, repeat from *….* 10 (8, 9) times.
To Finish Row 21: Large: sc in last 2 stitches. ch1, turn. (42). Medium: sc in next 2 stitches. FPtr2tog around next 1st & 2nd FPdc’s from R19. skip 1 stitch, sc in last st of row, ch1, turn. (40) Small: sc in last 2 stitches. ch1, turn. (38)
Row 22: *Hdc 1 in next stitch, hdc 1 (FLO) in next st* – *repeat* to end of row, ch1, turn. (42) (40, 38)
Row 23: Hdc 1 (BLO) in each stitch across, ch1, turn. (42) (40, 38)
Note:
- Rows 24 – 37 stitch count is the same (42) (40, 38).
- Ch 1 and turn at end of each of these rows.
- Change colors when you finish the last stitch of each row.
Row 24 – 29: Alternating repeat of rows 22 & 23 (row 24 repeats row 22, row 25 repeats row 23, etc.)
Rows 30 – 35 in Grey.
Row 30 – 35: Alternating repeat of rows 22 & 23.
Rows 36 – 37 in Ecru.
Row 36: Rep R22.
Row 37: Rep R23.
+ Assembly
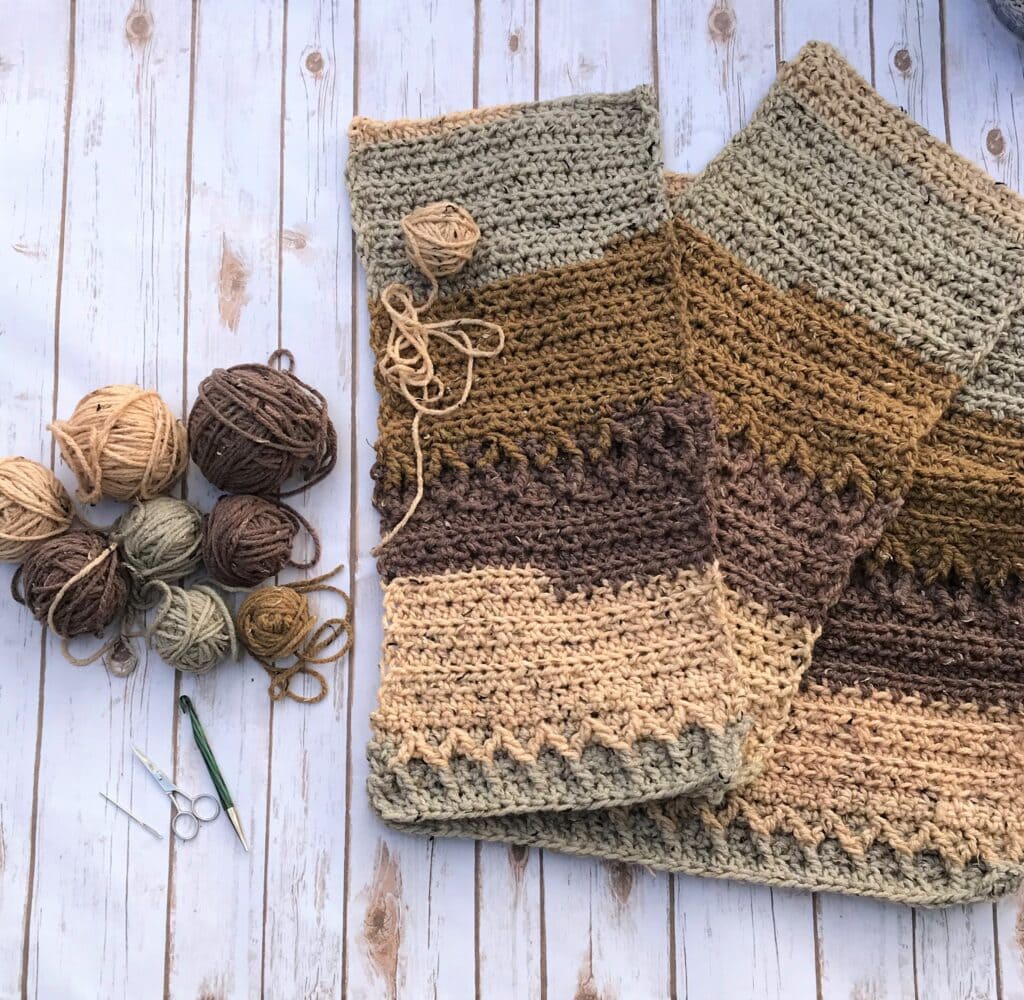
Sewing Panels Together
If you want to block the panels at this point, it would be a good idea. Blocking is:
- Wetting
- Gently pressing water out.
- Lay it flat on towel or board.
- Shape it.
- Let it dry completely.
The edges and front posts will benefit from blocking prior to sewing them together.
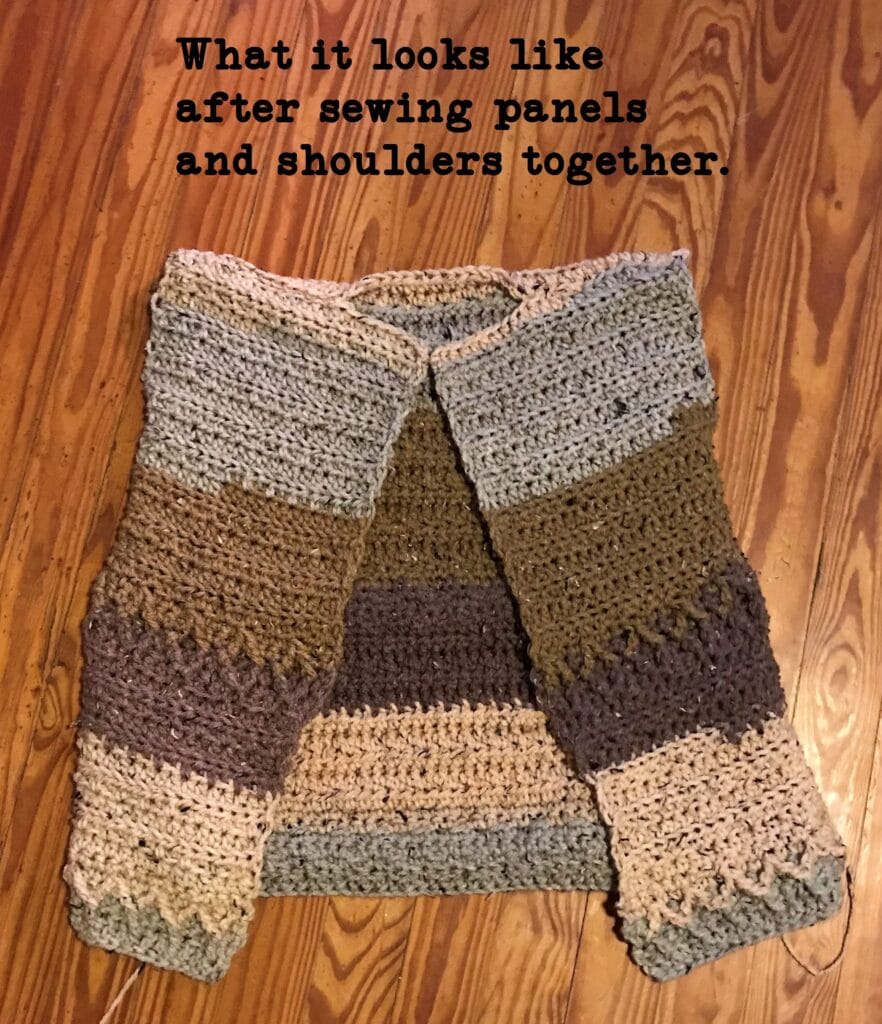
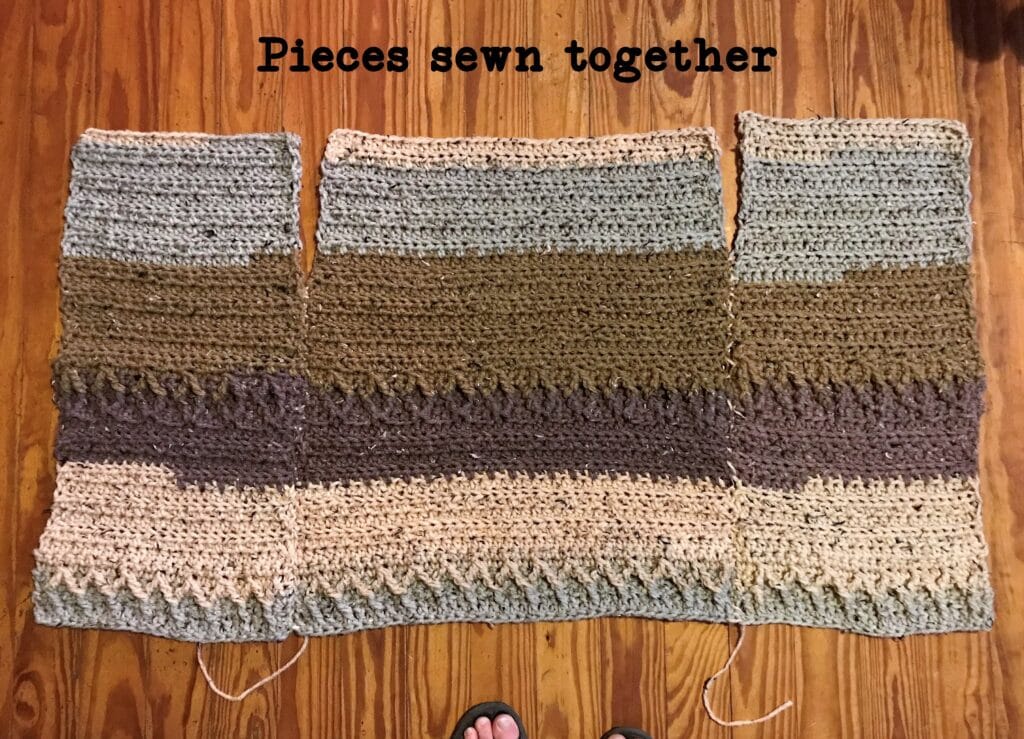
When you are ready to sew them together – Lay back panel flat with front side facing you (front side is the side with the raised pattern). Arrange front panels side by side on top of back panel, with their front sides down.
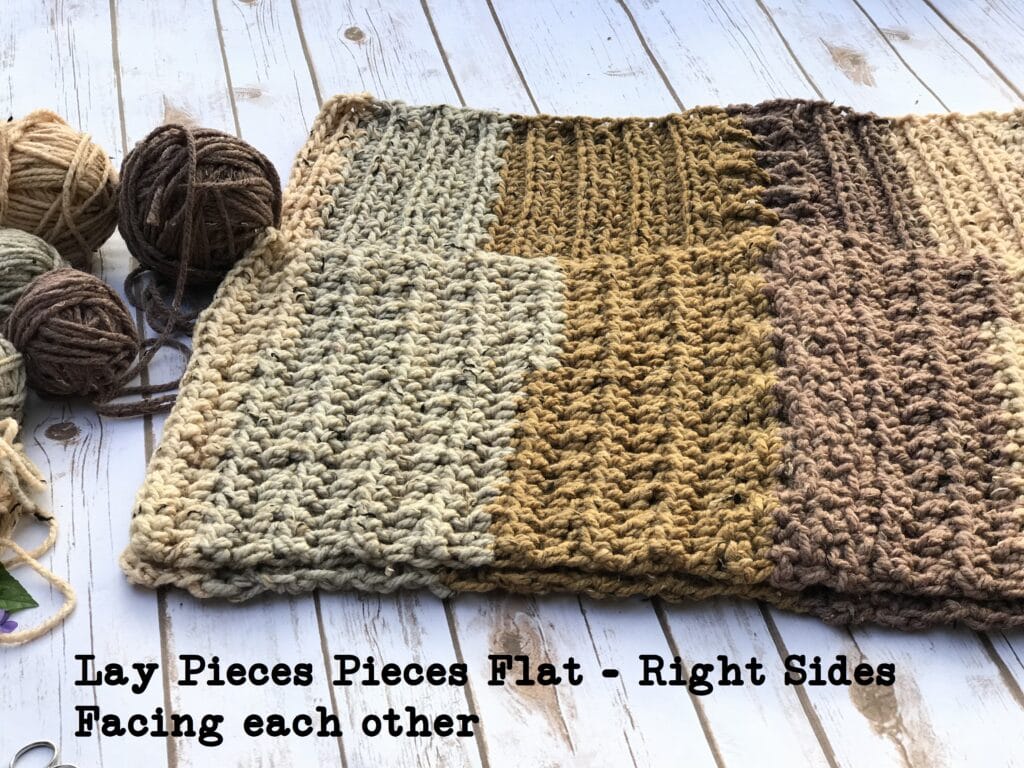
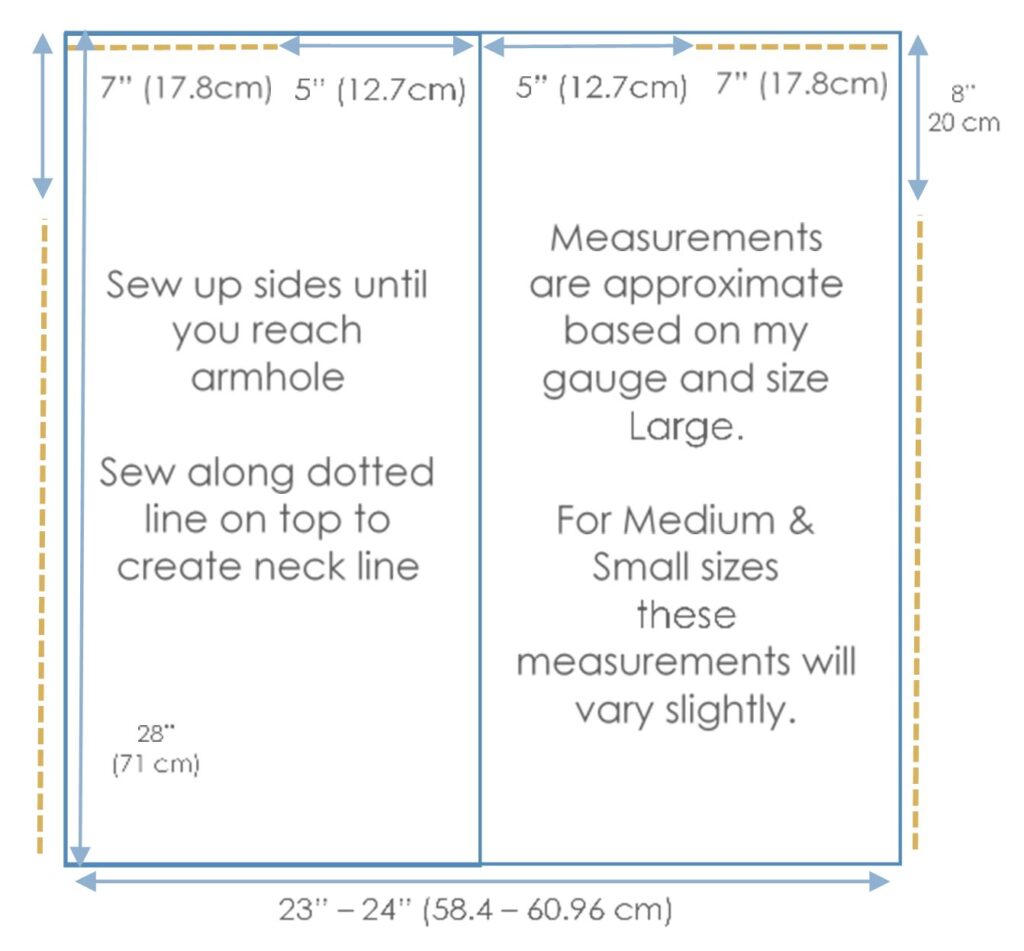
The front panels measure wider than the back panel, so there will be a little overlap. The way I resolved the overlap for sake of sewing, is to stretch the back piece out a bit until pieces meet. The front panels are meant to be wider than the back as a part of the design, measurements are based on written pattern for Large.
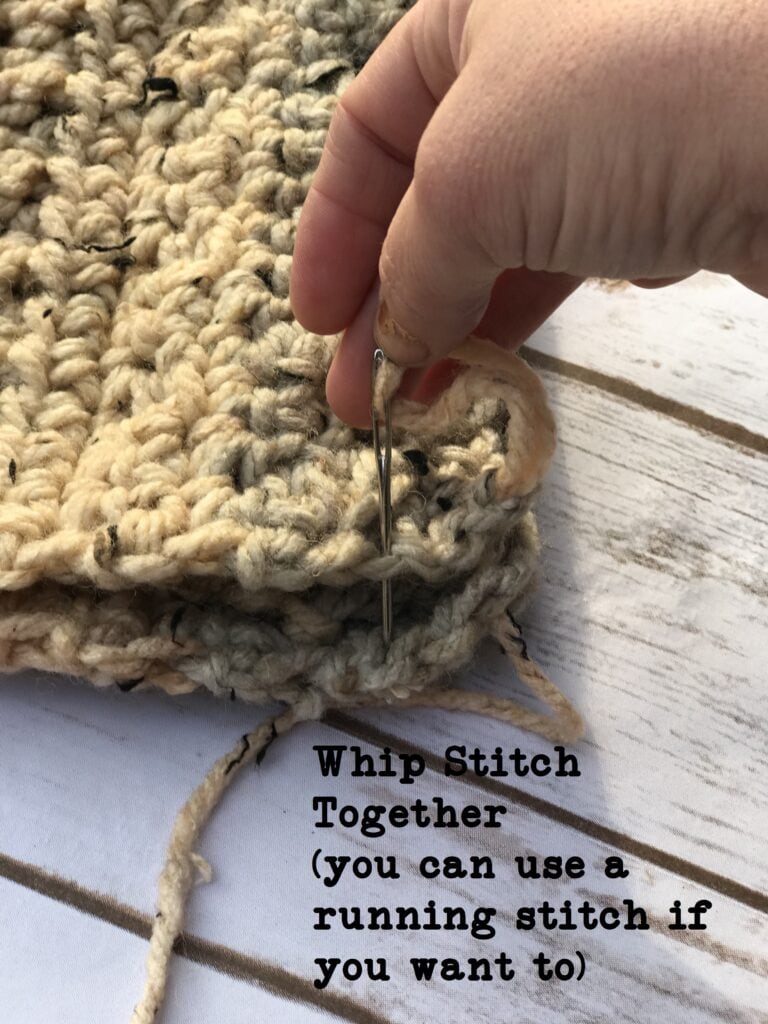
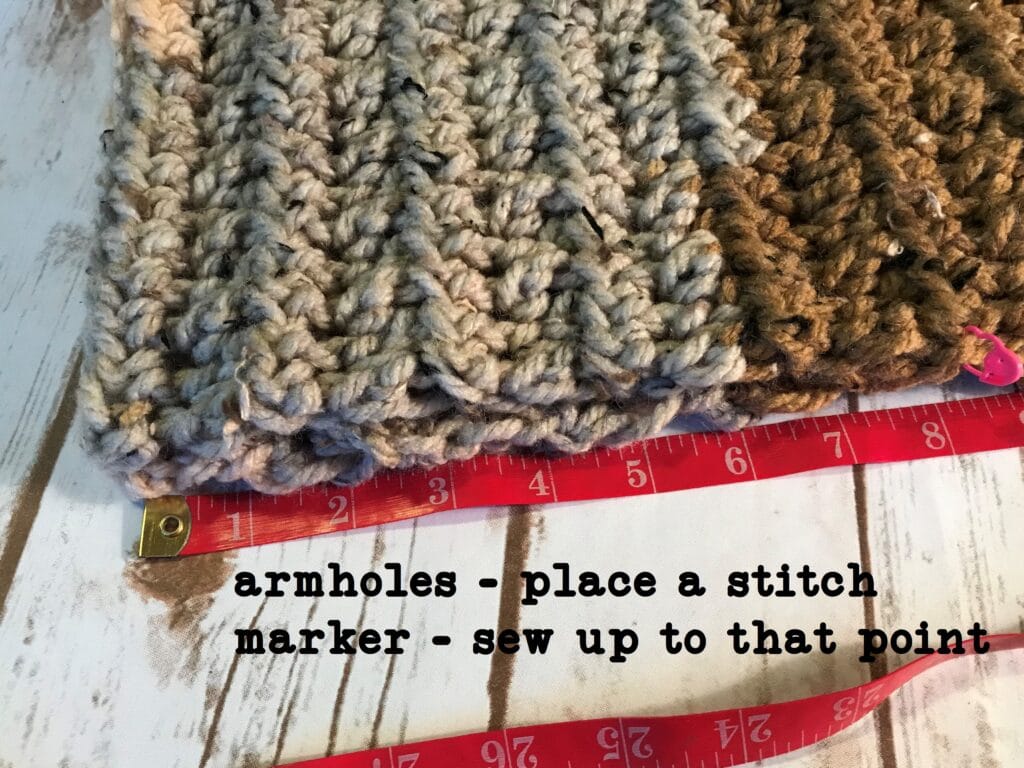
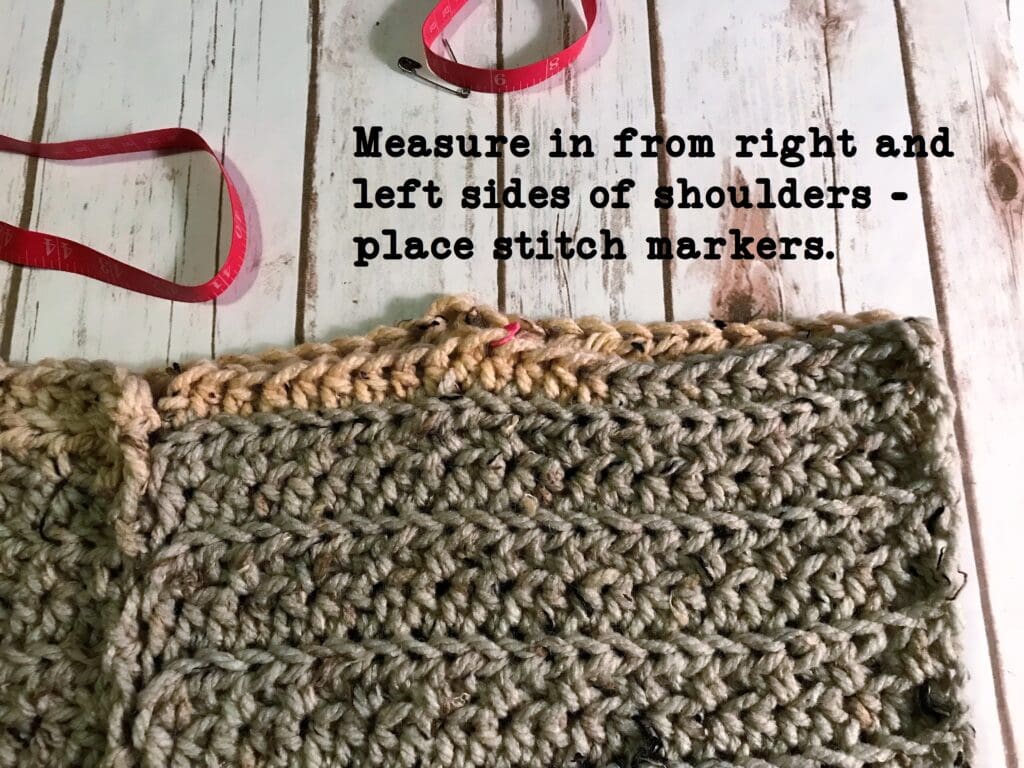
Armhole measurements: These are completely adjustable and up to you – general guides for armhole sizes are as follows: Large/8” Med/7” Small/6” (or whatever size you would like to make your armhole). Use yarn or stitch markers to hold pieces together for arms and shoulders together until you sew it (needs to be strong so you can try it on.
The diagram below is based on measurements for the large. For medium and small, you can make the opening for the neck a little smaller, its preference.
+ Hood:
Let’s get started on the hood of this beginner crochet cardigan pattern – what do you think of it so far? Leave a comment below with any questions, comments.
The hood is created by extending the collar up. Place body flat, front facing you. Open up the collar.
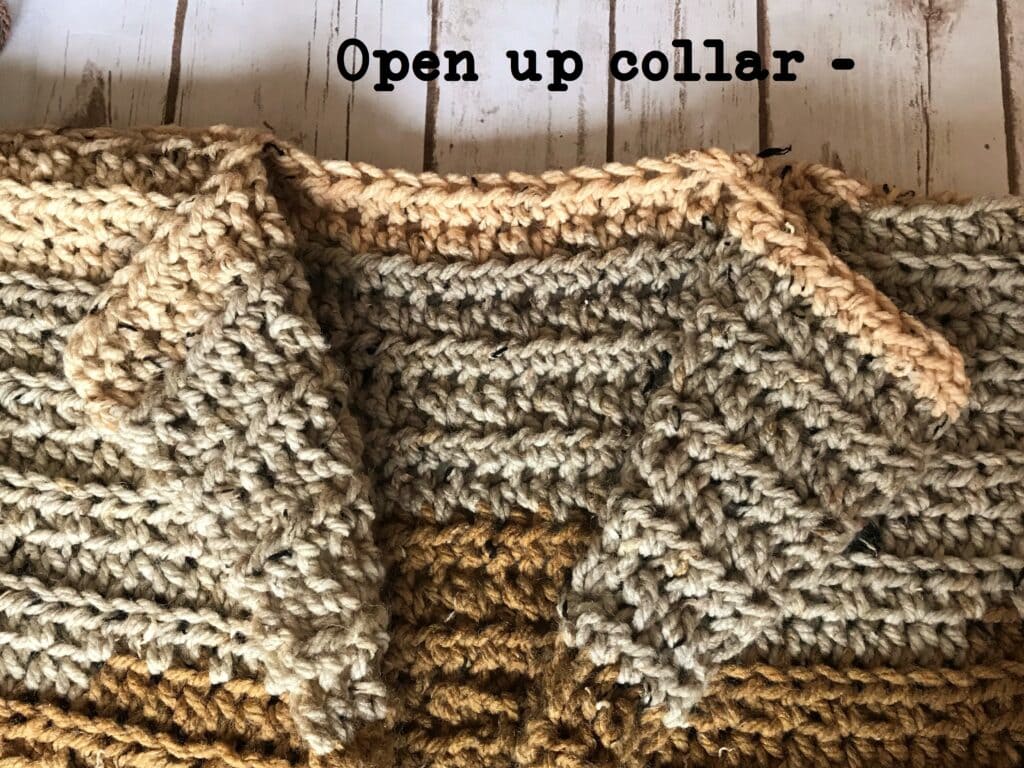
Rows 1 -10 in Ecru.
Attach yarn (Ecru color) in top right of the collar in both loops of first stitch of Row 37, and chain 2. Work the first row across the front panel, across the top to end of other front panel – works in rows.
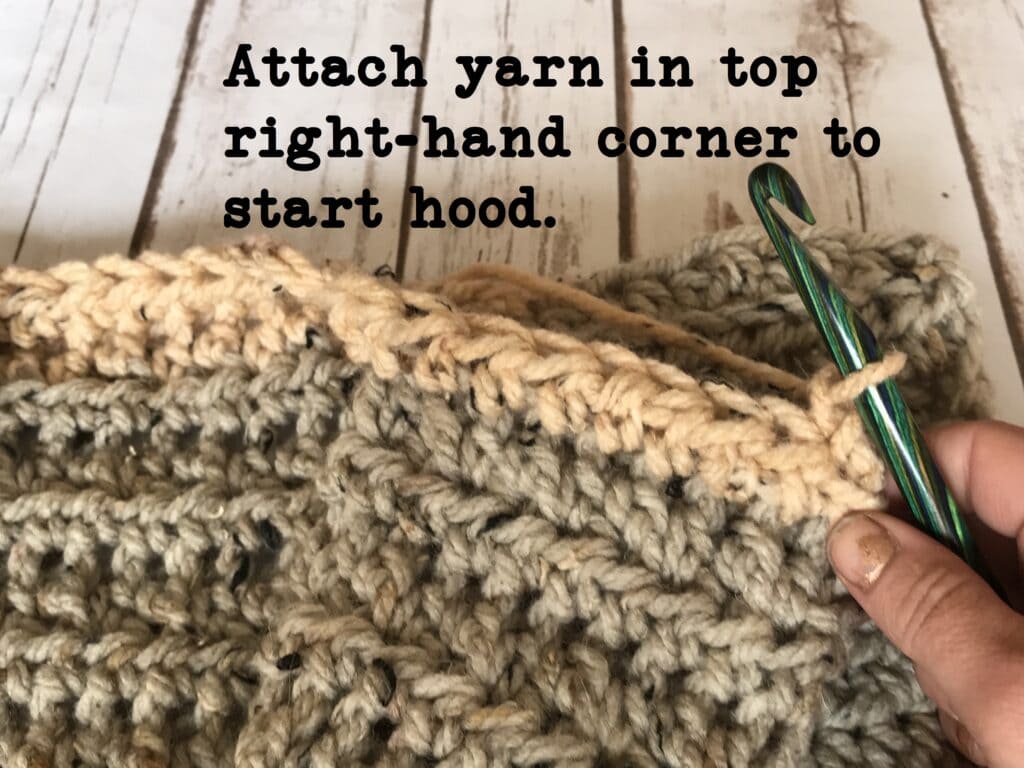
Row 1: Hdc 1 in same space where you joined the yarn. *hdc 1 (FLO), hdc 1 in next st* – *repeat* to end, ch 1, turn.
Row 2: Hdc 1 (BLO) in each stitch across entire row,
Row 3 – 10: Alternating repeat of rows 1 & 2.
Change to Golden Brown at end of row 10.
Rows 11 – 14 in Golden Brown.
Row 11: Rep R1, inc by 1 at beg and inc by 1 at end of row,
Row 12: Rep R2.
Row 13: Rep R1.
Row 14: Rep R2.
Change to Chocolate Brown at end of row 14.
Rows 15 – 18 in Chocolate Brown.
Row 15 – 18: Alternating repeat of row 1 & 2
Row 19: Rep R1.
Don’t break yarn. Turn it inside out with “right” sides facing each other and slip stitch the two hood pieces together through all 4 loops (2 loops of ea st from each side) Tie off and weave in tails.
+ Sleeves (Make 2):
Take your armhole length and multiply it by 2 Mine was 16” (40 cm). So for large the armhole circumference will be appx 16” (40 cm). I made sure the last row of my sleeve measures 16” (40 cm) wide because I worked the Large. (Ultimately, you want the last row of your armhole (topmost) to match the
length/circumference of your armhole. General sizes for adult armholes range from 6” to 8”.
To decrease length of sleeves: You can make the arms shorter by removing two rows after rows 6 & 7, this may throw off your inc rows, so adjust for that. This should take about 2” off the length.
The measurements below are approximate, everyone has varying gauge. Use this as a guideline, and adjust to make the sleeves perfect for your body. The stitch counts for the rows below will create sleeves that match the measurements in the diagram below. (keep in mind the yarn is thick and will stretch a bit. The measurements for small will fit a teenager)
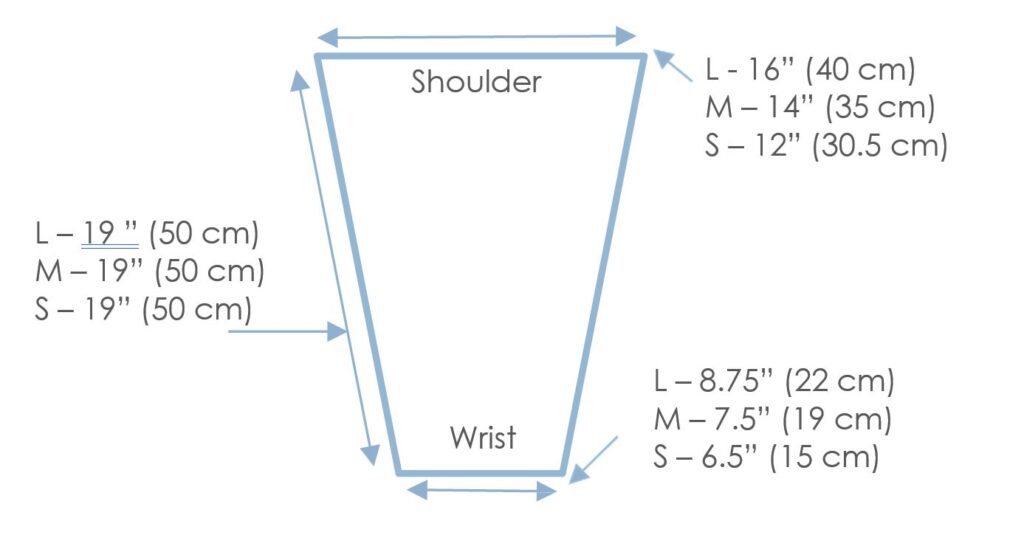
Take your armhole length and multiply it by 2 Mine was 16” (40 cm). So for large the armhole circumference will be appx 16” (40 cm). I made sure the last row of my sleeve measures 16” (40 cm) wide because I worked the Large. (Ultimately, you want the last row of your armhole (topmost) to match the
Rows 1 & 2 color is Grey.
Row 1: Fhdc. (16, 14, 12), ch 1, turn.
Row 2: Sc in ea st of row, , change to Ecru at end of this row, ch 1, turn. (16, 14, 12).
Rows 3 – 4 is Ecru.
Row 3: FPdc around first fhdc of R1, skip 1 stitch on current row, sc in next. *skip 1 fhdc from R1, FPdc around next fhdc from R1, skip 1 stitch on current row, sc in next * – *repeat* 7 (6, 6) more times. ch 1, turn. (16, 14, 12).
Notes:
- On rows where the stitch count for your size becomes an odd number – work the repeat to the end of the row, and keep going until you reach the end of the row, it doesn’t matter which stitch you end the row with.
- Make increases at the beginning of rows that require the first stitch to be in the BLO, hdc through both loops instead (sturdier) and continue pattern as written.
Row 4: *Hdc 1, hdc 1 (FLO) in next st* – *repeat* to end of row, Change to Golden Brown at end of this row, ch1, turn. (16, 14, 12)
Rows 5 – 9 color is Chocolate Brown.
Row 5: Hdc 1 (BLO) in ea st of row, change to Chocolate Brown, . (16, 14, 12)
Row 6: Repeat 4. (16, 14, 12)
Row 7: Repeat 5. inc by 1. (17, 15, 13)
Row 8: Repeat 4. inc by 1. (18, 16, 14)
Row 9: Repeat 5. inc by 1. (19, 17, 15) Change to Golden Brown at end of row 9.
Rows 10-17 color is Golden Brown.
Row 10: Repeat 4. (19, 17, 15)
Row 11: Repeat 5. inc by 1. (20, 18, 16)
Row 12: Repeat 4. (20, 18, 16)
Row 13: Repeat 5. inc by 1. (21, 19, 17)
Row 14: Repeat 4. inc by 1. (22, 20, 18)
Row 15: Repeat 5. (22, 20, 18)
Row 16: Repeat 4. (22, 20, 18)
Row 17: Repeat 5. inc by 1. (23, 21, 19) Change to Grey at end of row 17.
Rows 18-23 color is Grey.
Row 18: Repeat 4. inc by 1. (24, 22, 20)
Row 19: Repeat 5. inc by 1. (25, 23, 21)
Row 20: Repeat 4. (25, 23, 21)
Row 21: Repeat 5. (25, 23, 21)
Row 22: Repeat 4. inc by 1. (26, 24, 22)
Row 23: Repeat 5. (26, 24, 22)
Row 24: Repeat 4. inc by 1. (27, 25, 23)
Row 25: Repeat 5. inc by 1. (28, 26, 24)
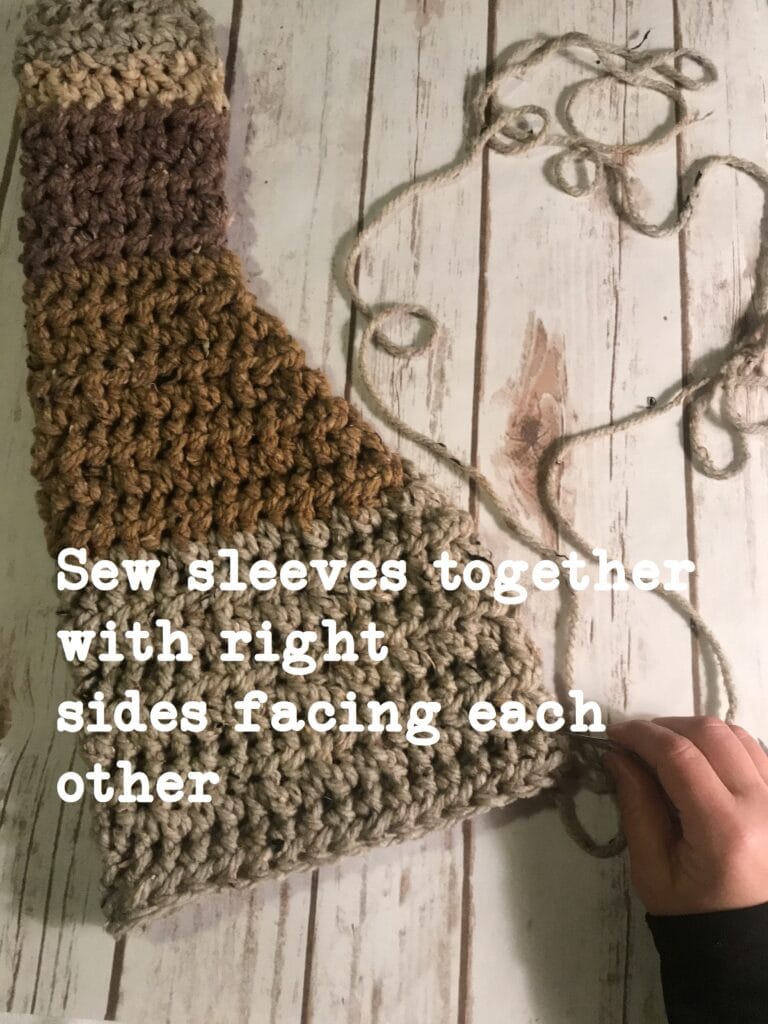
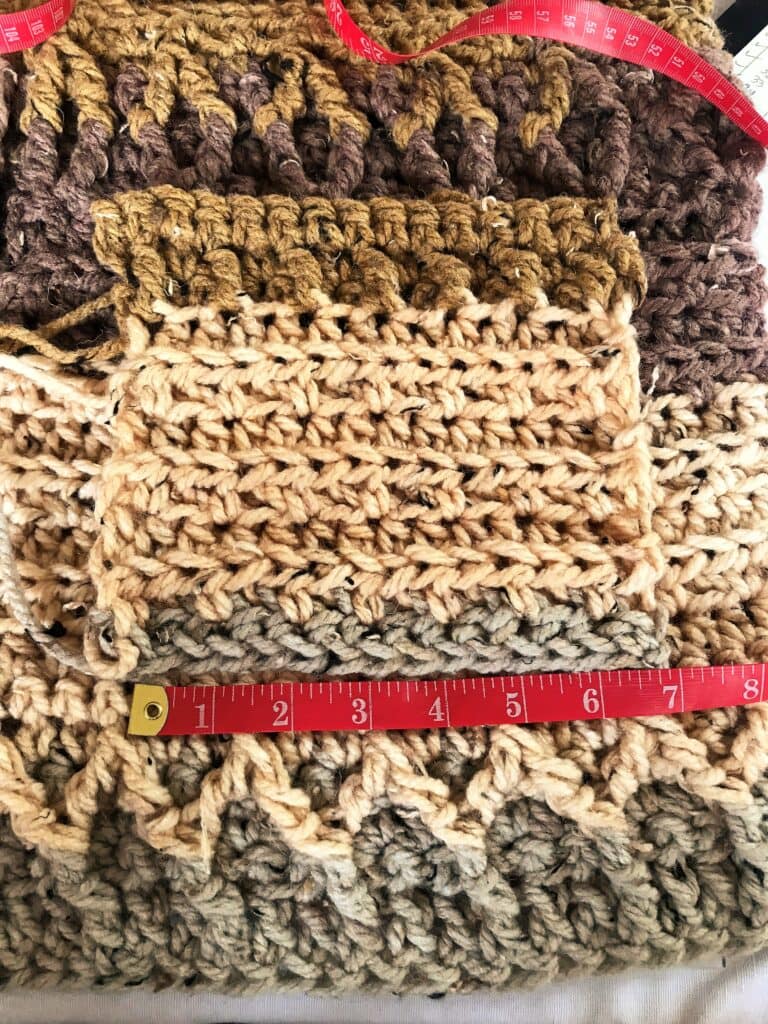
The image below doesn’t quite match the final pattern after testing. I fixed the row counts to create a smoother transition.
+ Pockets (Make 2):
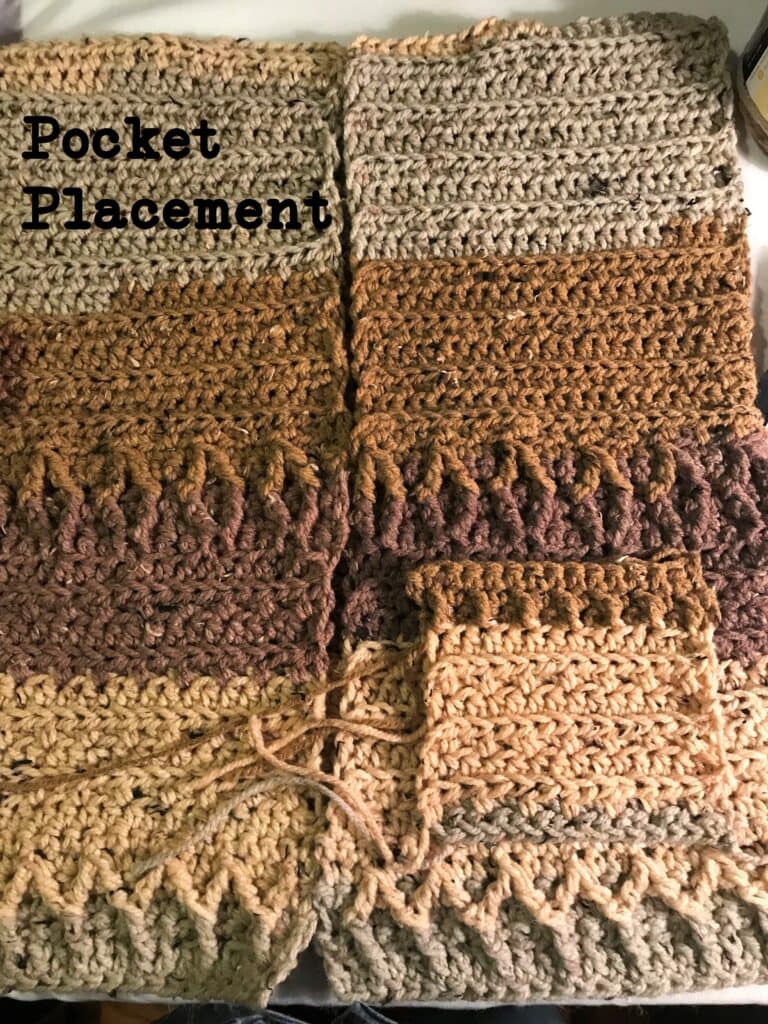
7” tall x 7” wide for large, 7” tall x 6” wide for medium, 7” tall x 5” wide for small. (You can make these whatever size you wish, I prefer larger/deeper pockets. If you want to change the shape, it is up to you, just remember to increase or decrease by 2).
Stitch counts for all rows of pockets is the same: (14, 12, 10)
Color is Grey.
Row 1: Fsc 14 (12, 10), change to Ecru at end of this row,
Rows 2 – 5: Color is Ecru.
Row 2: *hdc 1, hdc 1 (FLO) in next st* – *repeat* to end of row, ch 1, turn.
Row 3: hdc 1 (blo) in ea st of row, ch 1, turn.
Row 4 – 7: Alternating repeat of rows 2 & 3.
Change to Golden Brown at end of Row 7.
Rows 8 – 10: Color is Golden Brown.
Row 8: Sc (FLO) in ea st of row, ch 1, turn.
Row 9: Dc in 1st front loop, of R8, skip stitch on current row, sc in next st. *skip 1 front loop on R8, dc in next front loop of R8, skip stitch on current row, sc in next st* – *repeat* to end. Ch 1, turn.
Row 10: sc in ea st of row,
Cut yarn and weave in tails.
+ Sleeve Assembly
Sew sleeves to body, with right sides facing each other. I usually tuck the sleeve into the hole, and work around the inside to draw them together. Weave in all tails.
If you would like to create a border – its optional. Toggle buttons are also optional.
Congratulations! You’re finished!
I hope you enjoyed creating this beautiful beginner crochet cardigan pattern. You will find more great free patterns scrolling around the site. Check them out!
You May Enjoy These Free Crochet Patterns
Kirra Cardigan | Beginner Crochet Cardigan Pattern Video Tutorial




Any border recommendations?
I have a question. On the 3rd row of the front panels: on the 7th repeat, there is only 1 stitch left to SC after the FPtr but if you follow the repeats as written, there should be 2 SC’s after the FPtr. Am I missing something??
Ugh. Never mind. I didn’t read far enough 🤦♀️
Nice! but i wish the pattern was in my size, which is xxl.
I actually bought this pattern when it was on Ravelry. Absolutely love it. My first ever cardigan I used my own home spun alpaca but unfortunately i was new to spinning so it was a bit thick & ridiculously heavy but i have kept it as its such a lovely pattern fancy but not too hard. Thank you for sharing
It IS soooooo thick! I found that my testers used two worsted weight yarns and crocheted with a smaller hook – they said they really enjoyed the feel of it. I am so grateful you like it! Thanks for sharing your thoughts on it too 🙂
This says free pattern, but I don’t see the pattern. If I follow the link through to ETSY, there is a charge for the pattern. Am I missing the pattern somewhere?
Hi Diana! It’s there…It premiered at 7 pm instead of 5 pm. Hope you found it!
this is really cute and looks so warm!! I love the colors, they would match nearly anything!
Thanks! You can make it any color of course :). It’s an easy pattern too!