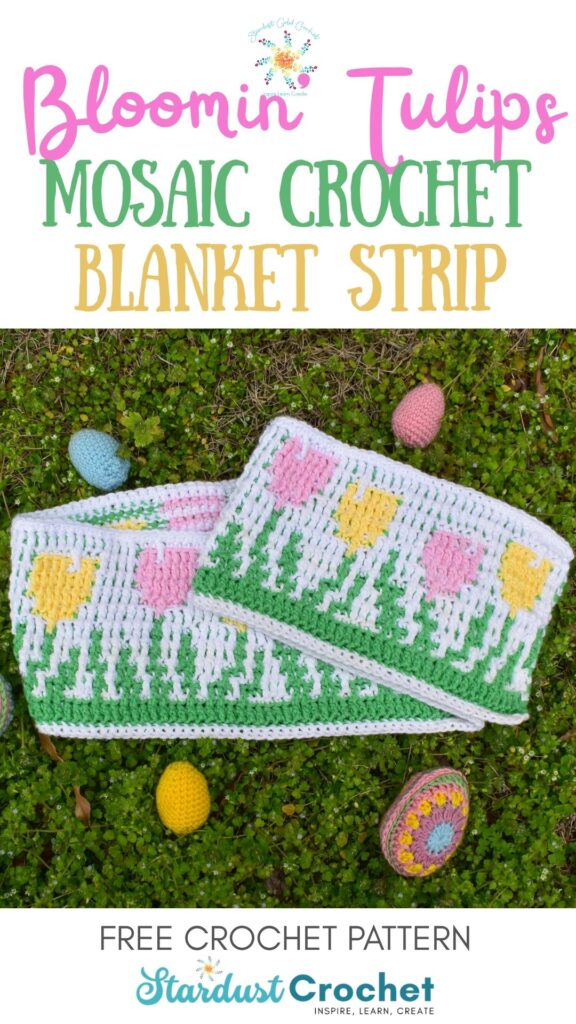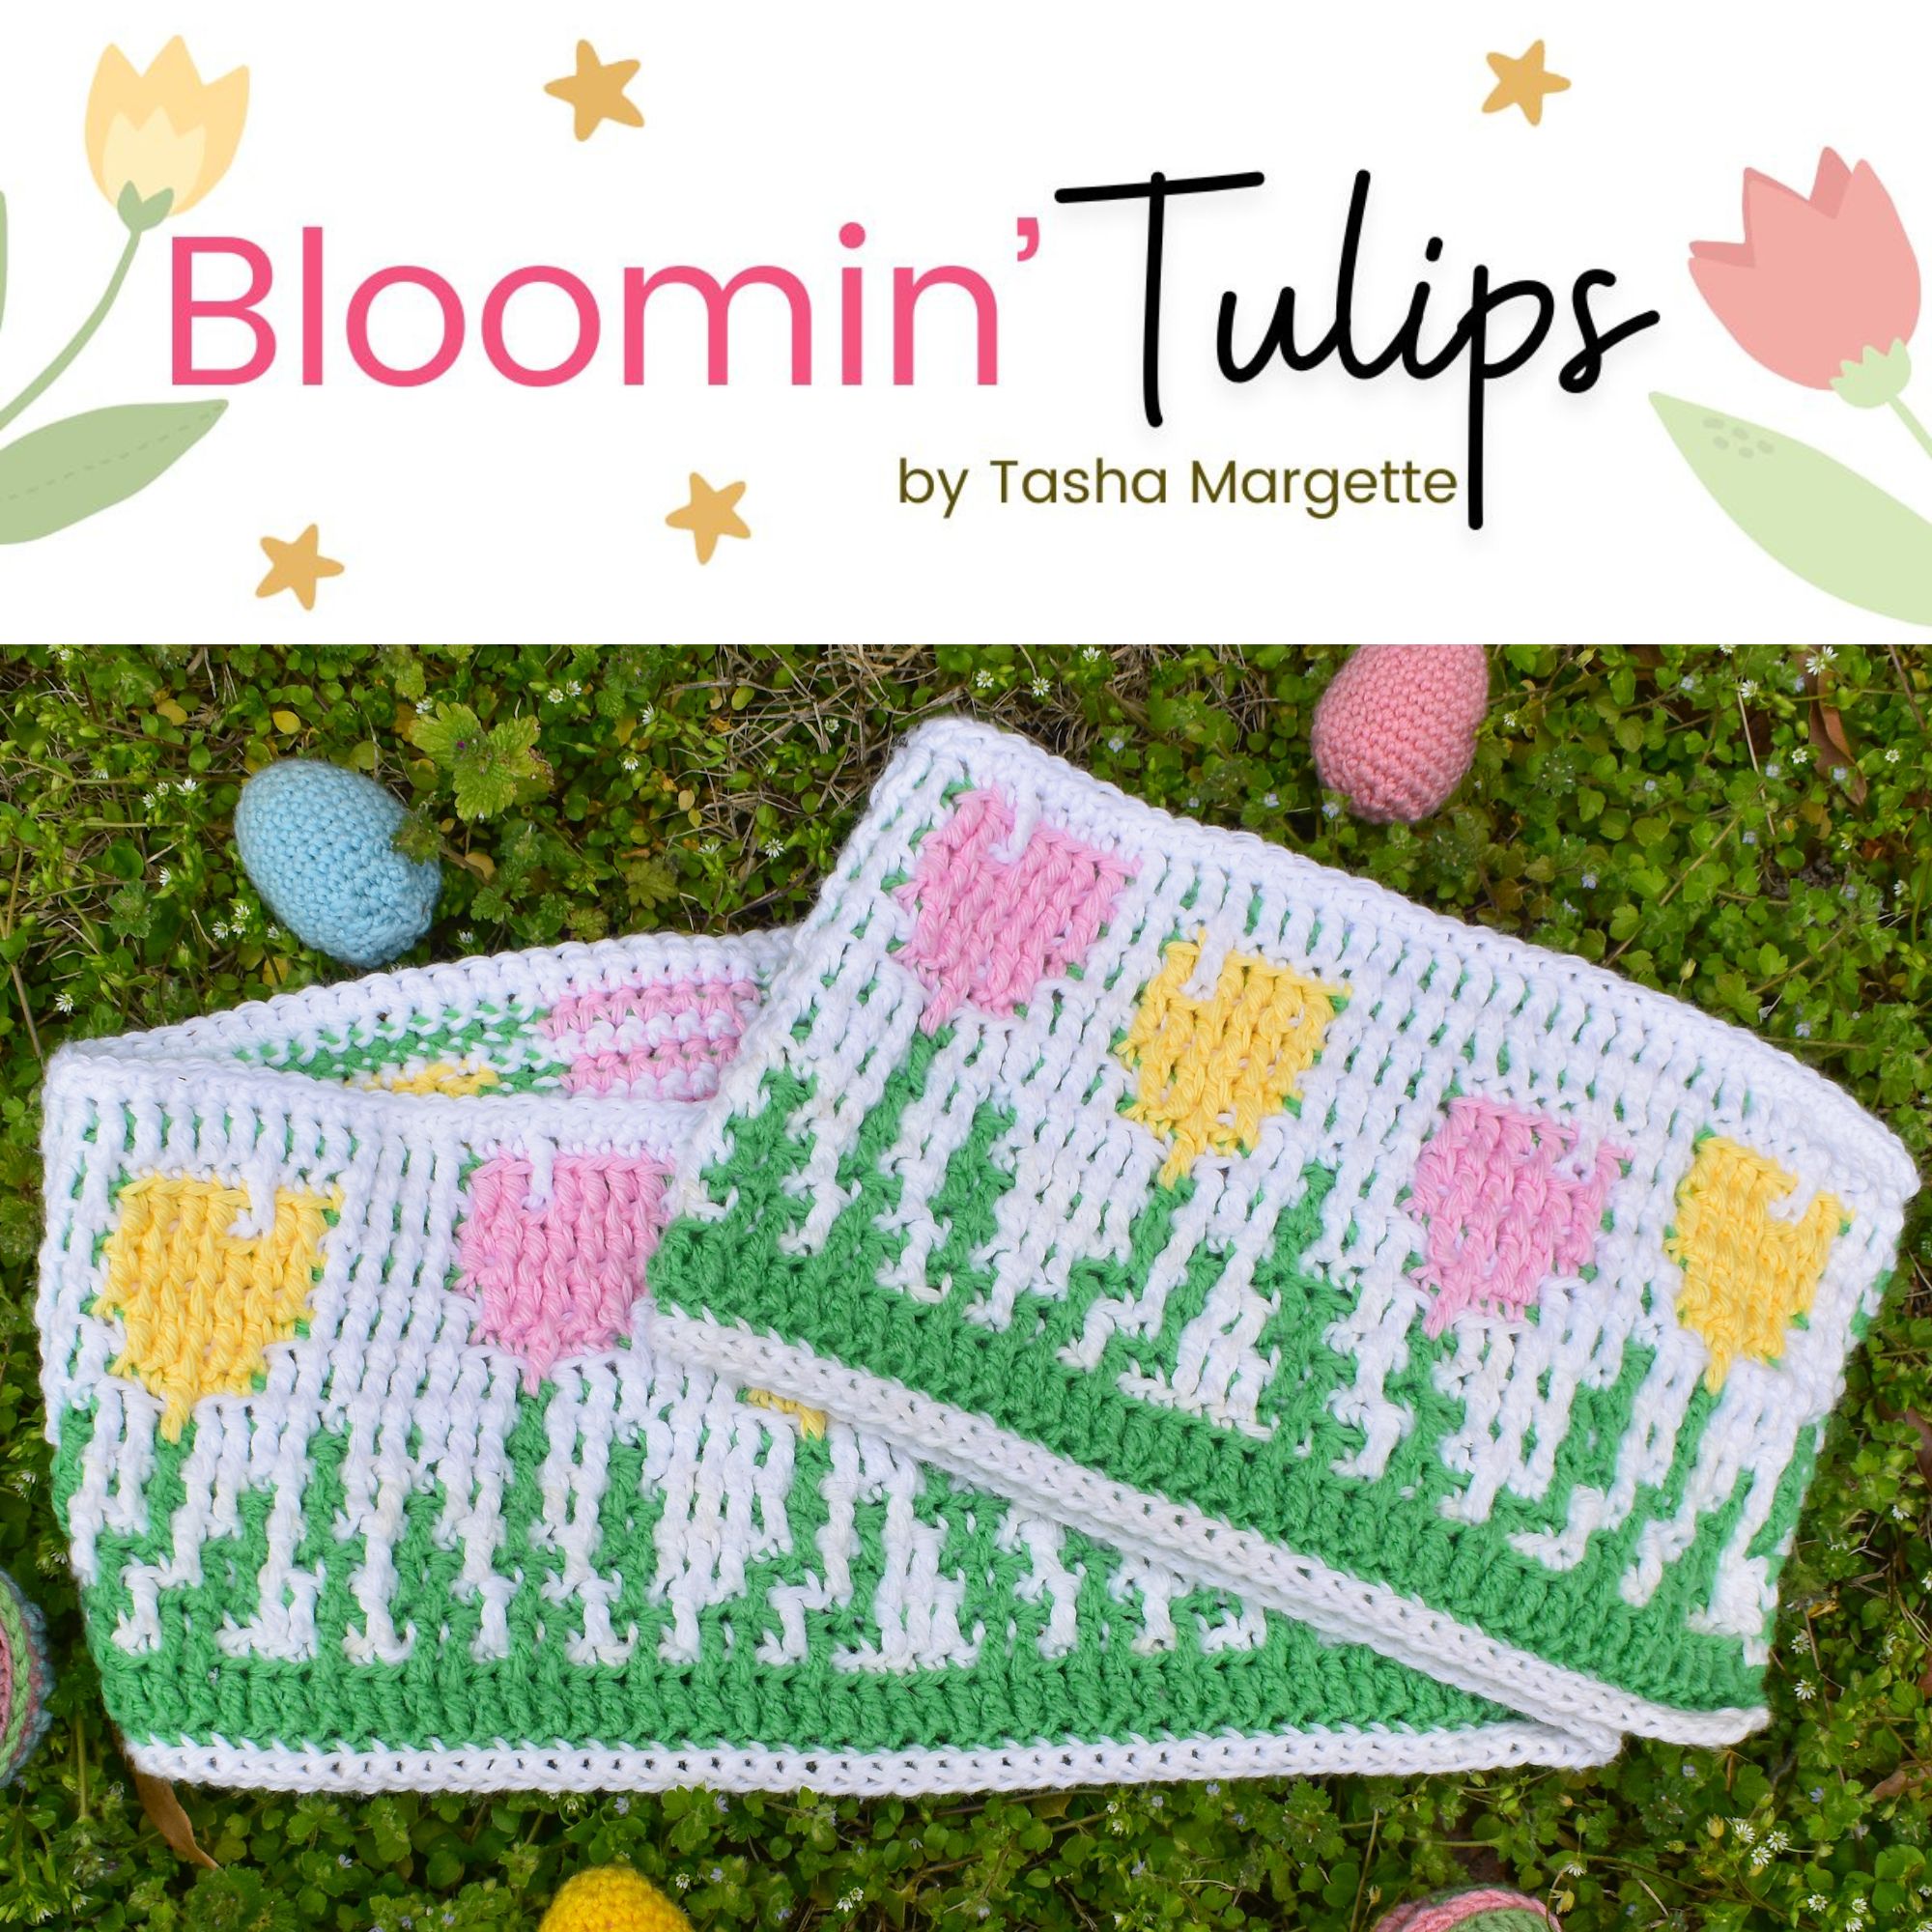
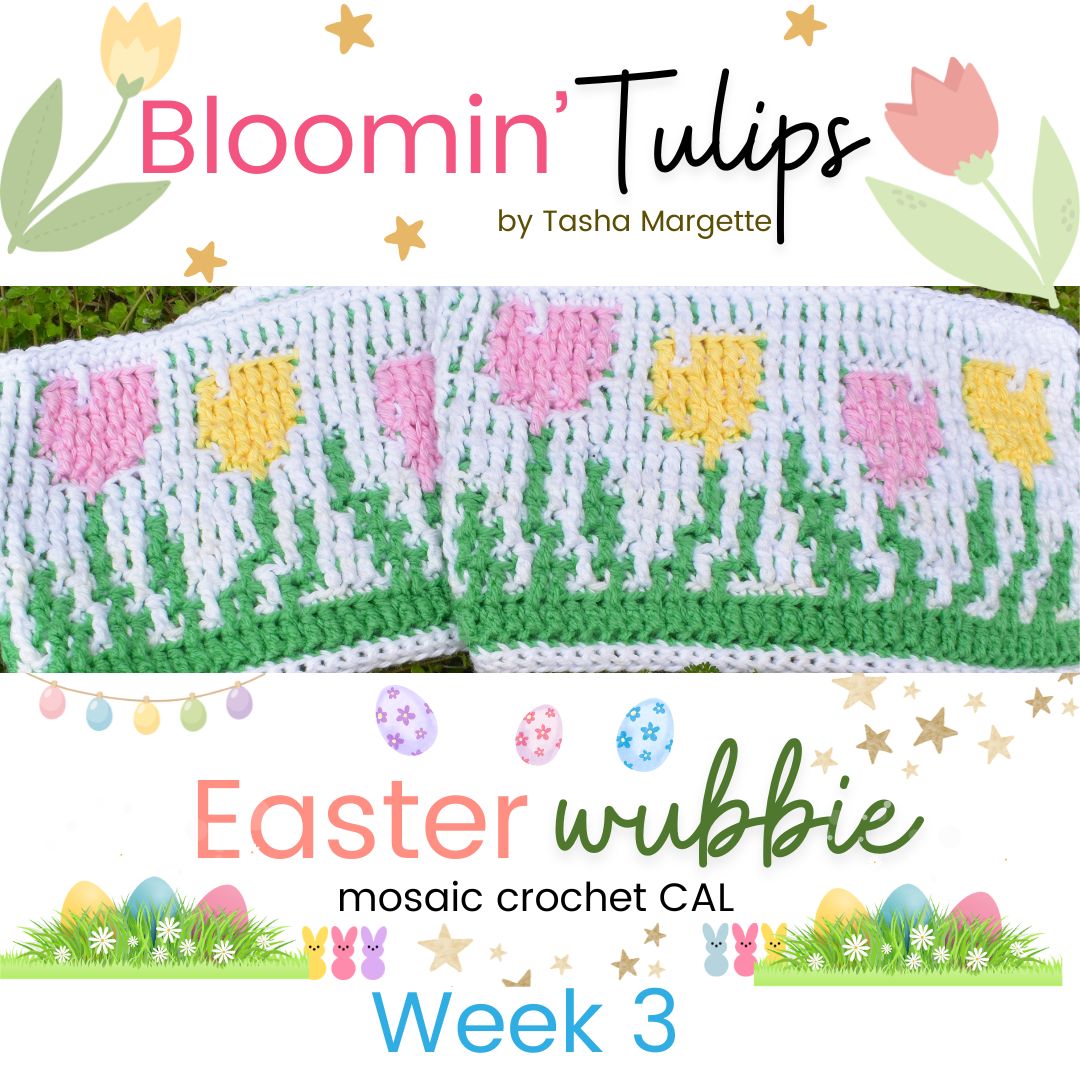
Hi and welcome friends! 👋 It’s Week 3 and the final week of the CAL! I hope you’ve enjoyed it. I am still working on my blanket – bet you are too. This beautiful Bloomin’ Tulips Mosaic Crochet Pattern is pattern #3 in the Easter Wubbie Mystery Mosaic Crochet CAL!
I personally LOVED creating this pattern. It was a little difficult to crochet the first few rows of the grass though, I must admit. But after you get to the top part of the tulips it gets a lot better.
Week 3 Easter Wubbie Crochet Along
If you made if here without knowing about the full blanket or the CAL do these steps:
- Head over to the main blog post for the Easter Wubbie CAL and get all the details.
- Get pattern #1 – The Peek-a-Boo Bunnies Mosaic Crochet Blanket Panel.
- Get pattern #2 – The Easter Eggs Mosaic Crochet Pattern.
- Scroll down for Pattern #3!
Get the Ebook and Work at Your Own Pace
If you want to skip all the anticipation and get the full pattern – you can get it here >>> Easter Wubbie Mosaic Blanket Ebook – Just $10.99! For ALL 3 Patterns + 4 BONUS patterns!

Scroll Down for the FREE Pattern & Graph!
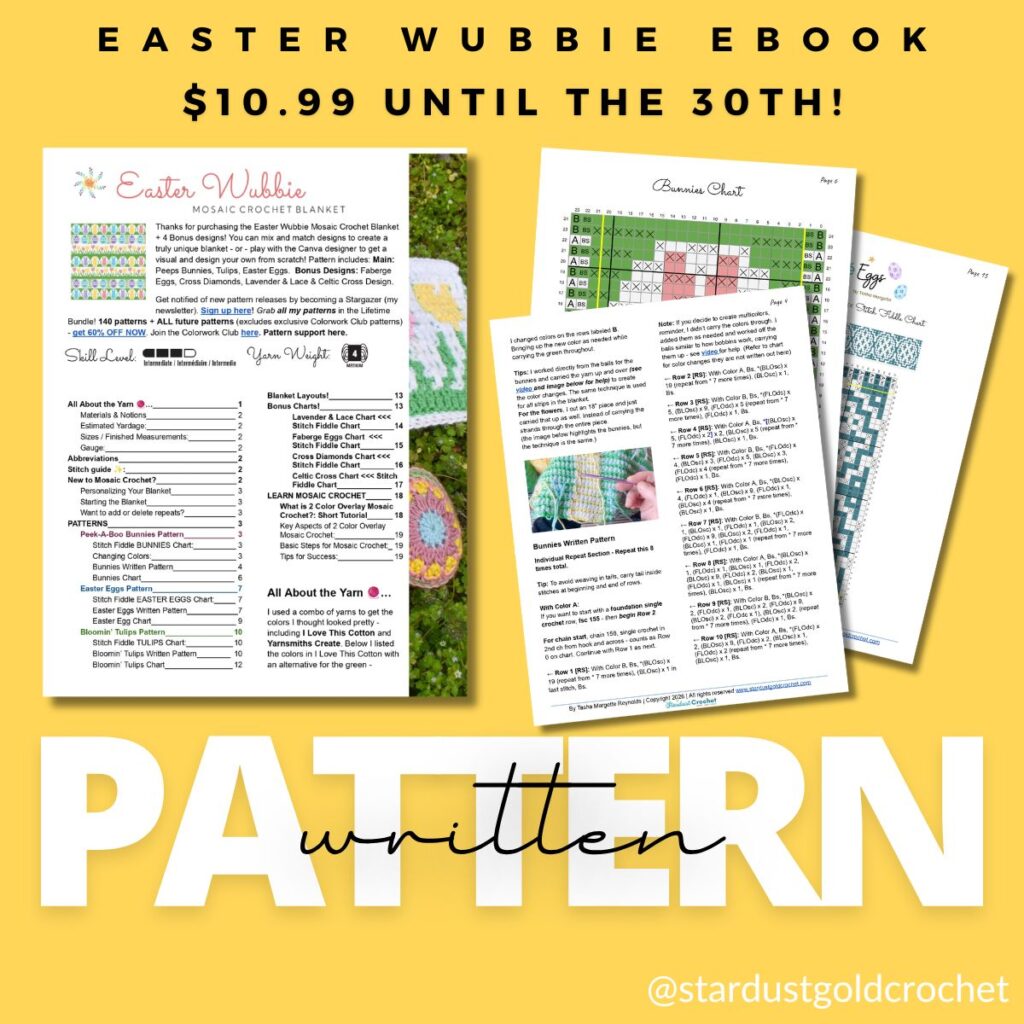
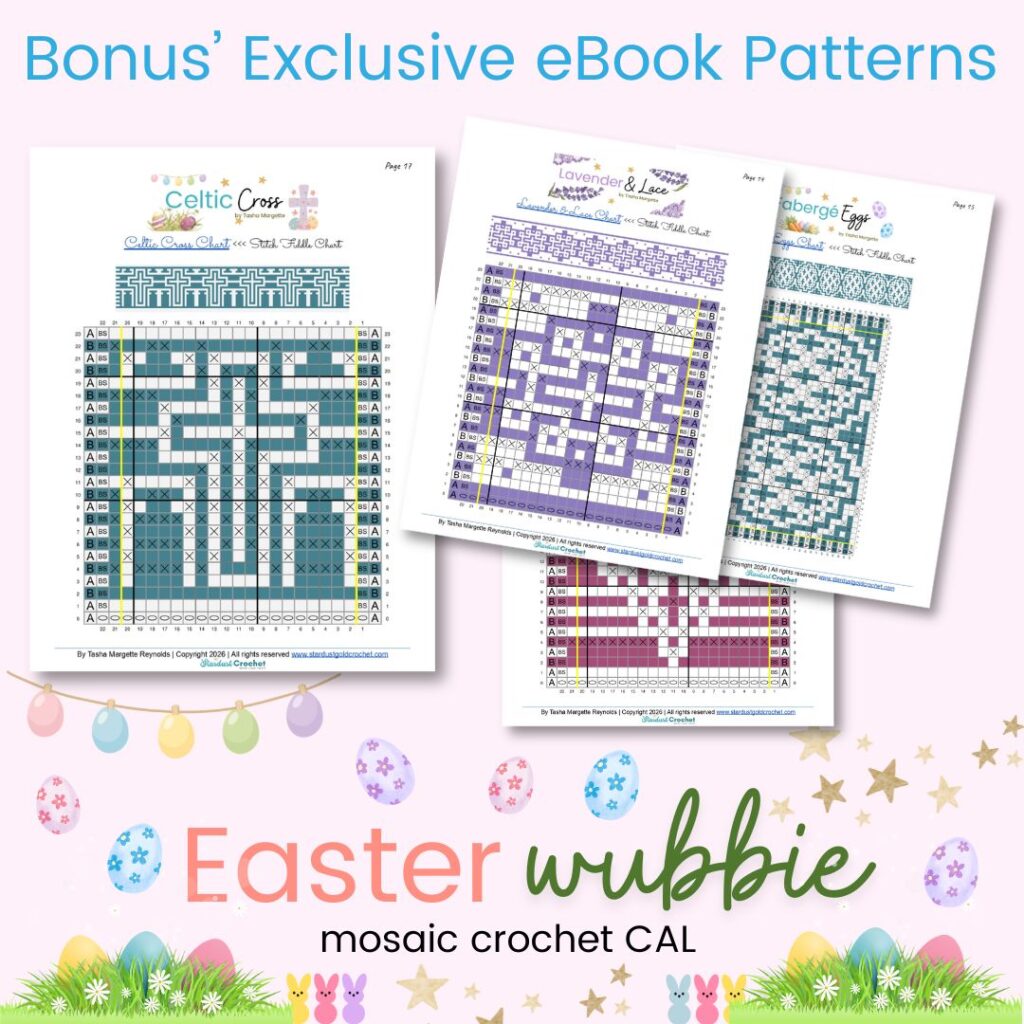
Table of contents
- Week 3 Easter Wubbie Crochet Along
- Get the Ebook and Work at Your Own Pace
- Learn How to Do Overlay Mosaic Crochet
- Bloomin’ Tulips Mosaic Crochet Pattern
- Bloomin’ Tulips Mosaic Crochet Written Pattern
- Pattern Notes:
- Multi-Color Changes Mid-row:
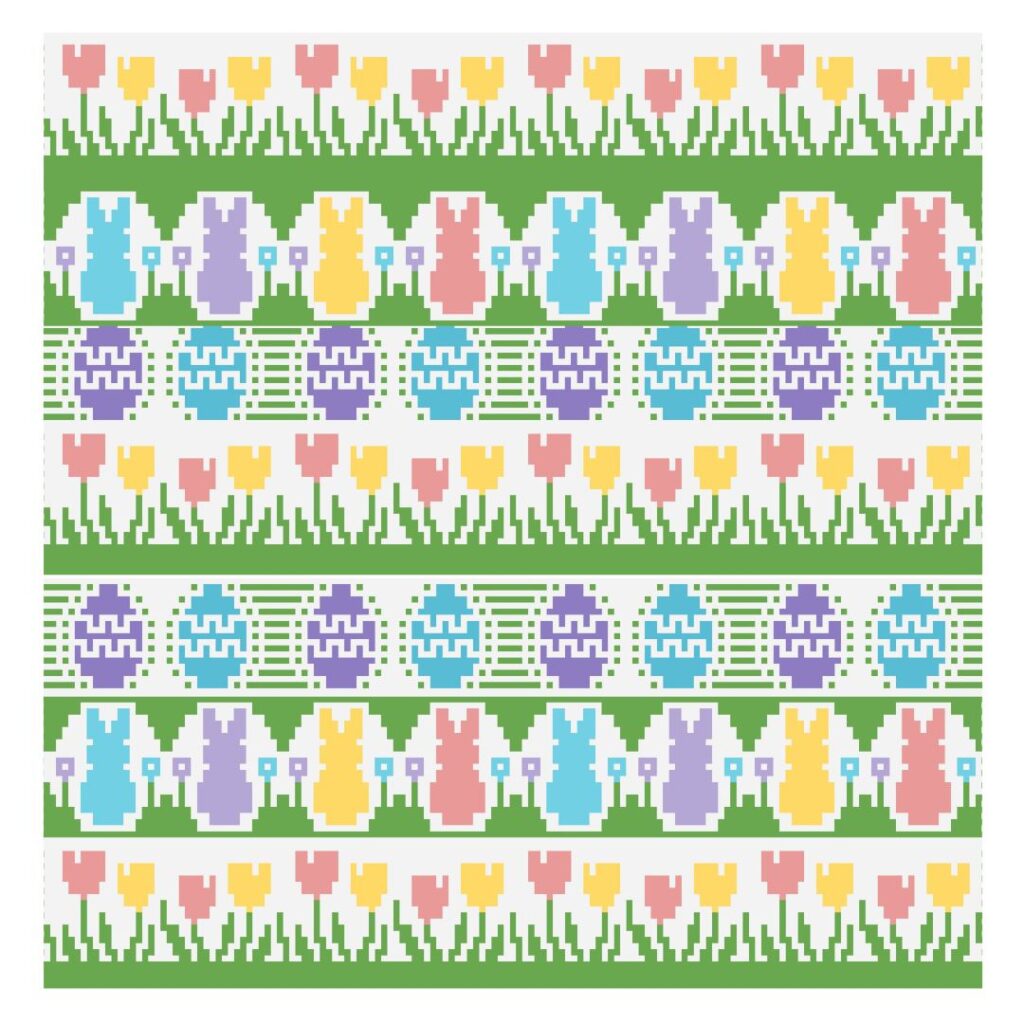
- Blanket Design #1
- Blanket Design #2
- Blanket Design #3 (I’m crocheting this one!)
- Bloomin’ Tulips Mosaic Crochet Pattern – Written Instructions
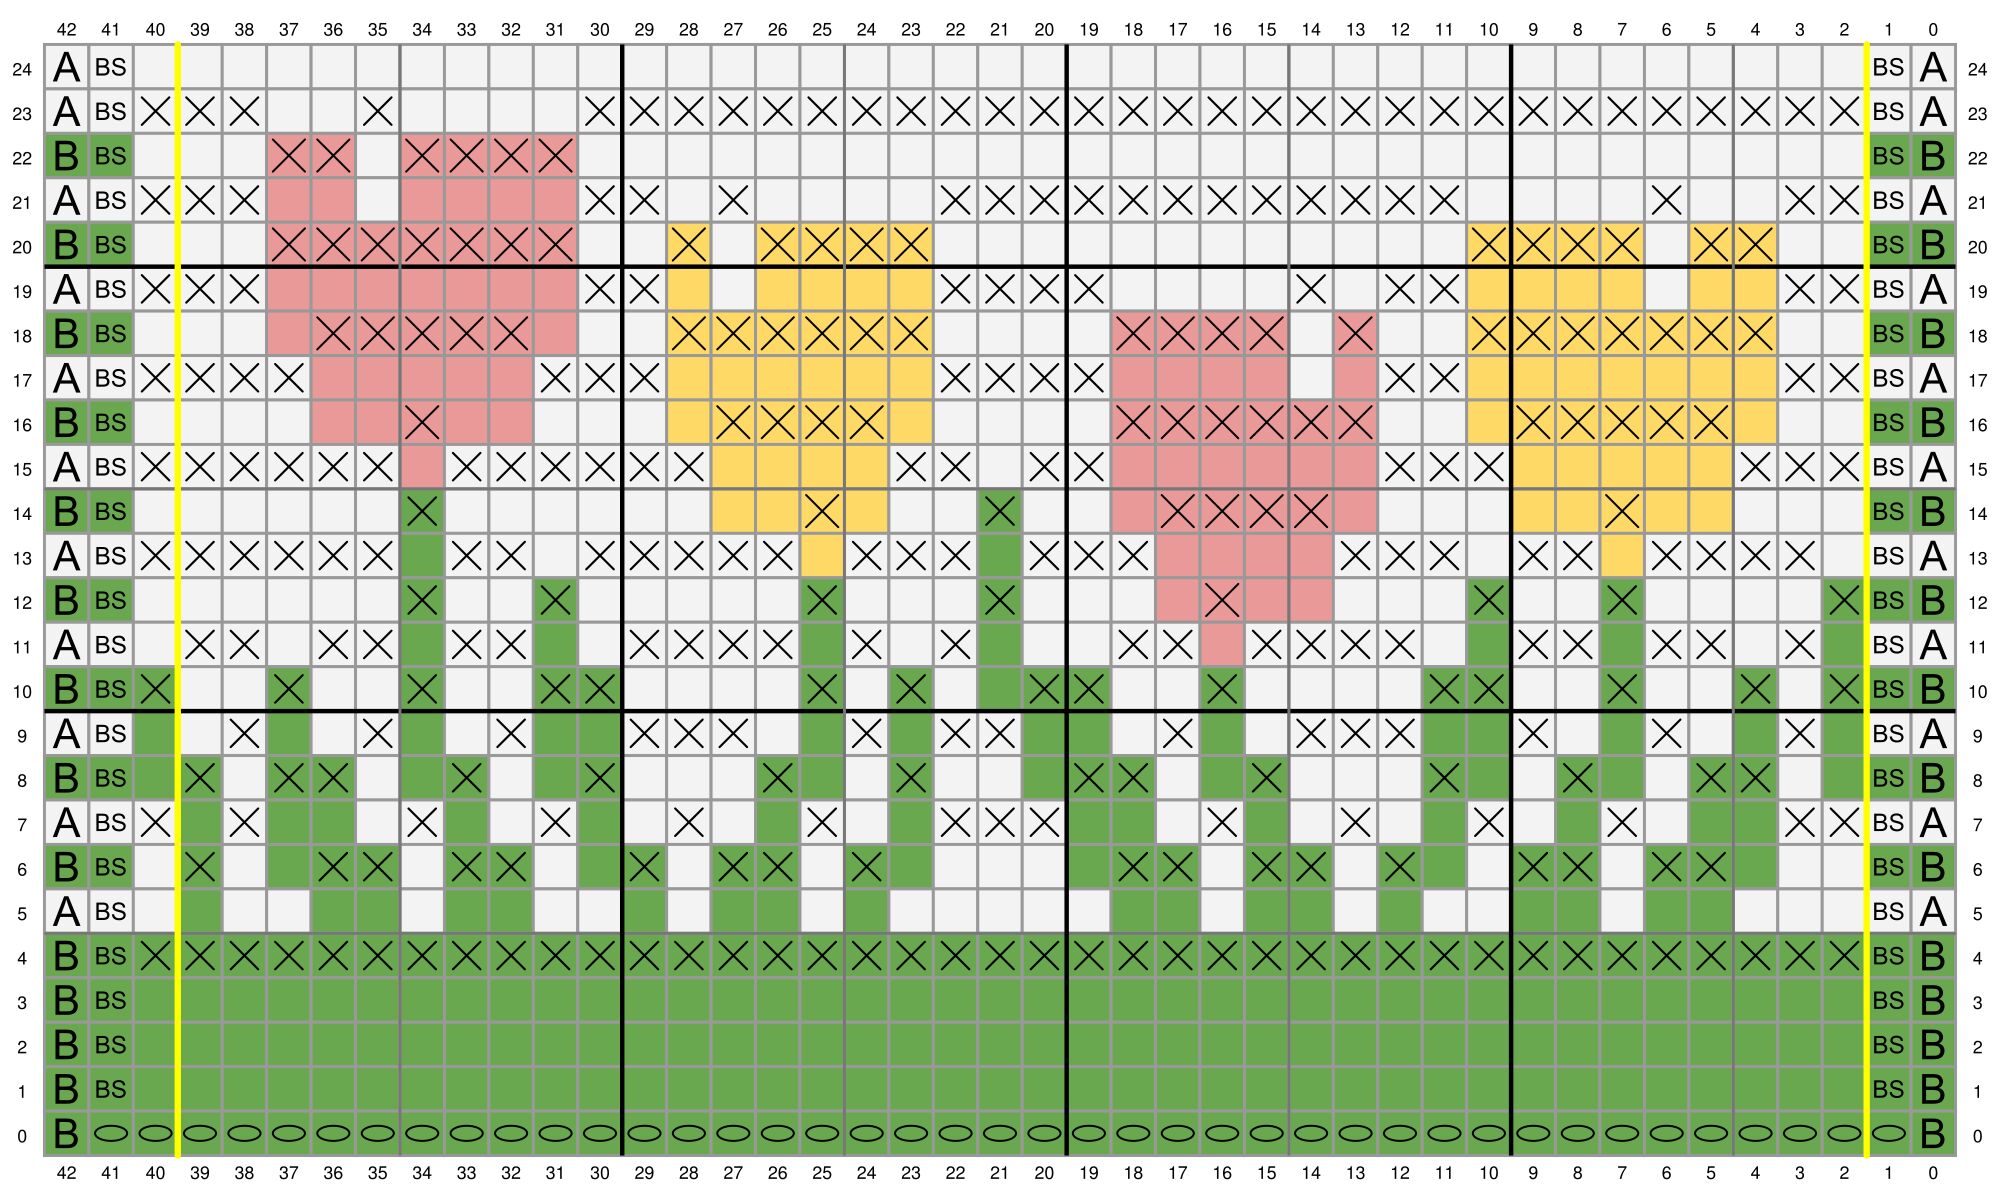
- Mosaic Crochet Bloomin’ Tulips Chart
Learn How to Do Overlay Mosaic Crochet
If you want to read more about it and get the yarn details, abbreviations, mosaic crochet tutorials and more, please head over to the main page (linked below) and get all the details about the yarn, and how to start! 🧶
Also, if you are new to overlay mosaic crochet, please head over to the main Easter Wubbie CAL page where you’ll find all the links and tutorials on how to do Overlay Mosaic Crochet and learn more about the details of the CAL.
Bloomin’ Tulips Mosaic Crochet Pattern

This written pattern is for the wubbie sized blanket (4 repeats.)
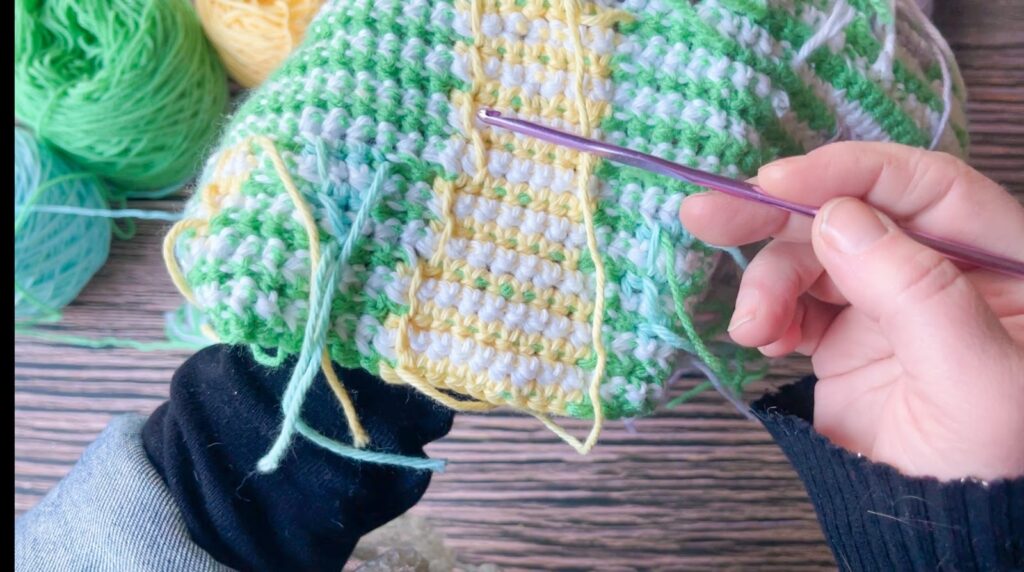
Changing Colors:
Use the Chart as a guide to change colors and reference the video above on creating multi color mosaic crochet patterns.
I changed colors on the rows labeled B. Bringing up the new color as needed while carrying the green throughout.
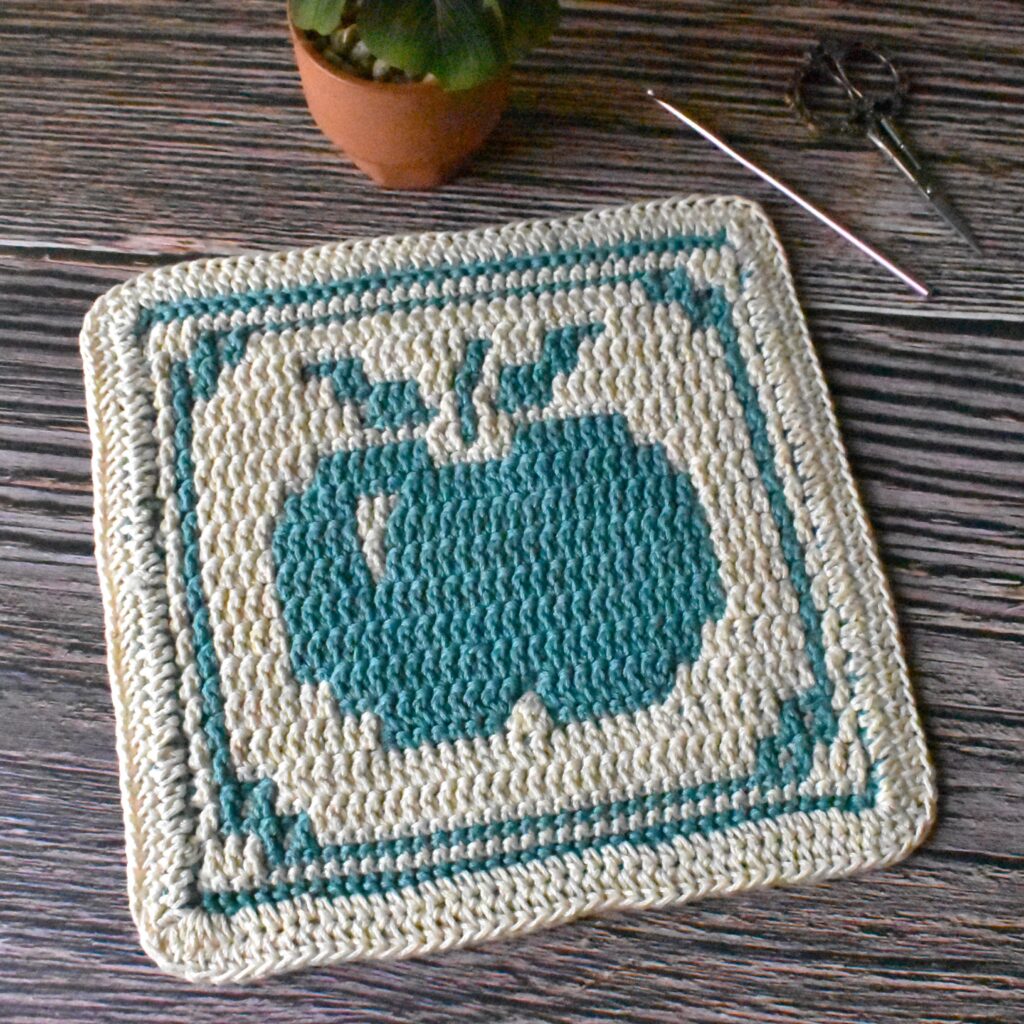
Tips: I worked directly from the balls for the tulip tops and carried the yarn up and over (see video and image below for help) to create the color changes. The same technique is used for all strips in the blanket.
(the image below highlights the bunnies, but the technique is the same across the board for color changes.)
Bloomin’ Tulips Mosaic Crochet Written Pattern
Pattern Notes:
Main Repeat throughout the pattern is in between the brackets.
- The LCM (least common multiple) in this blanket pattern is 38 stitches.
- Repeat the brackets however many times as indicated.
- Individual Repeat Section – Repeat this 4 times total for .
- Tip: To avoid weaving in tails, carry tail inside stitches at beginning and end of rows.
All About the Yarn 🧶…
I used a combo of yarns to get the colors I thought looked pretty – including I Love This Cotton and Yarnsmiths Create. Below I listed the colors in I Love This Cotton with an alternative for the green – because I used Yarnsmiths for green in my samples.
Materials & Notions
Suggested Yarn: I used 4-weight yarn (I Love This Cotton).
- Hook Size: 5 mm (US H)
- Scissors
- Darning Needle
Estimated Yardage:
To make then entire blanket;
- 4 Skeins – White (Color A)
- 3 Skein – Bright Green or Premier (Color B MC)
- 1 Skein – Pink
- 1 Skein – Aqua
- 1 Skein – Buttercup or Curry
- 1 Skein – Amethyst
Sizes / Finished Measurements:
Approximately 45″ wide x 42″ tall (about 114 cm x 107 cm) – without border
Gauge:
Approximately 14 sts × 17 rows (in overlay mosaic) = 4″ x 4” (10 x 10 cm) with H/8 (5.0 mm) hook.
Abbreviations
- FLOdc = front loop only double crochet
- BLOsc = back loop only single crochet
- ch(s) – chain(s)
- Bs – border stitch
- st (s) – stitch(es)
- yo – yarn over
- fsc – foundation single crochet
- RS – right side
[…] – Repeat inside brackets as many times as indicated.
Stitch guide ✨:
Bs – Border Stitch: It’s a single crochet stitch, placed between the V of the single crochet below. Insert your hook into the designated stitch or space. Yo and pull up a loop. Yarn over again and draw the yarn through both loops on the hook. (it’s a single crochet)
BLOsc = Back Loop Only Single Crochet: Insert your hook into the back loop only of the designated stitch. Wrap the yarn over your hook and pull up a loop. Yarn over again and draw the yarn through both loops on the hook.
FLOdc = Front Loop Only Double Crochet (aka drop down double crochet): Yo, insert your hook into the front loop only 2 rows down. Yo and pull up a loop. Yarn over and draw through two loops on the hook.
FUN TIP: Lately, I’ve been doing a front POST drop down double crochet because I think it looks a lot better.
New to Mosaic Crochet?
- If you are new to mosaic crochet head to the table of contents to find the tutorials (at end of the eBook – full of links and tutorials to learn how to do mosaic crochet).
Personalizing Your Blanket
The great thing about these patterns is you can create a blanket as large as you’d like and as small as 41 stitches wide! Mix and match motifs. Create something truly unique!
Starting the Blanket
The blanket is 155 stitches wide.
Want to add or delete repeats?
Repeat the area between the yellow lines. When you get the number of repeats you’d like, complete the last stitch + the border stitch to finish it off.
To customize the size, use the graph below:
- Repeat only the stitches between the yellow lines of the chart for the body of your project.
- To adjust the width, multiply the number of stitches between the yellow lines by the number of repeats you want, then add 3 stitches to your foundation chain.
- After completing your repeats, work the final two stitches shown at the end of the graph to finish the edge.
Notes:
- Worked flat from R – L (L-R if left handed)
- No turning, all worked on RS.
- For 2 Color Patterns: Color changes each row – cut yarn after each row.
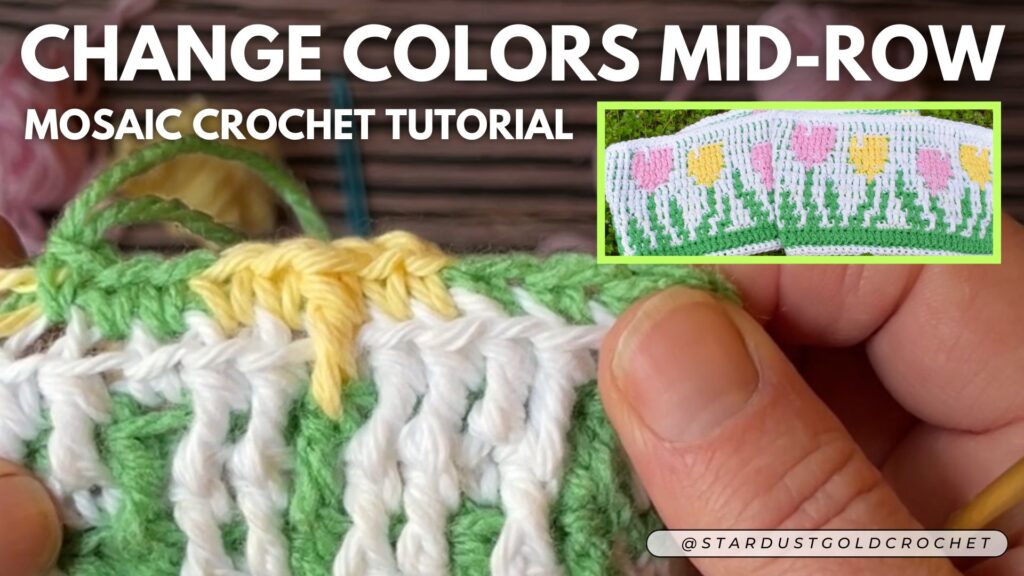
Multi-Color Changes Mid-row:
If you like the multi-color, you can achieve that by changing colors mid-row (refer to the CHART for when to change).Similar to any color change midrow, you use bobbins or balls and bring up the color as needed, carrying it up and over and enclosing it. (I created a video for this) – check out the video links above.
Blanket Pattern Ideas
Now that we’ve have all the pieces of the puzzle to the blanket! Here are some of the pattern ideas I came up with! Or you can come up with your own too!
Blanket Design #1
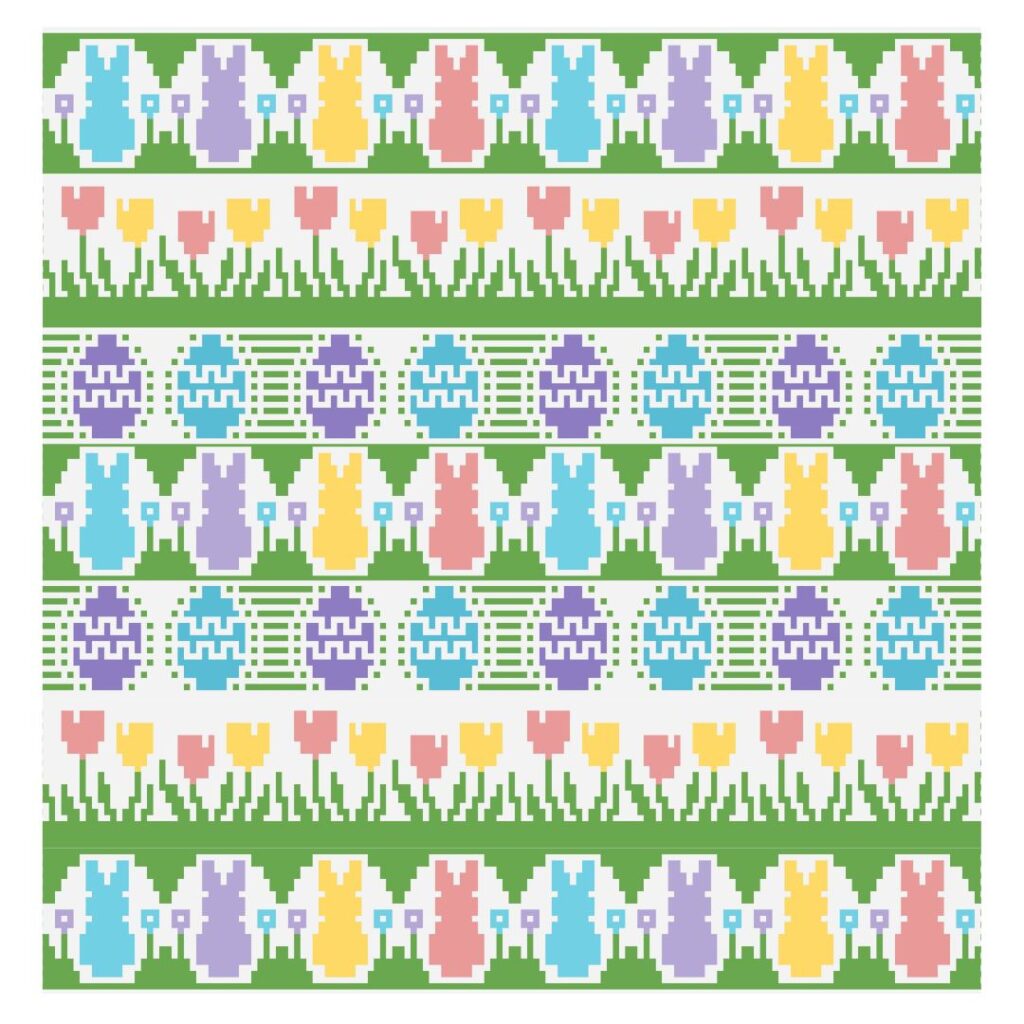
Blanket Design #2
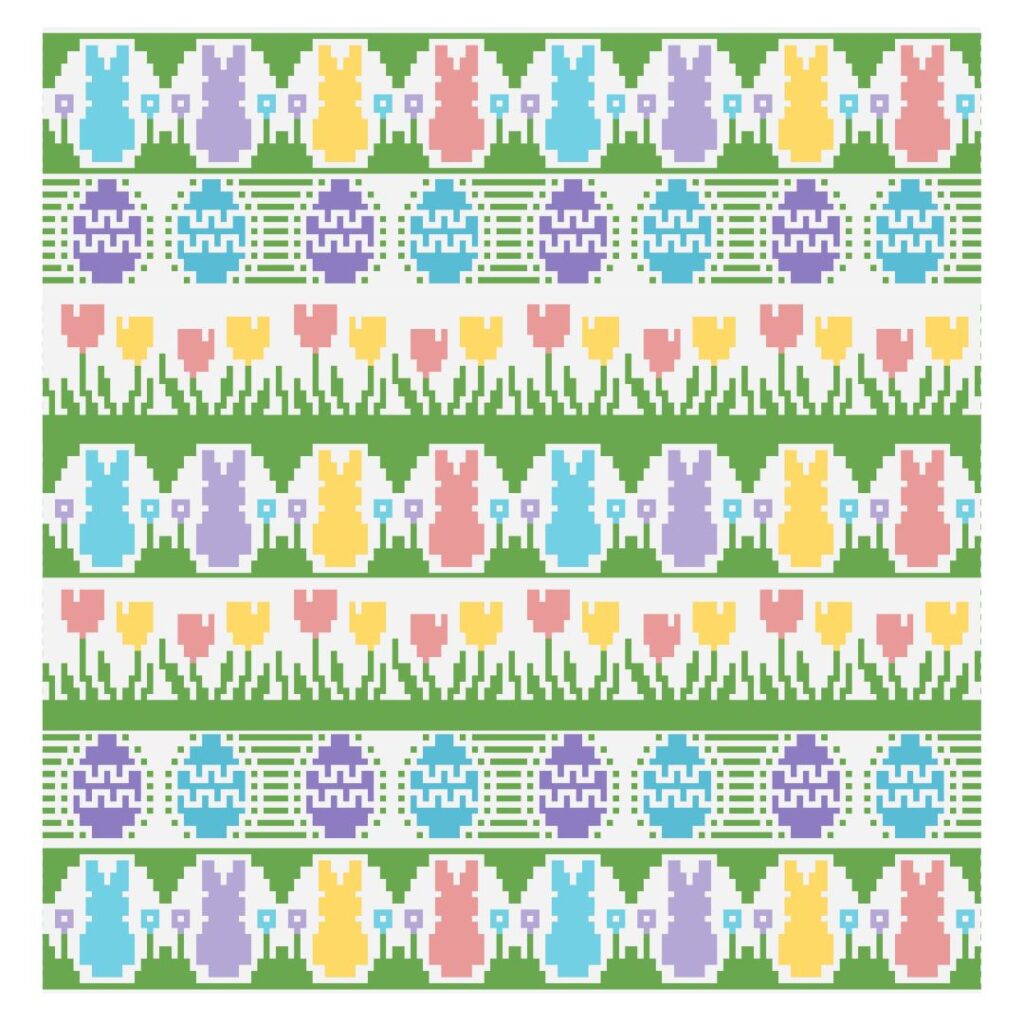
Blanket Design #3 (I’m crocheting this one!)
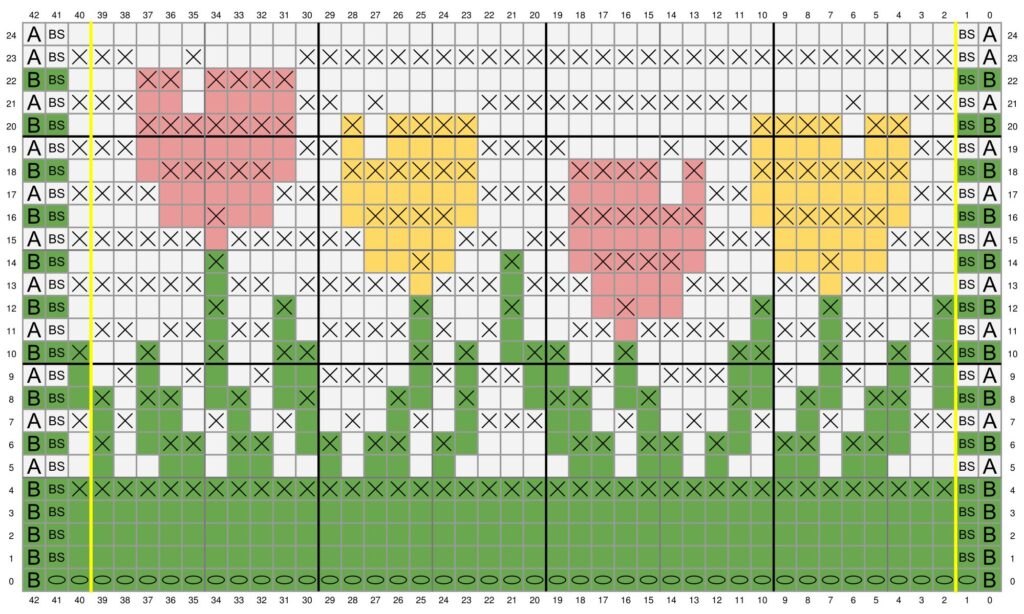
Bloomin’ Tulips Mosaic Crochet Pattern – Written Instructions
Note: If you decide to create multicolor, reminder, I didn’t carry the colors through. I added them as needed and worked off the balls similar to how bobbins work, carrying them up – see How to Change Colors in Mosaic Crochet video for help. (Refer to chart for color changes they are not written out here)
This written pattern is for the wubbie sized blanket (4 repeats.)
For the Tulips (color changes) , I created bobbins for the separate colors.
Individual Repeat Section – Repeat this 4 times.
This is the third panel, so you’ll start Row 1 at the top rightmost stitch of Row 23 from previous panel and continue as normal.
← Row 1 [RS]: With Color B, Bs, *(BLOsc) x 38 (repeat from * 3 more times), (BLOsc) x 1 in last stitch, Bs.
← Row 2 [RS]: With Color B, Bs, *(BLOsc) x 38 (repeat from * 3 more times), (BLOsc) x 1 in last stitch, Bs.
← Row 3 [RS]: With Color B, Bs, *(BLOsc) x 38 (repeat from * 3 more times), (BLOsc) x 1 in last stitch, Bs.
← Row 4 [RS]: With Color B, Bs, *(FLOdc) x 38 (repeat from * 3 more times), (FLOdc) x 1 in last stitch, Bs.
← Row 5 [RS]: With Color A, Bs, *(BLOsc) x 38 (repeat from * 3 more times), (BLOsc) x 1 in last stitch, Bs.
← Row 6 [RS]: With Color B, Bs, *(BLOsc) x 3, (FLOdc) x 2, (BLOsc) x 1, (FLOdc) x 2, (BLOsc) x 2, (FLOdc) x 1, [(BLOsc) x 1, (FLOdc) x 2] x 2, (BLOsc) x 5, (FLOdc) x 1, (BLOsc) x 1, (FLOdc) x 2, (BLOsc) x 1, (FLOdc) x 1, (BLOsc) x 2, (FLOdc) x 2, (BLOsc) x 1, (FLOdc) x 2, (BLOsc) x 2, (FLOdc) x 1 (repeat from * 3 more times), (BLOsc) x 1 in last stitch, Bs.
← Row 7 [RS]: With Color A, Bs, *(FLOdc) x 2, (BLOsc) x 3, [(FLOdc) x 1, (BLOsc) x 2] x 3, (FLOdc) x 1, (BLOsc) x 3, (FLOdc) x 3, [(BLOsc) x 2, (FLOdc) x 1] x 4, (BLOsc) x 3, (FLOdc) x 1, (BLOsc) x 1 (repeat from * 3 more times), (FLOdc) x 1 in last stitch, Bs.
← Row 8 [RS]: With Color B, Bs, *(BLOsc) x 2, (FLOdc) x 2, [(BLOsc) x 2, (FLOdc) x 1] x 2, (BLOsc) x 3, (FLOdc) x 1, (BLOsc) x 2, (FLOdc) x 2, [(BLOsc) x 3, (FLOdc) x 1, (BLOsc) x 2, (FLOdc) x 1] x 2, (BLOsc) x 2, (FLOdc) x 2, (BLOsc) x 1, (FLOdc) x 1 (repeat from * 3 more times), (BLOsc) x 1 in last stitch, Bs.
← Row 9 [RS]: With Color A, Bs, *(BLOsc) x 1, [(FLOdc) x 1, (BLOsc) x 2] x 3, (FLOdc) x 3, (BLOsc) x 2, (FLOdc) x 1, (BLOsc) x 3, (FLOdc) x 2, (BLOsc) x 1, (FLOdc) x 1, (BLOsc) x 2, (FLOdc) x 3, [(BLOsc) x 2, (FLOdc) x 1] x 3, (BLOsc) x 1 (repeat from * 3 more times), (BLOsc) x 1 in last stitch, Bs.
← Row 10 [RS]: With Color B, Bs, *(FLOdc) x 1, (BLOsc) x 1, [(FLOdc) x 1, (BLOsc) x 2] x 2, (FLOdc) x 2, (BLOsc) x 4, (FLOdc) x 1, (BLOsc) x 2, (FLOdc) x 2, (BLOsc) x 2, (FLOdc) x 1, (BLOsc) x 1, (FLOdc) x 1, (BLOsc) x 4, (FLOdc) x 2, (BLOsc) x 2, (FLOdc) x 1, (BLOsc) x 2, (FLOdc) x 1, (BLOsc) x 2 (repeat from * 3 more times), (FLOdc) x 1 in last stitch, Bs.
More Mosaic Crochet Pattern You’ll Love
- CottagCore Mosaic Crochet Blanket
- Woven Worlds Mosaic Crochet Blanket
- Mosaic Crochet Hotpads / Trivets


← Row 11 [RS]: With Color A, Bs, *(BLOsc) x 1, (FLOdc) x 1, [(BLOsc) x 1, (FLOdc) x 2] x 2, (BLOsc) x 2, (FLOdc) x 4, (BLOsc) x 1, (FLOdc) x 2, (BLOsc) x 3, [(FLOdc) x 1, (BLOsc) x 1] x 2, (FLOdc) x 4, (BLOsc) x 2, (FLOdc) x 2, (BLOsc) x 1, (FLOdc) x 2, (BLOsc) x 1, (FLOdc) x 2 (repeat from * 3 more times), (BLOsc) x 1 in last stitch, Bs.
← Row 12 [RS]: With Color B, Bs, *(FLOdc) x 1, (BLOsc) x 4, (FLOdc) x 1, (BLOsc) x 2, (FLOdc) x 1, (BLOsc) x 5, (FLOdc) x 1, (BLOsc) x 4, (FLOdc) x 1, (BLOsc) x 3, (FLOdc) x 1, (BLOsc) x 5, (FLOdc) x 1, (BLOsc) x 2, (FLOdc) x 1, (BLOsc) x 5 (repeat from * 3 more times), (BLOsc) x 1 in last stitch, Bs.
← Row 13 [RS]: With Color A, Bs, *(BLOsc) x 1, (FLOdc) x 4, (BLOsc) x 1, (FLOdc) x 2, (BLOsc) x 1, (FLOdc) x 3, (BLOsc) x 4, [(FLOdc) x 3, (BLOsc) x 1] x 2, (FLOdc) x 5, (BLOsc) x 1, (FLOdc) x 2, (BLOsc) x 1, (FLOdc) x 5 (repeat from * 3 more times), (FLOdc) x 1 in last stitch, Bs.
← Row 14 [RS]: With Color B, Bs, *(BLOsc) x 5, (FLOdc) x 1, (BLOsc) x 6, (FLOdc) x 4, [(BLOsc) x 3, (FLOdc) x 1] x 2, (BLOsc) x 8, (FLOdc) x 1, (BLOsc) x 5 (repeat from * 3 more times), (BLOsc) x 1 in last stitch, Bs.
← Row 15 [RS]: With Color A, Bs, *(FLOdc) x 3, (BLOsc) x 5, (FLOdc) x 3, (BLOsc) x 6, (FLOdc) x 2, (BLOsc) x 1, (FLOdc) x 2, (BLOsc) x 4, (FLOdc) x 6, (BLOsc) x 1, (FLOdc) x 5 (repeat from * 3 more times), (FLOdc) x 1 in last stitch, Bs.
← Row 16 [RS]: With Color B, Bs, *(BLOsc) x 3, (FLOdc) x 5, (BLOsc) x 3, (FLOdc) x 6, (BLOsc) x 5, (FLOdc) x 4, (BLOsc) x 6, (FLOdc) x 1, (BLOsc) x 5 (repeat from * 3 more times), (BLOsc) x 1 in last stitch, Bs.
← Row 17 [RS]: With Color A, Bs, *(FLOdc) x 2, (BLOsc) x 7, (FLOdc) x 2, (BLOsc) x 6, (FLOdc) x 4, (BLOsc) x 6, (FLOdc) x 3, (BLOsc) x 5, (FLOdc) x 3 (repeat from * 3 more times), (FLOdc) x 1 in last stitch, Bs.
← Row 18 [RS]: With Color B, Bs, *(BLOsc) x 2, (FLOdc) x 7, (BLOsc) x 2, (FLOdc) x 1, (BLOsc) x 1, (FLOdc) x 4, (BLOsc) x 4, (FLOdc) x 6, (BLOsc) x 3, (FLOdc) x 5, (BLOsc) x 3 (repeat from * 3 more times), (BLOsc) x 1 in last stitch, Bs.
← Row 19 [RS]: With Color A, Bs, *(FLOdc) x 2, (BLOsc) x 7, (FLOdc) x 2, (BLOsc) x 1, (FLOdc) x 1, (BLOsc) x 4, (FLOdc) x 4, (BLOsc) x 6, (FLOdc) x 2, (BLOsc) x 7, (FLOdc) x 2 (repeat from * 3 more times), (FLOdc) x 1 in last stitch, Bs.
← Row 20 [RS]: With Color B, Bs, *(BLOsc) x 2, (FLOdc) x 2, (BLOsc) x 1, (FLOdc) x 4, (BLOsc) x 12, (FLOdc) x 4, (BLOsc) x 1, (FLOdc) x 1, (BLOsc) x 2, (FLOdc) x 7, (BLOsc) x 2 (repeat from * 3 more times), (BLOsc) x 1 in last stitch, Bs.
← Row 21 [RS]: With Color A, Bs, *(FLOdc) x 2, (BLOsc) x 2, (FLOdc) x 1, (BLOsc) x 4, (FLOdc) x 12, (BLOsc) x 4, (FLOdc) x 1, (BLOsc) x 1, (FLOdc) x 2, (BLOsc) x 7, (FLOdc) x 2 (repeat from * 3 more times), (FLOdc) x 1 in last stitch, Bs.
← Row 22 [RS]: With Color B, Bs, *(BLOsc) x 29, (FLOdc) x 4, (BLOsc) x 1, (FLOdc) x 2, (BLOsc) x 2 (repeat from * 3 more times), (BLOsc) x 1 in last stitch, Bs.
← Row 23 [RS]: With Color A, Bs, *(FLOdc) x 29, (BLOsc) x 4, (FLOdc) x 1, (BLOsc) x 2, (FLOdc) x 2 (repeat from * 3 more times), (FLOdc) x 1 in last stitch, Bs.← Row 24 [RS]: With Color A, Bs, *(BLOsc) x 38 (repeat from * 3 more times), (BLOsc) x 1 in last stitch, Bs.
Mosaic Crochet Bloomin’ Tulips Chart
Download the full sized chart here >>>
Thanks for being here! Show me your Easter Wubbie Mosaic Crochet Pattern in the Crochet Along with US Group!
I hope you enjoyed this pattern and thank you so much for joining the CAL! Please share your finished blanket with me!