The Hearts C2C Crochet Baby Blanket was a crochet along and it now a stand alone free crochet pattern. 💕 I’ve been crocheting away the last few weeks and so happy with how this cute crochet baby blanket turned out!
This cute heart filled crochet baby blanket pattern is forever free, and full crochet pattern is below. Thanks to everyone who participated in the crochet along!
Learn C2C – Absolute Beginner Course
C2C may seem scary, but I’m here to help! Take the full Absolute Beginner C2C course to learn how to create beautiful projects with ease.
Absolute Beginner C2C Course – Get 50% OFF with code: SKILLS
Table of contents
- Learn C2C – Absolute Beginner Course
- Materials
- Approximate Size of Blanket
- Adjusting Your Blanket Size:
- Projected yardage for C2C using 4.5 mm hook:
- Yarn Subs and Where to Buy the Yarn
- All About the Yarn and Colors
- Let’s Get Started!
- Stitch Guide
- How to C2C:
- Part 1 – Full Video Tutorial
- Helpful Corner to Corner Crochet (C2C) tutorials:
- Pattern
- Joining the Squares
- Diagram 1
- Part 2 Video Tutorial – Joining the Squares
- Border Pattern
- Part 3 Video Tutorial – Creating a Puff Stitch Border
- Sneak Peek of this beautiful blanket!
Grab the PDF
The ad-free PDF of the Hearts Crochet Baby Blanket is in the Infinite Yarniverse. It will be updated on February 10th with the border pattern and joins.
Materials
- Suggested Yarn: Premier Parfait Chunky or similar (yarn subs listed below)
- Hook Size: 4.5 mm Crochet Hook
- Darning Needle
- Scissors
Approximate Size of Blanket
C2C blanket size using 4.5 mm hook, suggested yarn, and double crochet C2C (5/2 method) will measure approximately 32″ x 32″ (78 cm x 78 cm)
This blanket is perfect for a crib, car seat, or to lay down and let your baby play on. It’s so soft!
If you want to test this using the C2C Blanket Size Calculator, it will give you a better idea of how big YOUR squares and blanket will be.
Individual Heart Square: 9.75” W x 8.75” T
Squares blocked & Joined: 30” x 30”
Blanket with Border: Approx. 32” x 32”
Adjusting Your Blanket Size:
Decrease the Size
- Try using half double crochets instead of double crochets.
- Use a smaller yarn (worsted weight – 4 or light worsted – 3 weight yarn).
- Create fewer squares.
Increase the size
- Increase hook size to 5.5, 6, or 6.5 mm (with this yarn you can use up to an 8 mm hook!)
- Add an extra row to the blanket squares border.
- Add an extra row to the entire blanket border.
- Create more than 9 squares.
Projected yardage for C2C using 4.5 mm hook:
These numbers and yardage are based off my own crochet tension, hook size, and stitch. I used a double crochet 5/3 method and a 4.5 mm crochet hook. Calculate your own C2C yardage here.
- Cream (5-6 skeins), includes border.
- Other colors (1 skein of each color or 2-3 of a complimentary color)
If you want to know the exact number of skeins you will need – based off your own hook size, tension & stitch, please use my C2C yardage calculator.
Yarn Subs and Where to Buy the Yarn
It seems Parfait yarn is in such high demand these days. Here are a few options if you can’t find all the colors I use in the blanket.
- Top Choice: Parfait Chunky Yarn
- Herschners – Parfait Chunky
- Get it at Walmart
- Amazon has Parfait Chunky Cream 3 Skeins (I purchased 2 packs of these for the blanket)
- Parfait Chunk Cotton Candy 3 Pack (a pink background with white hearts would be pretty too!)
- Yarn subs for Parfait on Yarnsub.com
All About the Yarn and Colors
Premier Parfait Chunky Yarn Details:
100% polyester, 3.5 oz. / 100 g, 131 yds. / 120 m
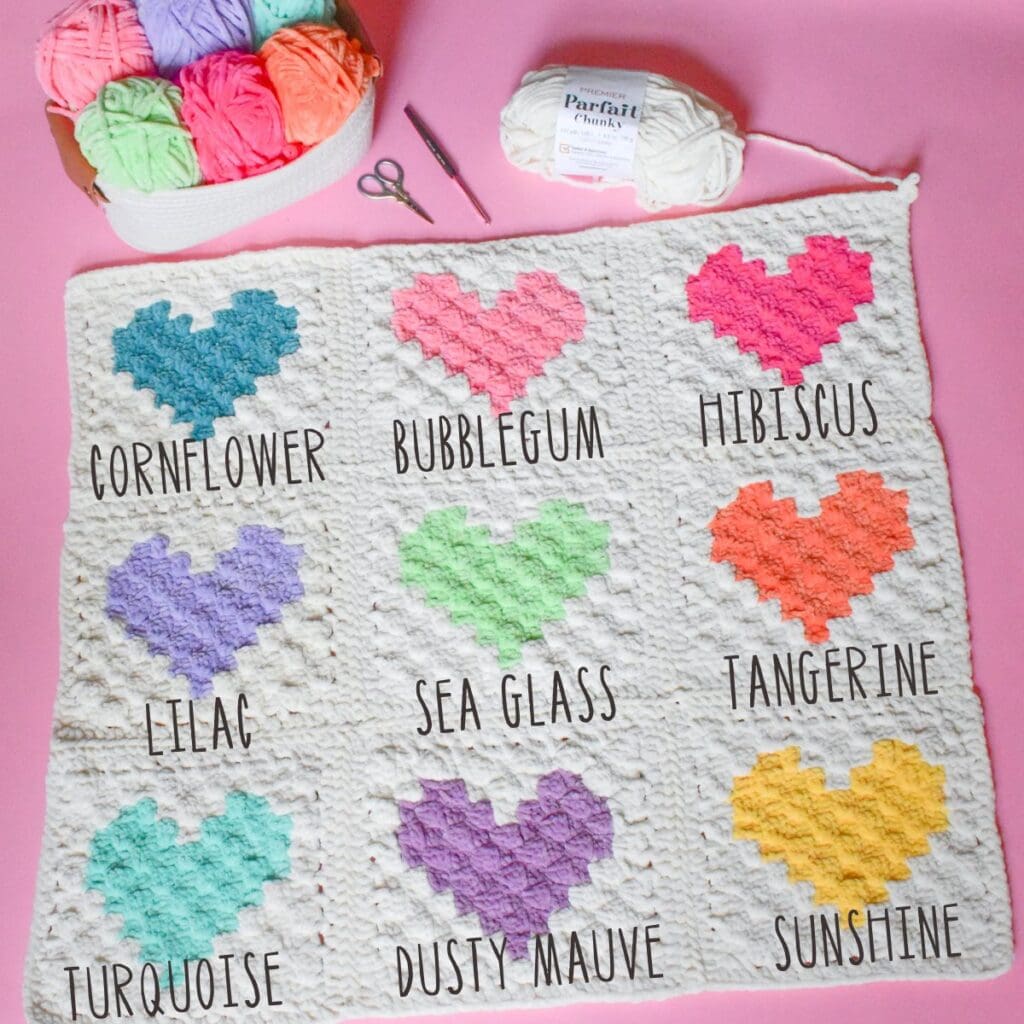
There are a total of 9 squares.
If you choose to make the hearts using one color instead of multiple colors, you’ll need around 2 skeins total of that color.
| Color | # of Sqs/Sts | Skeins |
| Cream | 64 (per sq) 576 (9 sqs) | 5 – 6 for blanket squares + borders |
| Hearts | 46 (per sq) 414 (9 sqs) | Less than 1 skein per square + more for border |
Let’s Get Started!
Here we go! You’re going to love making this pattern, it’s so easy and soft. Remember there are video tutorials to help you through every aspect of this blanket including the border.
If you have any questions, please let me know!
Stitch Guide
sc – Single Crochet: Insert hook in indicated stitch, yo, pull up a loop, yo, pull through both loops.
dc – Double Crochet: Yo, insert hook in indicated stitch, yo and draw up a loop, yo, draw through two loops (two times).
hdc – Double Crochet: Yo, insert hook in indicated stitch, yo and draw up a loop, *yo, draw through all three loops on hook.
PS – Puff Stitch: Yo, insert hook in indicated stitch, yo and draw up a loop, *insert hook in same stitch, yo pull up a loop, repeat from * 2 more times. Yo, draw through all but one loop, yo, draw through last two loops.
How to C2C:
Part 1 – Full Video Tutorial
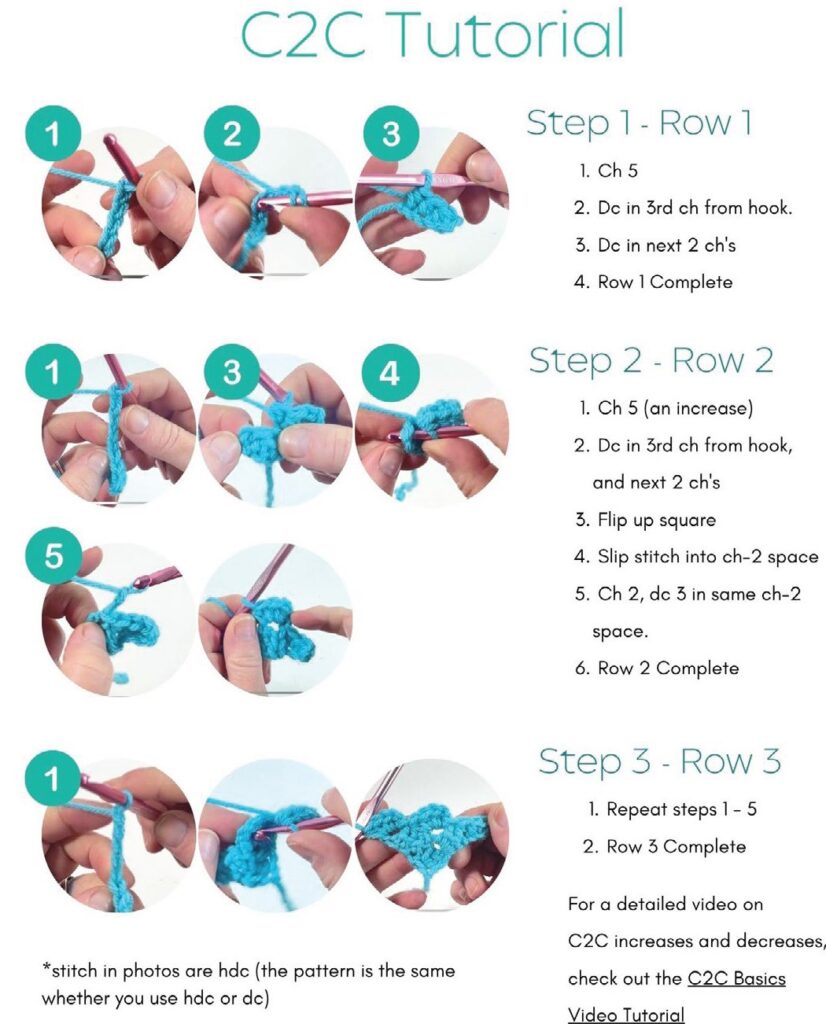
If you are new to C2C and want to learn. This is the perfect crochet along for you. I’ve created an entire video tutorial walkthrough for the Hearts Plushie Baby Blanket.

Helpful Corner to Corner Crochet (C2C) tutorials:
Pattern
Let’s get started and please let me know if you have any questions!
Follow the instructions on how to do C2C above.
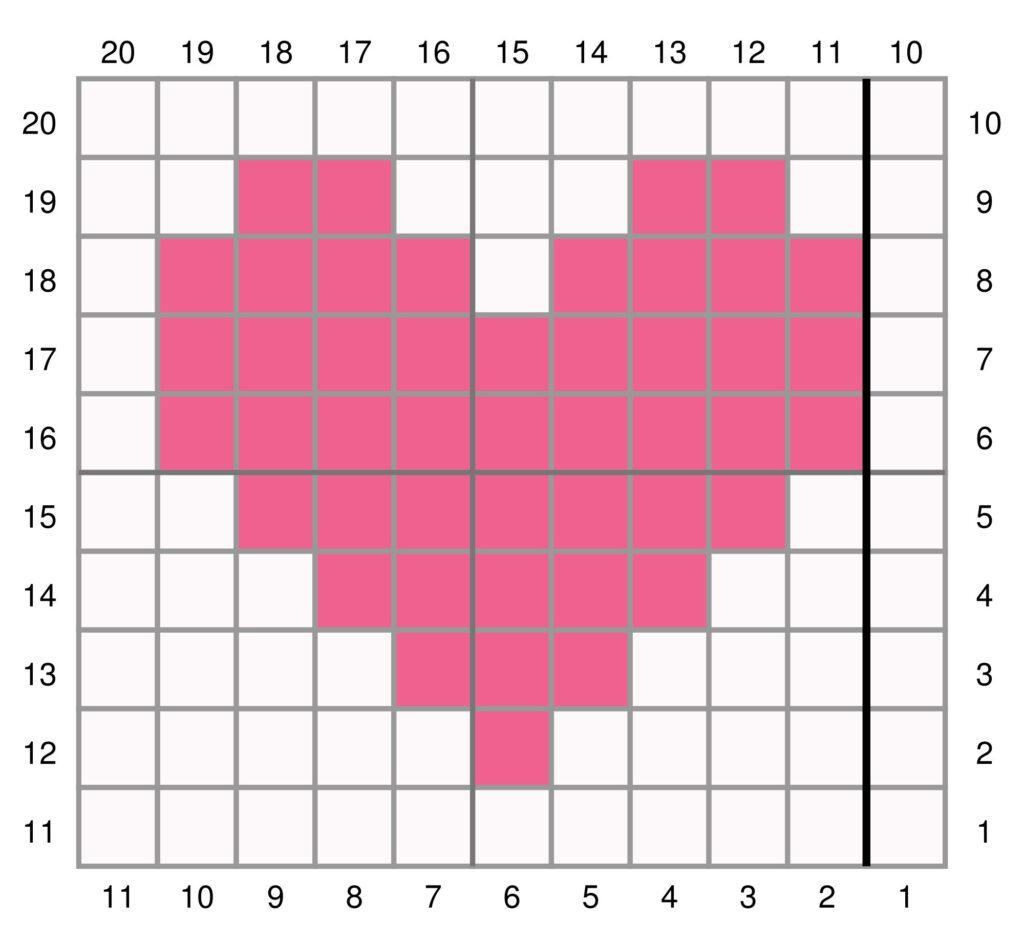
↙ Row 1 [RS]: (MC) x 1 (1 sq)
↗ Row 2 [WS]: (MC) x 2 (2 sqs)
↙ Row 3 [RS]: (MC) x 3 (3 sqs)
↗ Row 4 [WS]: (MC) x 4 (4 sqs)
↙ Row 5 [RS]: (MC) x 5 (5 sqs)
↗ Row 6 [WS]: (MC) x 6 (6 sqs)
↙ Row 7 [RS]: (MC) x 1, (CC) x 5, (MC) x 1 (7 sqs)
↗ Row 8 [WS]: (MC) x 2, (CC) x 5, (MC) x 1 (8 sqs)
↙ Row 9 [RS]: (MC) x 1, (CC) x 6, (MC) x 2 (9 sqs)
↗ Row 10 [WS]: (MC) x 3, (CC) x 5, (MC) x 2 (10 sqs)
Corner: Start decreasing on RS
When you finish Row 10, turn. Do not chain 5. Slip stitch in the 3 stitches along the top of your blanket and in the ch-2 space. Then begin Row 11 with a ch 2, and 3 dc (or whatever stitch you chose) into the ch-2 space.
You are only decreasing on the RS, so continue to increase on the WS.
↙ Row 11 [RS]: (MC) x 1, (CC) x 6, (MC) x 3 (10 sqs)
Corner: Start decreasing on WS
When you finish Row 11 turn. Do not chain 5. Slip stitch in the 3 stitches along the top of your blanket and in the ch-2 space. Then begin Row 12 with a ch 2, and 3 dc (or whatever stitch you chose) into the ch-2 space. You will no longer be increasing from either side from now on.
↗ Row 12 [WS]: (MC) x 3, (CC) x 5, (MC) x 1 (9 sqs)
↙ Row 13 [RS]: (MC) x 3, (CC) x 3, (MC) x 2 (8 sqs)
↗ Row 14 [WS]: (MC) x 2, (CC) x 3, (MC) x 2 (7 sqs)
↙ Row 15 [RS]: (MC) x 2, (CC) x 3, (MC) x 1 (6 sqs)
↗ Row 16 [WS]: (MC) x 1, (CC) x 3, (MC) x 1 (5 sqs)
↙ Row 17 [RS]: (MC) x 1, (CC) x 2, (MC) x 1 (4 sqs)
↗ Row 18 [WS]: (MC) x 3 (3 sqs)
↙ Row 19 [RS]: (MC) x 2 (2 sqs)
↗ Row 20 [WS]: (MC) x 1 (1 sq)
Total: (MC) x 64, (CC) x 46
Border For Heart Square
Don’t cut yarn.
Row 1: Ch 1, sc 2 in same as ch-1, {sc in space between C2C stitches, *ch 2, sc in next space, repeat from * 8 times total, (sc 2, ch-1, sc 2) in corner, *sc in space, ch 2, repeat from * 9 times total, sc in the next space,} (sc 2, ch-1, sc 2) in the corner. Repeat from { to } one more time, (sc 2, ch1) in the corner, join in 1st sc – 53 sc, 35 ch-2.
Row 2: Ch 1, hdc 2 in ch1 space, {hdc in next two sts, *hdc 2 in next ch sp, repeat from * 8 x, hdc in next 2 sts, (hdc 2, ch 1, hdc 2) in ch 1 corner, hdc in next 2 sts, hdc 2 in next ch sp, repeat from * 9 x, hdc in next 2 sts,} (hdc 2, ch 1, hdc 2), repeat from { to }, 1 more time, hdc 2 in corner, ch 1, join – 100 hdc, 4 ch-1.
Graph
Joining the Squares
I hope you are enjoying the CAL! If you made it here, it means you’ve completed your squares and you’re ready to join!
Step 1: Lay your blocked squares in the pattern you’d like your colors as seen in the diagram.
Step 2: Create a slip knot, insert your hook into the bottom right-hand corner (from front to back) of square 7 (as seen in diagram). *Sc 1, take your loop off the hook.
Step 3: Insert your hook into the bottom leftmost corner of square 8 (as seen in diagram), place loop back on your hook, pull a little tight (not too tight), and slip stitch through.
Step 4: Insert hook into both loops of next stitch on square 7**, repeat from * in step 2, end repeat at **.
Continue joining up (following the path of the red arrow in the diagram).
Once you finish, begin joining square 9 to square 8, and follow the path of the orange arrow.
Tie off after each column is joined.
Rotate your columns. Begin joining the columns in the same manner following the path of the blue arrow. Cut yarn, then join following the path of the green arrow.
Cut, tie off and weave in all tails.
Diagram 1

Part 2 Video Tutorial – Joining the Squares
Here is the full video tutorial for Part 2 – Joining Crochet Squares video tutorial.

Border Pattern
After your squares are seamed together, join yarn in the top right corner.
Row 1: Side 1 > Ch 2, hdc 2 in same as ch-2, *hdc in each stitch across, (hdc 2, ch 1, hdc 2) in corner, repeat from * on Side 2 & 3. Side 4 > (hdc 2, ch 1, hdc 2) in next corner, hdc in each stitch across, hdc 2 in starting corner space, ch 2, join (don’t cut yarn).
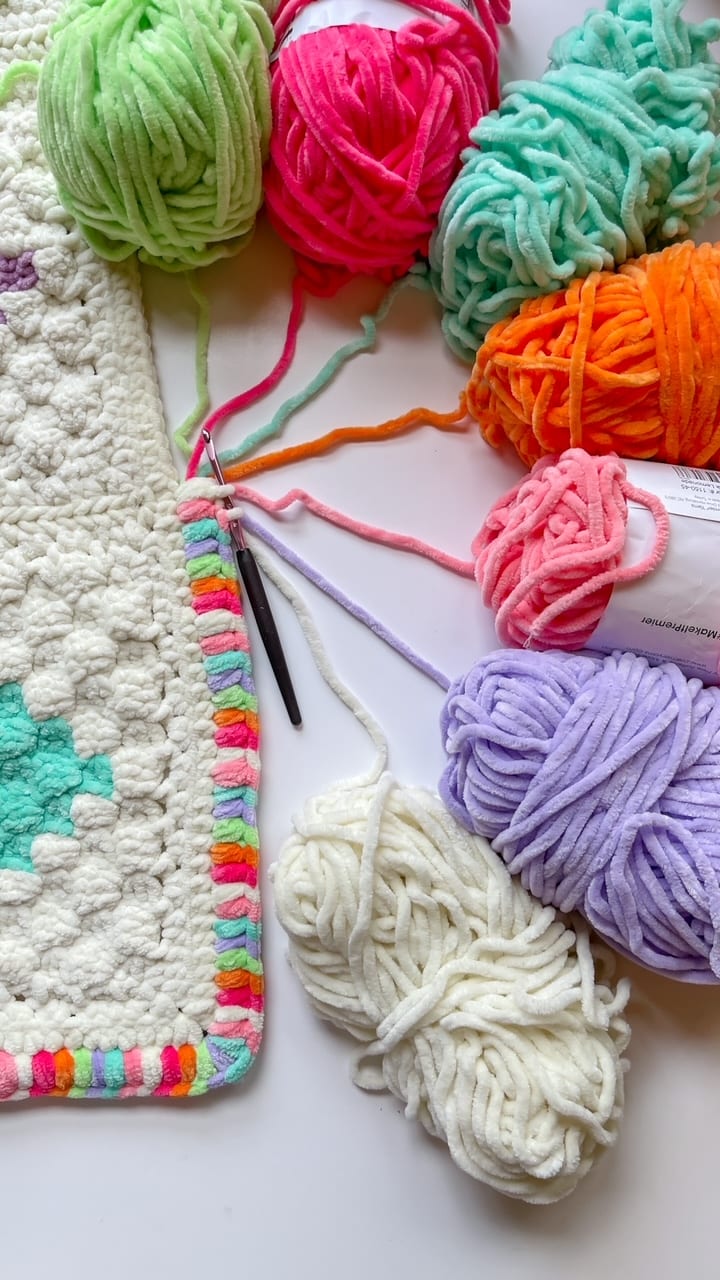
Row 2: Ch 2, gather your colors together.
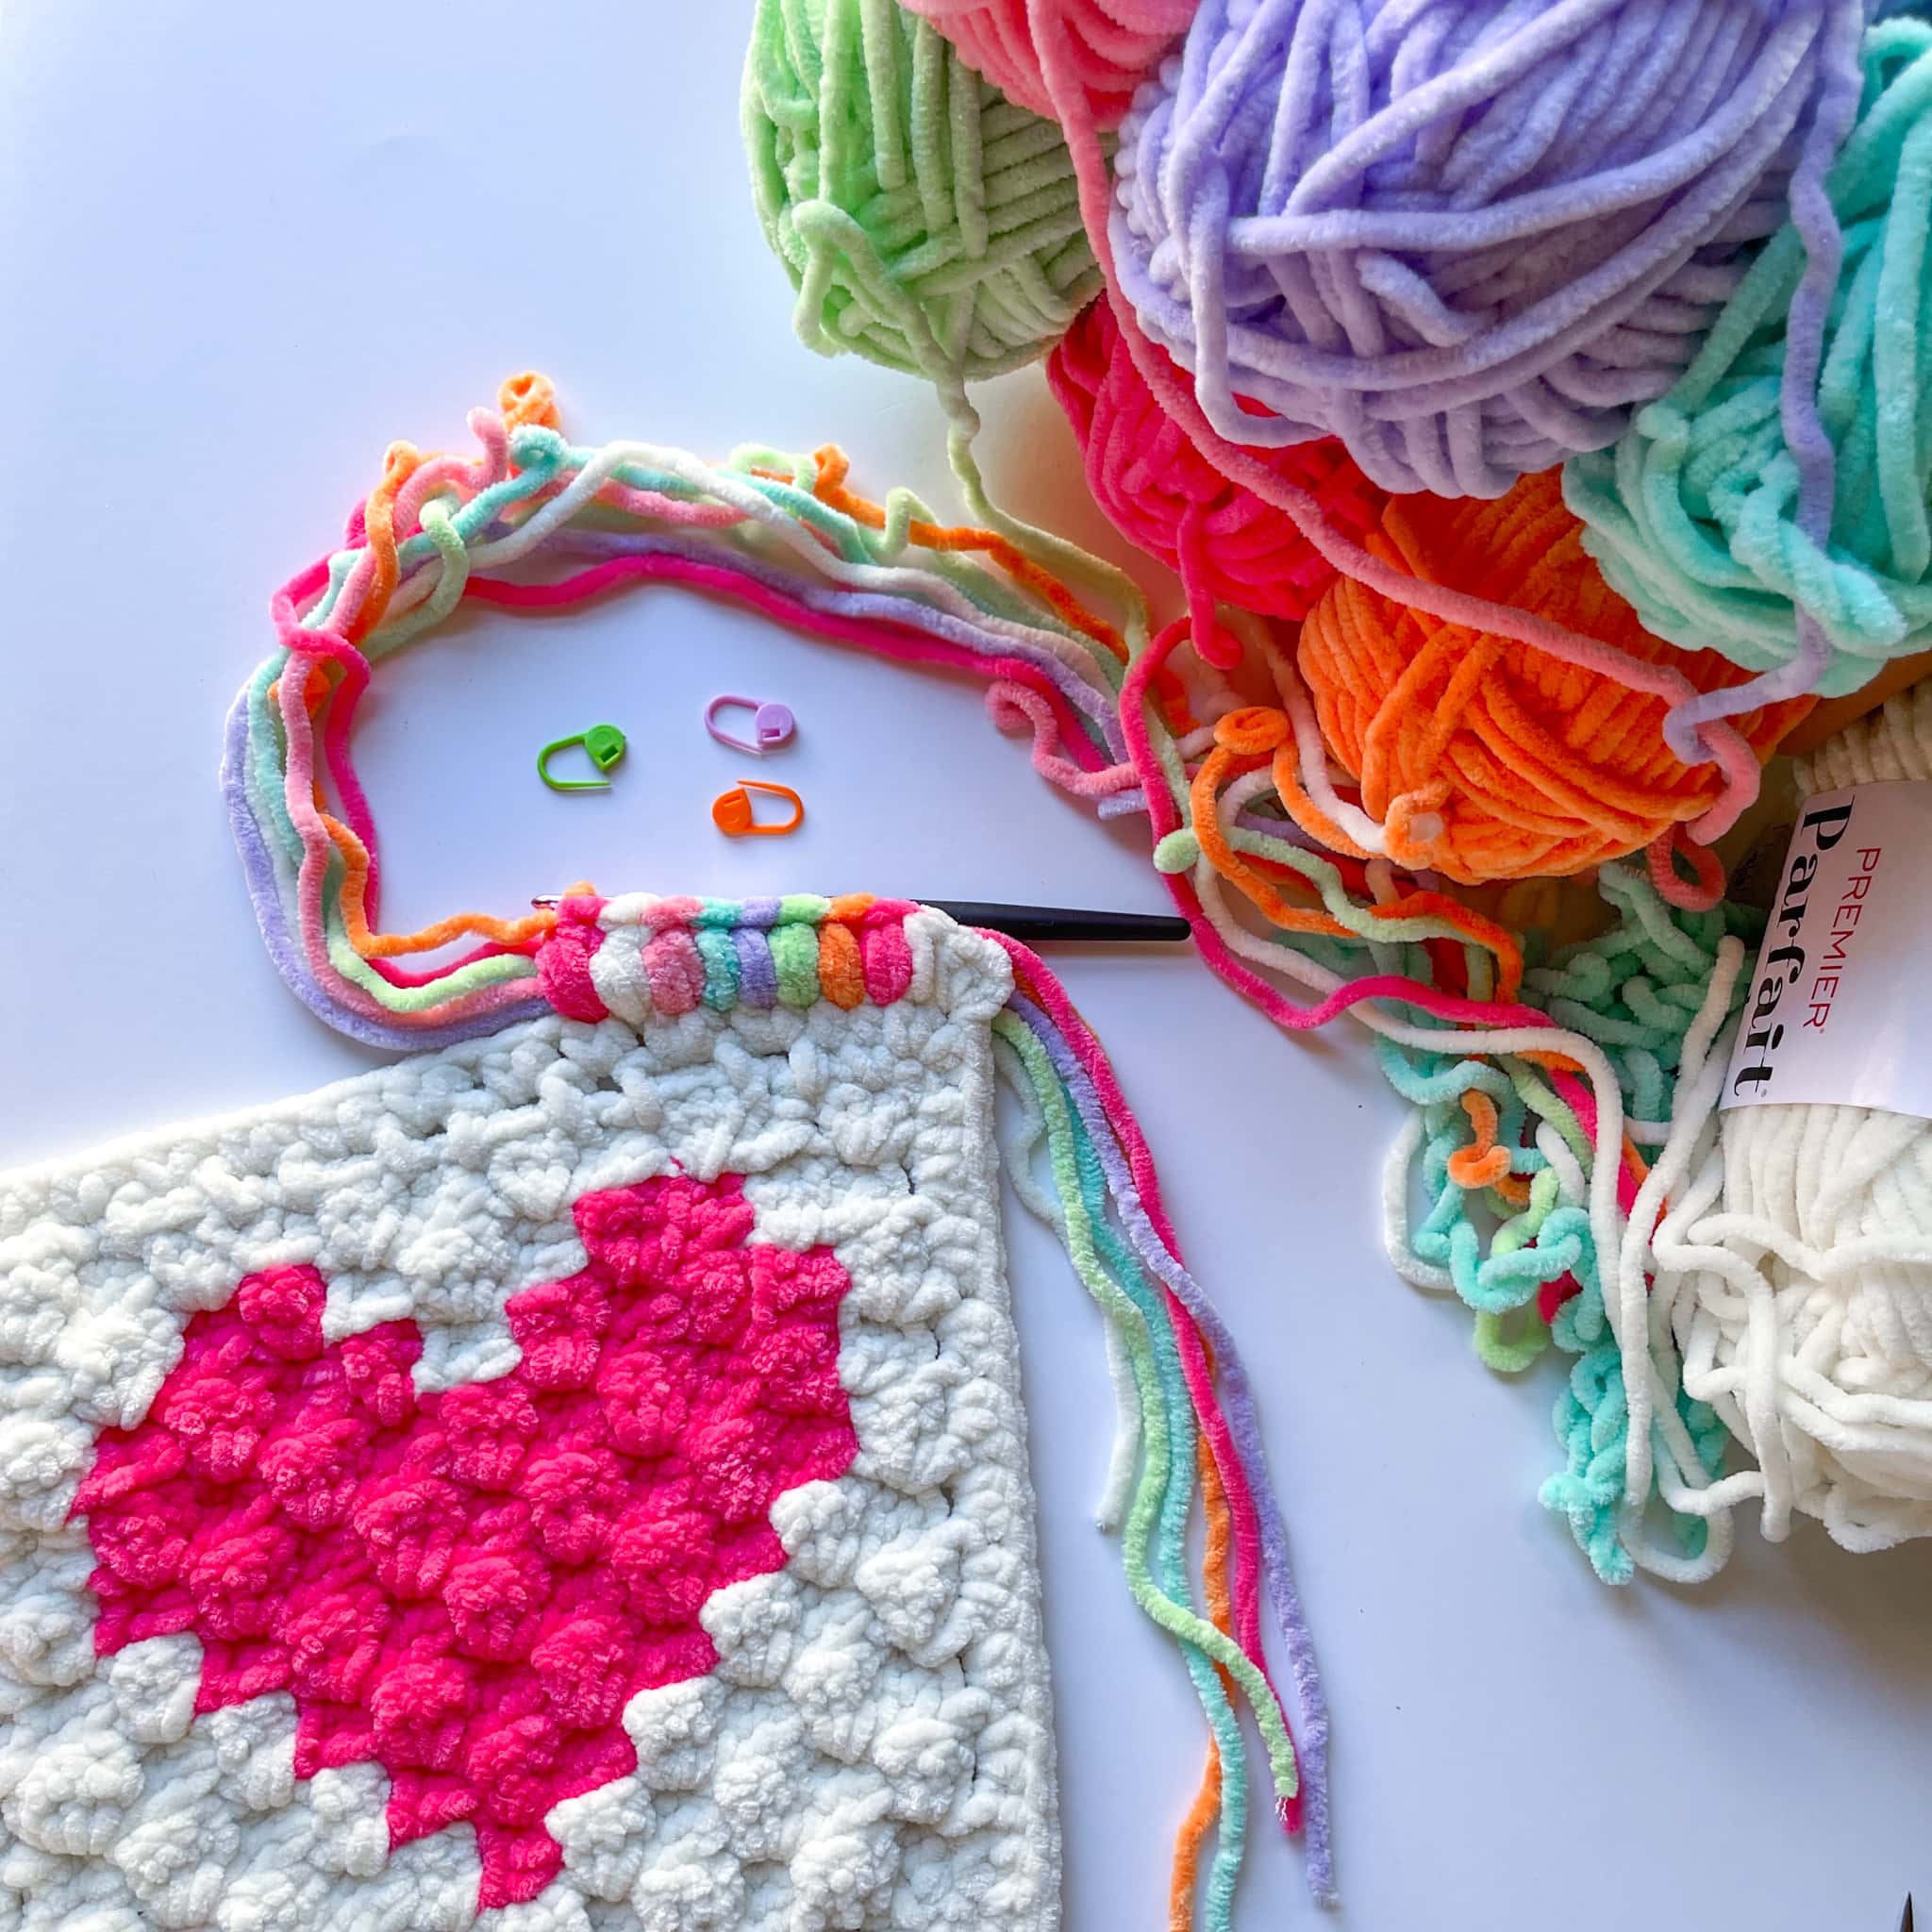
My color sequence is as follows: Cream, Hibiscus, Tangerine, Key Lime, Lilac, Turquoise, Pink Flamingo.
Work the sequence throughout the entire border, including the corners.
Line up the ends of yarn, and tie then ends in a light knot. Place gathered strands of yarn behind your ch-2 and work 1 puff stitch in the corner, carrying all the strands inside the stitch.

Close out the final part of the puff stitch with your new color, following the sequence. Continue working 1 puff stitch in each stitch across the blanket. In the corners, work (2 Puffs, Ch 2, 2 Puffs).
When you reach the beginning, work 2 puffs, ch 1, 1 Puff in the corner, join.
Tie off.
Row 3: Side 1 > Attach MC in any corner. Ch 2, hdc 2 in same as ch-2, *hdc in each stitch across, (hdc 2, ch 2, hdc 2) in next corner, repeat from * on Side 2 & 3. Side 4 > (hdc 2, ch 2, hdc 2) in corner, hdc in each stitch across, hdc 2, ch 1 in corner, invisible join.
Weave in all tails.

Congratulations! You’re finished!
For help with the border and joining, please refer to the full video tutorial on how to create a crochet puff stitch blanket border.
Part 3 Video Tutorial – Creating a Puff Stitch Border

Sneak Peek of this beautiful blanket!
The border and blanket are finished! I hope you enjoyed this complete tutorial on how to crochet the Hearts Plushie Baby Blanket!

Here is the Finished Blanket!
It was so much fun crocheting this plushie blanket, I absolutely loved it! I hope you did too!

Thanks for being here and I can’t wait to crochet along with you!
Please let me know if you have any questions.



*any FREE pdf download participants agree to my privacy policy.
*affiliate links – these do not affect the price you pay, but I will earn a commission if you purchase from my links, which helps support my small business – so thank you!


I thought you had shared what you used to make this pixel grid but I can’t find it anywhere. 🙏❤️ for your mom! I did purchase the bundle and I love all of your patterns. Thank you for taking the time.
Thank you for this pattern, I can’t wait to get started but it will be a few weeks yet, I have done c2c but not with a pattern in it plus I will have to find the best hook size as I don’t have much strength in my hands so it always works up bigger lolBright blessingsJulie
Thanks, I’m so glad you like it!
Did you know that Google doesn’t want to download this pdf because something is causing it to be unable to scan for viruses? Do you have any suggestions? Btw, it’s an adorable blanket. ❤️
That’s a common conundrum with google drive links. I promise there is no virus in my PDF. It’s just a general warning.