Welcome to the Fair Isle CAL Week 1 – Part 3! I’m so glad you are here with me today! If you’ve landed here and want to catch up, see the Introduction, then Part 1. In Part 2, we went over how to read graphs, and why different hooks work for this project. I also created a video for how to create a graph yourself from scratch (see below). Here is a post I dedicated to finding the best graphing programs for C2C, and these programs are also great for row-by-row, like we are using today.
Scroll down for Pattern Details and Video
The WinStitch Video Series is in its infancy but this can help you create your own graphs 
note: If you want to skip forward, you’re welcome to purchase the pattern in the Infinte Yarniverse, or on Ravelry or Etsy, (use code FAIRISLECAL for a 40% discount on the PDF) however, you can find the complete pattern in pieces throughout this tutorial.
If you are landing here and want to start from the beginning, please visit the Fair Isle Crochet Beanie Tutorial page to start from the beginning.
#StardustGoldCrochet #FairIlseCAL2019
 Let’s Crochet!
The video at the bottom of the post will go over the following:
- How to work the Knit (Waistcoat Stitch)
- Changing Colors using the Fair Isle technique
- Trouble Shooting
- Frogging and Fixing mistakes
- Creating the foundation single crochet row
- Row 2 & Row 3
I will write everything out here that is featured in the video.
 The Knit Stitch (ks) aka Waistcoat Stitch
The knit stitch (waistcoat stitch) is created by stitch placement. It is a single crochet stitch that, instead of inserting your hook in the top two loops of the stitch below, you insert your hook diagonally, like this \ , into the center of the single crochet, in-between the right and left leg of the “V”. As seen below.

 Changing Colors:
To change colors:
With MC, insert hook into center of single crochet from previous round between the V legs, pull up a loop. Add the CC to your hook and complete the single crochet using the CC. Repeat this with each color change indicated in the graph (see video for more detail on changing colors).
Tip: Hold the color you are using most on top. i.e., if you are alternating MC/CC then it doesn’t matter which yarn you hold on top. If you are working a row that has mostly MC and just a few of the CC, then hold your MC on top and CC on the bottom.
Tip 2: Take note of what color the starting stitch of each round is. You want to make sure you complete the last stitch of each round with the color that you will begin the next round with.
 Trouble Shooting:
Some problems you may encounter with the knit stitch and changing colors using the knit stitch.
- The V’s may be hard to find: It seems that when you change colors with knit stitch, sometimes the V hides. Don’t fret, just do your best. As you work more rounds, and loosen your tension, they will appear and you will begin to identify them better.
- Tension! Keep your knit stitches loose, and if you are using a tapered hook, remember to push the loop on your hook back to the 6mm point so you don’t inadvertently start to tighten your tension.
- Frogging:
If you make a mistake and need to rip it back (ribbit – aka frog)
Pull out one color at a time and separate them so they don’t get tangled.
Okay! I think it’s time to start crocheting 
Abbreviations:
| sc | single crochet |
| ks | knit stitch |
| sp | space |
| ch | chain |
| fsc | foundation single crochet |
| MC | main color |
| CC | contrasting color |
| rnd | round |
| ch | chain |
| sk st | skip stitch |
| st(s) | stitches |
| FPdc2tog | front post double crochet 2 together |
| FPdc3tog | front post double crochet 3 together |
| BPdc2tog | back post double crochet 2 together |
| BPdc3tog | back post double crochet 3 together |
Stitch guide:
(stitches in pink are clickable links and will take you to the YouTube video tutorials I’ve created for each)
the knit stitch is a single crochet stitch that works into the center V of the st from the previous round, instead of the top two loops.
fsc – foundation single crochet
create a slip knot. ch 2, insert hook in 1st chain. yo, draw up a loop. ch 1, yo, draw through both loops on hook. (2nd st) insert hook in bottom two loops of ch 1. yo, draw up a loop, ch 1, yo, draw through both loops (2 fsc created).
FPdc2tog – front post double crochet 2 together
yo, *insert hook insert hook around next post of stitch (from front to back and out the front again). yo, draw through two loops*, repeat from * to * one more time. yo, draw through all loops on hook.
FPdc3tog – front post double crochet 3 together
yo, *insert hook insert hook around next post of stitch (from front to back and out the front again). yo, draw through two loops*, repeat from * to * two more time. yo, draw through all loops on hook.
BPdc2tog – back post double crochet 2 together
yo, *insert hook insert hook around next post of stitch (from back to front and out the back again). yo, draw through two loops*, repeat from * to * one more time. yo, draw through all loops on hook.
BPdc3tog – back post double crochet 3 together
yo, *insert hook insert hook around next post of stitch (from back to front and out the back again). yo, draw through two loops*, repeat from * to * two more time. yo, draw through all loops on hook.
Gauge:
15 ks x 19 rows = 4 x 4” or (10 x 10 cm)
- The band/brim is where we will adjust it to fit the available sizes.
- The top of the hat is one size and worked in 3 sections, except the toddler section is worked in 2 sections.
- For Adult: Work all three graphs – Snowflake, Diamond, Heart
- For Toddler: Work the Snowflake & Diamond or Snowflake & Heart (it’s up to you)!
- Remember to count your stitches 😉.
- Stitch count: 90 sts throughout/60 for toddler, counts are end of each rnd.
- Joining: Joins are made by sl st into the ch 1 at end of rnd, unless otherwise indicated.
- Knit Stitch: Work very loose – they tend to get very tight.
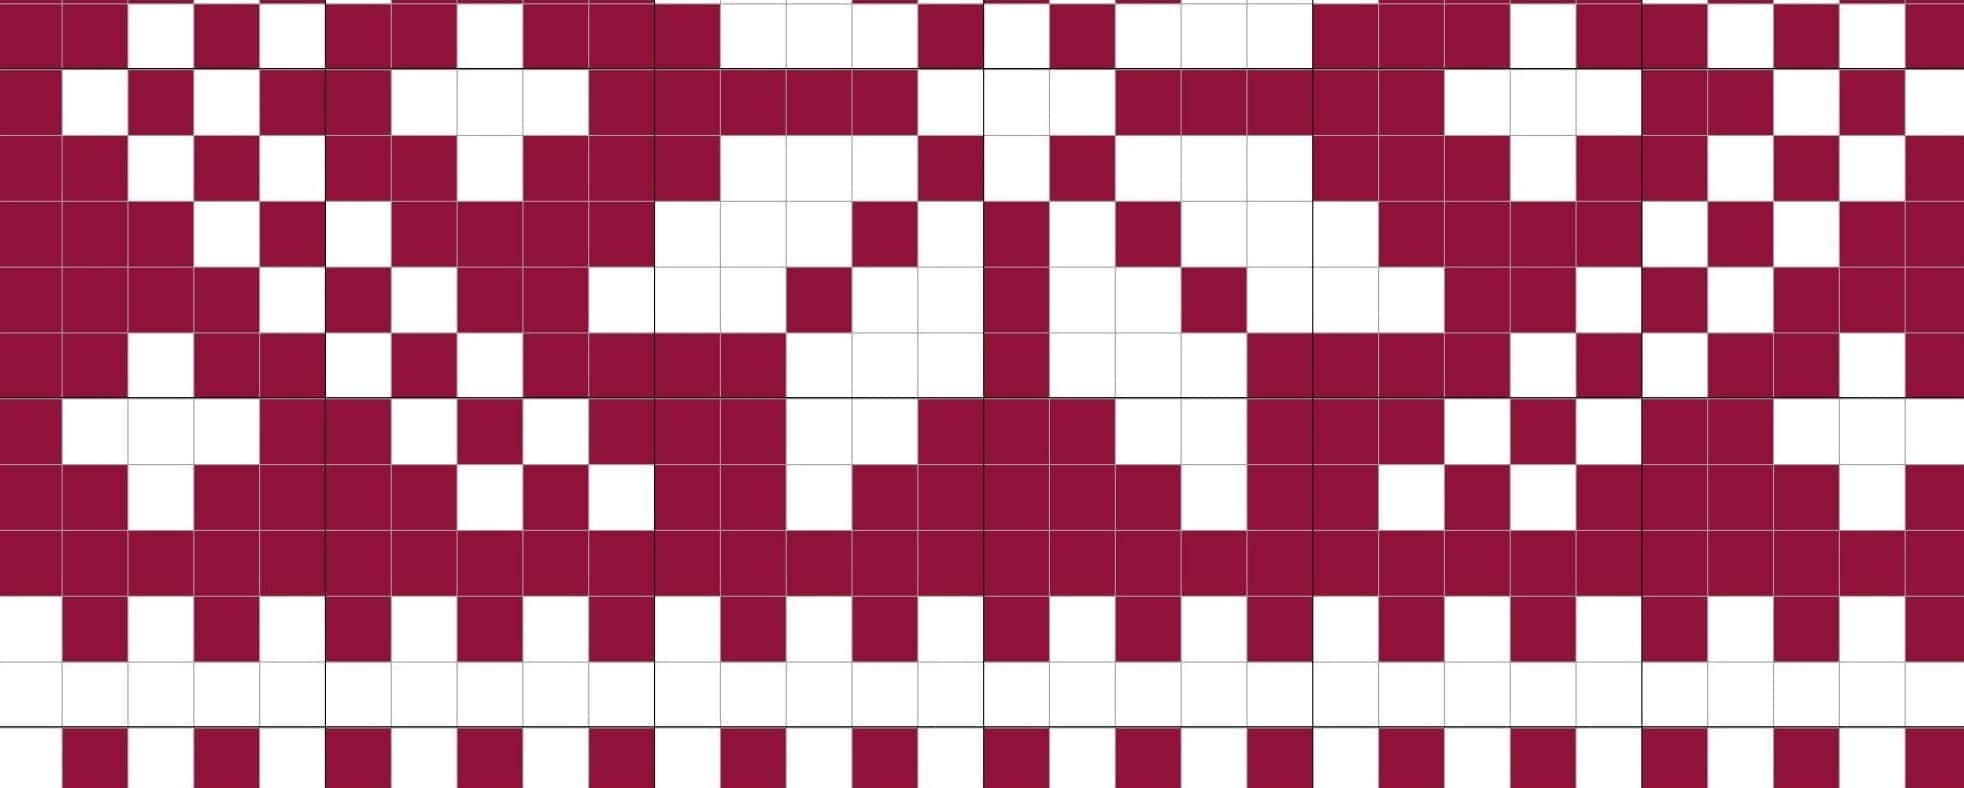
- Each square represents 1 stitch.
- *…* – repeat instructions from * to *
Fair Isle Crochet Beanie Pattern:
Note: You may need to use a 5.5 mm hook for the foundation row to obtain the proper gauge of 15ks per 4″ (10 cm). In the video below, I used a 5.5 with acrylic yarn and ended up with a perfect 15 ks per 4″ (10 cm)
Using J hook and MC (I used burnt sienna as main color (MC) and white as contrasting color (CC)).
Beanie:
Using recommended yarn and hook size, rounds 1 – 21 measure approximately 4.75” (12 cm).
Rnd 1: fsc 90 (60 for tod). Join in 1st fsc of rnd, make sure the chain is not twisted.
Rnd 2: ch 1, sc 1 in each of the 90 (60) fsc. Join.
Graph – Section 1 – The Snowflake Rows 3 – 12:
Rnds 3 – 12: ch 1, then work graph below using the ks beginning in 1st sc. For each round work graph 3 times working it bottom up, right to left, for a total of 90 sts. Join. Toddler: Work graph 2 times for a total of 60 sts. Join.

I was recently published (my first published design!) in the September issue of Happily Hooked magazine 😊. Go grab a copy here.
In Part 4…
- We will continue to work rows 3 – 12 (this may take some people a while, so I’m giving it a week! and next Sunday I will release section 13 – 23)
- Post photos! I’d love to see your work so far! You can post photos in my group on Facebook here.
Let’s Get Crocheting! 
If this video does not play properly, please click here and it will take you to YouTube.
Hope everyone has a great time learning together, and please subscribe to my Stargazers mailing list here to get notified when the new posts and videos go LIVE!
I’d love to see your work! Use hashtags on FB & IG
#stardustgoldcrochet #fairilseCAL2019
Thanks for stopping by and making beautiful things with me, PLEASE SHARE AND PIN! IT’S HOW I KEEP MY PATTERNS FREE!
If you’d like to collaborate with me, please send me a message or leave a comment, I would love to work with you!
If you like to learn new stitches, check out my Saturday Stitch Explorers series! I try to upload one every week! There is always a full video tutorial to accompany the written patterns too. :).


All photos and pattern are property of Stardust Gold Crochet.
Feel free to sell items created from this pattern, but please do not copy, distribute, or sell this pattern as your own.
This post contains affiliate links, if you happen to purchase from my links, I will earn a few cents :). Thank you for that!


 Let’s Crochet!
  The Knit Stitch (ks) aka Waistcoat Stitch
 Changing Colors:
  Trouble Shooting:
  If you make a mistake and need to rip it back (ribbit – aka frog)
  Pull out one color at a time and separate them so they don’t get tangled.

I never knew fairisle could be done in crochet. I really should try this when I find time