


Yay! It’s finally here! The Retro Flower Crochet Purse pattern is finished and the complete video tutorial is up on my YT channel! If you are just landing here and can’t wait to get started, head over to this post Retro Crochet Flower Hexagon and make 7 of those cuties. Then come back here to learn how to put them all together into one cute bag!
Inspiration Behind the Bag
I LOVE everything retro and have since I was a young girl. I feel drawn to decades that were long before my time, like the 30’s, 40’s, 50’s, & 60’s. So this 60’s style retro bag is a no brainer for me.
May Flowers Blog Hop

If you landed here for the May Flowers Blog Hop, welcome!
Scroll down and look for the DOWNLOAD pattern button, fill in your details and you’ll get the free PDF download. Thanks for being here and if you have any trouble, please feel free to reach out via email tasha @ stardustgoldcrochet.com
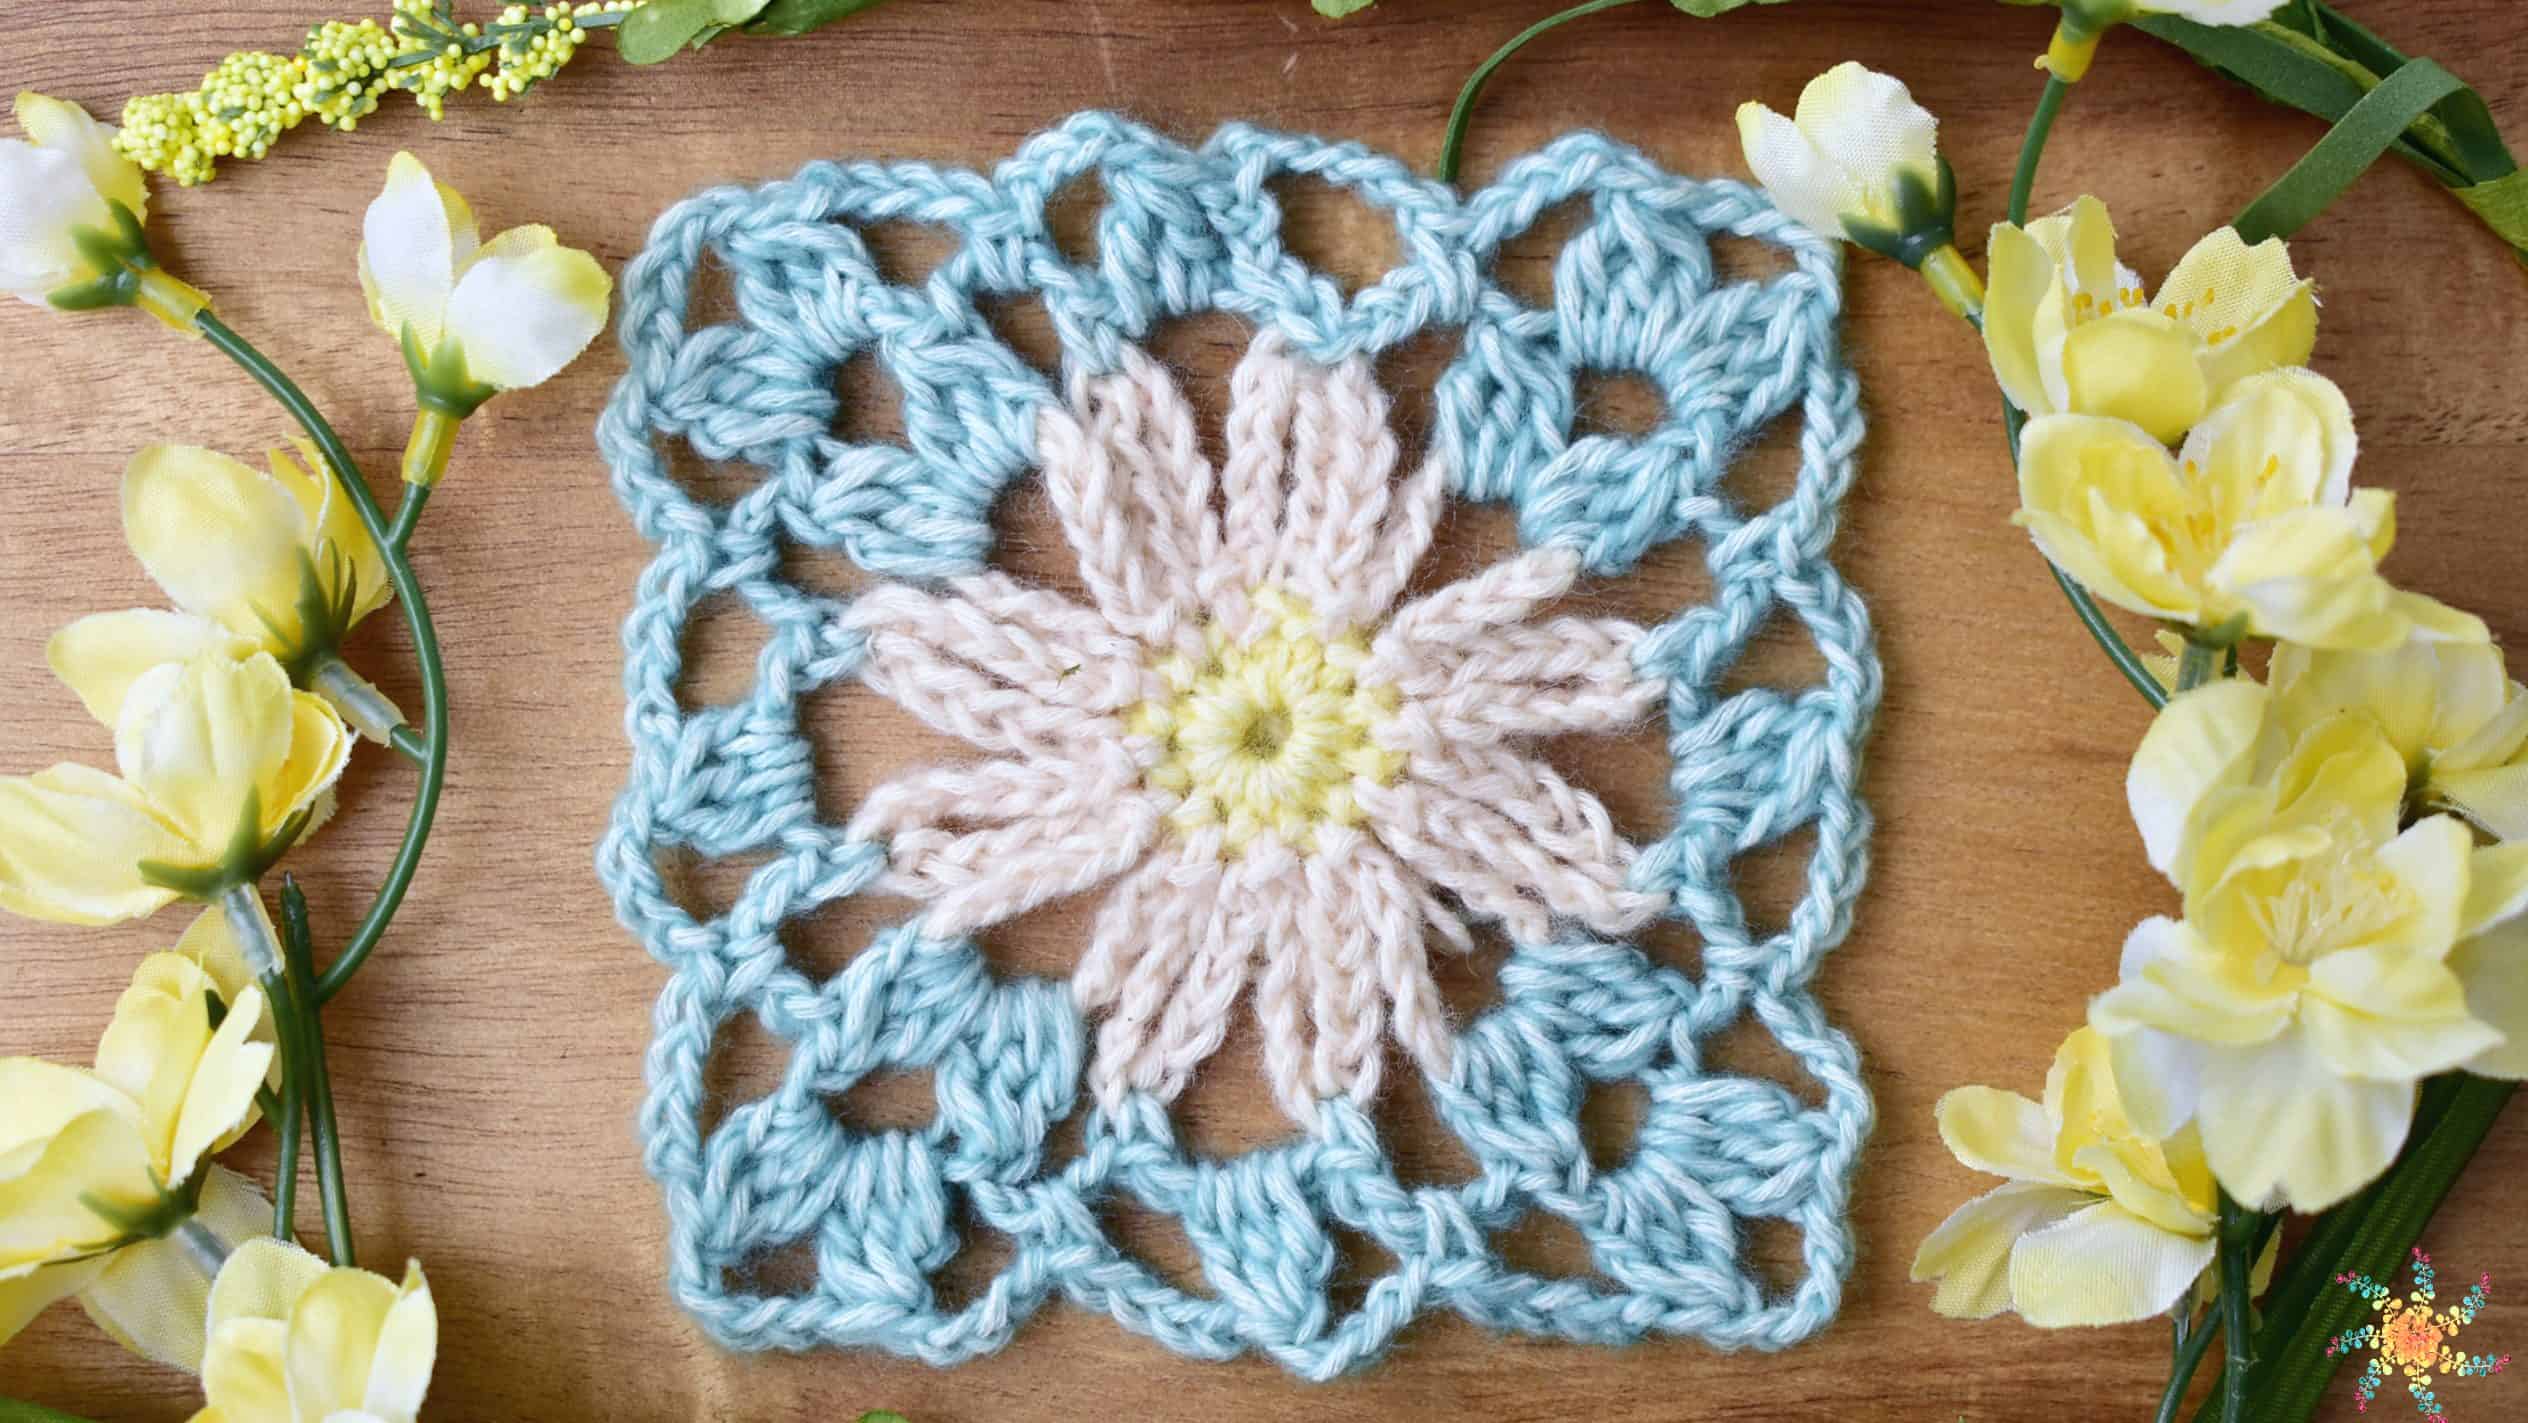
First Make the Flower Heart Hexagons
Head over to the Retro Flower Hexagons pattern page and create 7 of them. Then come back here to learn how to assemble them.
Complete Video Tutorial for Retro Flower Crochet Purse Tutorial


Table of contents
- Inspiration Behind the Bag
- May Flowers Blog Hop
- First Make the Flower Heart Hexagons
- Complete Video Tutorial for Retro Flower Crochet Purse Tutorial
- More Squares and Motifs You May Enjoy
- MATERIALS AND NOTES:
- Assembly
- Materials and Notions
- Complete Assembly Video Tutorial:
- Sizes / Finished Measurements:
- RETRO FLOWER CROCHET BAG ASSEMBLY TUTORIAL AND PATTERN:
- The Join
- Retro Crochet Hexagon Bag Assembly
- Creating the Border
- Border Pattern
- The Finished Bag
- Creating and Attaching a Liner
- MAY FLOWERS BLOG HOP
- Thanks Everyone!
Here is my finished bag and I LOVE it!

Making one using Scheepjes yarn too and it’s SO pretty!!
If you want to try making this version – here are the yarns used:
Scheepjes Stone Washed Colors
- Pink = Rose Quartz
- Dark Center = Boulder Opal
- Green = Peridot
- Cream = Axinite
- Yellow = Citrine (I’m going to make a few with a yellow center to the daisy)

More Squares and Motifs You May Enjoy


MATERIALS AND NOTES:
Assembly
We are going to jump right in and get you started on joining the squares together to make this adorable bag. But first you may need a few materials to get started!
Materials and Notions
- Hook Size: 5 mm (USA H) – you can use 6 mm (USA J) too, but your yardage may change.
- Retro Bamboo Purse Handles (affiliate link)
- Scissors
- Darning Needle
- Flexible Measuring Tape
Complete Assembly Video Tutorial:
If you are a visual learner, that’s perfect! There is a full video tutorial for you to walk through the pattern with ease: Retro Flower Crochet Purse Tutorial
Sizes / Finished Measurements:
Dimensions: From peak down and across – 14.5″ (36.5 cm) wide x 13″ (33 cm) tall.
Abbreviations
- Ch (s) – Chain (s)
- St (s) – Stitch(s)
- Sp – Space
- Yo – Yarn over
- Hdc – Half Double Crochet
- Hdc(X)tog – Half Double Crochet Stitches Together
- Sc – Single Crochet
Stitch guide:
Hdc – Half Double Crochet – Yo, insert hook in indicated stitch. Yo, draw up a loop. Yo, draw through all three loops on hook.
HdcXtog – Half Double Crochet X Together (This pattern has several versions of a half double X amount of stitches together)
To simplify it – creating a “together” stitch is done by first yarning over (for the half double stitch), then inserting your hook into the next stitch and pulling up a loop, until you’ve completed the number of stitches you’d like to draw together.
Then you yarn over and draw through ALL of the loops on your hook and chain 1.
Notes:
- The border is a little wonky – I must admit so the written version of the stitch counts may seem weird, and feel free to modify to your liking.
- Use the diagrams to guide you.
- Watch the video tutorial for complete tutorial.

RETRO FLOWER CROCHET BAG ASSEMBLY TUTORIAL AND PATTERN:
I created some graphics to help you better assembly the bag and this includes the written pattern for the join.
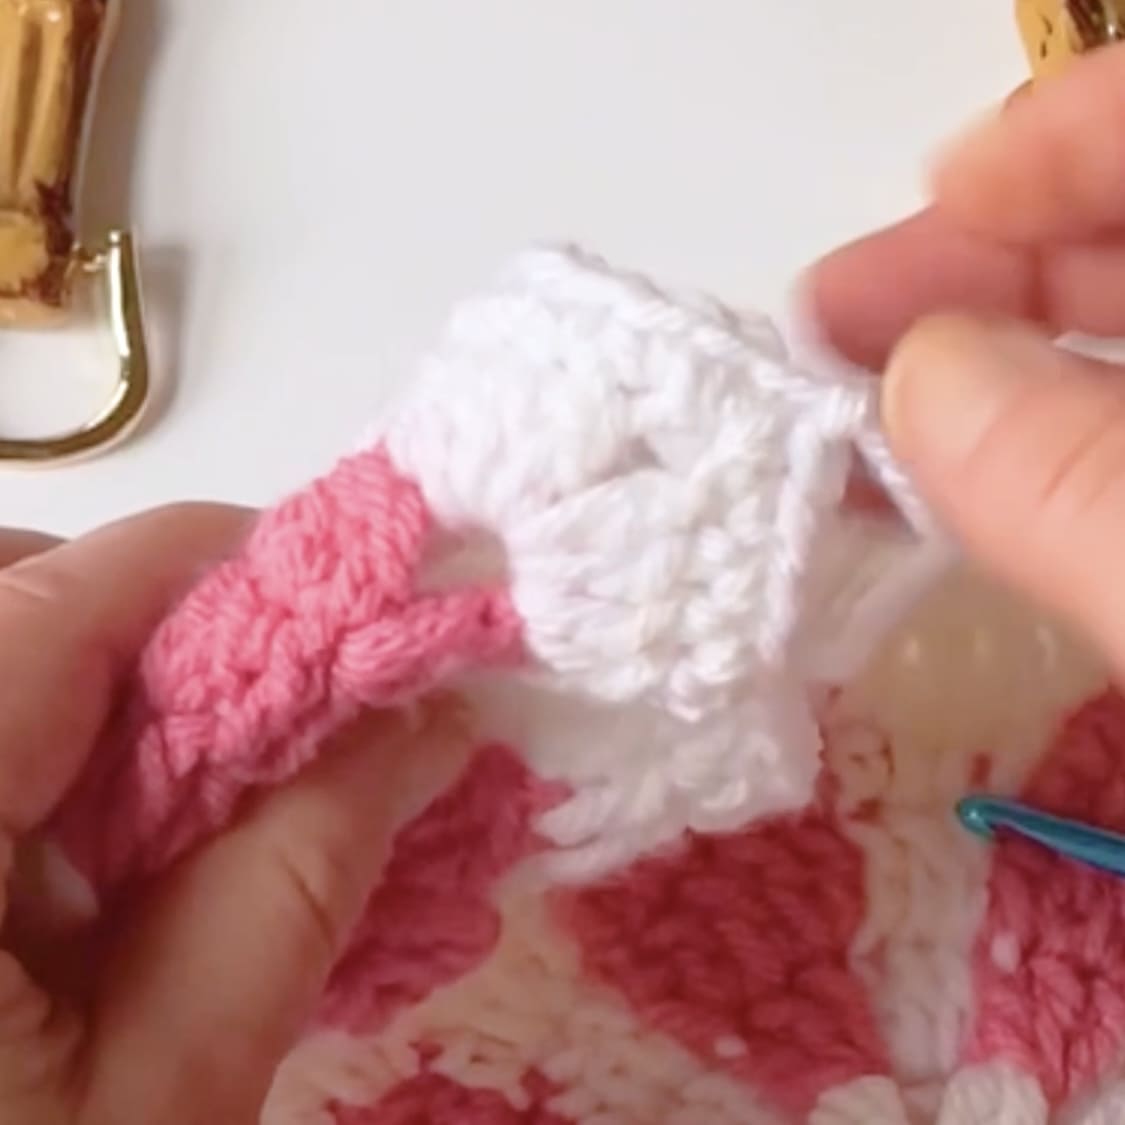
The Join
The join I used is a slip stitch / single crochet join. It’s fairly easy and creates a BEAUTIFUL seam that is very sturdy and perfect for a bag like this.
Step 1
To start, insert your hook in the right ch-2 space of your hexagon panel – or left if you’re a left handed crocheter.
Next, add your yarn to your hook, slip stitch through and chain 1.

Step 2
Insert your hook into the same chain 2 space on the left panel (right if you’re a left handed crocheter), yo, and pull up a loop.

Step 3
Complete a single crochet by yarning over and pulling through both loops on your hook.

Step 4
Pull your loop out, take out your hook (hold on to that loop with your free hand).

Step 5
Insert your hook into the next stitch on the right hexagon.

Step 6
Put the loop back onto your hook and pull tight.

Step 7
Slip stitch through.

Step 8
Repeat the pattern by next, inserting your hook into the next stitch on the left hexagon and completing a single crochet.


You did it! That is how we will join all of the hexagons together. The video tutorial shows how I assembled them in what order, but here are the diagrams to help you organize your hexagons and assemble them easily.
Retro Crochet Hexagon Bag Assembly
How to Arrange the Hexagons

How to Fold The Hexagons

Join the Hexagons Using Slip Stitch Single Crochet Join Method

Creating the Border
Okay y’all – this one was just crazy! As I was filming the video and AFTER I assembled the hexagons – I didn’t like the way it looked.
So I created a border “on the fly”, which, in hindsight was probably a bad idea, because the stitch counts were just so crazy and weird. It’s not normally what I do, but I wanted to get this pattern out ASAP.
However, the idea here is to create a gathering of the inside corners to draw in the top of the bag so the handles are easier to attach.
This worked out great, but the written pattern is kind of weird and not even. However, I simplified it into this diagram.
The written pattern for the border is below this diagram – and don’t laugh! If you are a seasoned crocheter, you’ll be fine. For beginners, if you have trouble with this, please reach out to me – I’m happy to help walk you through it!
If you want to just wing it, use this diagram below as a guide.

Border Pattern
Here is the written border pattern that matches the YouTube Video. Again, don’t laugh – this isn’t my normal MO.
Insert hook in top right ch-2 space of bag, ch 1.
- Sc 1 in corner
- Sc in next 3 sts
- Hdc in next 8 stitches
- Hdc5tog, ch 1
- Hdc in next 10 sts
- Hdc6tog, ch 1
- Hdc in next 9 stitches
- Sc in next 3 stitches
- Sc 2 in corner
- Sc in next 3 stitches
- Hdc in next 8 stitches
- Hdc8tog
- Hdc in next 10 stitches
- Sc in next 3 stitches
- Sc 1 in corner, join, leave a long tail for sewing on handle.
Attaching the Bamboo Handle
If you don’t have a bamboo handle or not sure where to get one, you can find them just about everywhere from Amazon to Etsy. I purchased mine from Amazon here (affiliate link).


Rounding Out the Corners
I like a more rounded look to the bag, so I tucked in the corners (same way I tucked in the top of the bag for the handles) of the hexagons and whip stitched around them a few times to secure it and create a more rounded look.

The Finished Bag
This bag is my new favorite accessory! I am in love with it! Looking forward to getting the fabric to create a liner for it. I can’t wait to see all the fun color combinations you come up with!

Creating and Attaching a Liner
Liners are a great way to make your bag more functional and secure. I am heading to the fabric store this week to get some cute fabric to line it with. When I do, I’ll create a new tutorial to show you how I lined my bag.
If you know how to line yours and want to share with the community, please head over to Stardust Gold Crochet & Friends on Facebook and share it with us! I’d LOVE to see it!
MAY FLOWERS BLOG HOP
If clicking on the photo doesn’t work, please click here.

Thanks Everyone!
I hope you enjoyed making the cute Retro Flower Hearts Hexagon Pattern & the bag!
Thanks so much for your love and support and I can’t wait to see what you make with them. Please tag me on social media so I can see!


I as well couldn’t find the download so I copied and pasted my own pattern to print and follow. Just a suggestion.
Good morning! I ordered the handles from your link. From your photos, it looks like you used just one of the bamboo handles? Thank you in advance for letting me know!
I am trying to find the download but can’t find anything? I hope someone can help me
I was having a very hard time finding the pattern download. I scrolled several times as well. There is a picture towards the bottom, it says, “Crochet May Flowers Blog Hop Get the Pattern (get the pattern is in pink)”When you hover over the picture, it gives the option to “Pin it”That is what you click. I hope this helps!
Well – sorry – <I dont see any Download button!I have scrolled down a couple of times ….
Love this pattern & am wanting to download the pattern, but despite scrolling up & down the page 4 times, am not finding where it says DOWNLOAD for means of saving the pattern. What am I doing wrong of which I’m not finding it? Thank you in advance.
I was having the same problem. There’s an image that says “get pattern ” that’s the one you click!! Hope that helps!
The download is right above where it says thanks Everyone!